Summary
In this tutorial, you will learn how to add units, or properties, to BrightSide. Follow these simple instructions to add a property and you will get the best results. To make the most of your BrightSide experience, we highly recommend exploring the possibilities in Maintenance Info. Many users neglect this useful tool.
HINT: Online travel agencies, i.e.: Airbnb, VRBO, and Booking.com, are often referred to in this tutorial as OTAs.
HINT: OTA tabs do not show up in your unit management screen until you activate them in your BrightSide settings. To learn how to do this, visit our integration tutorials.
Navigate to: Properties > Units > Add
Unit
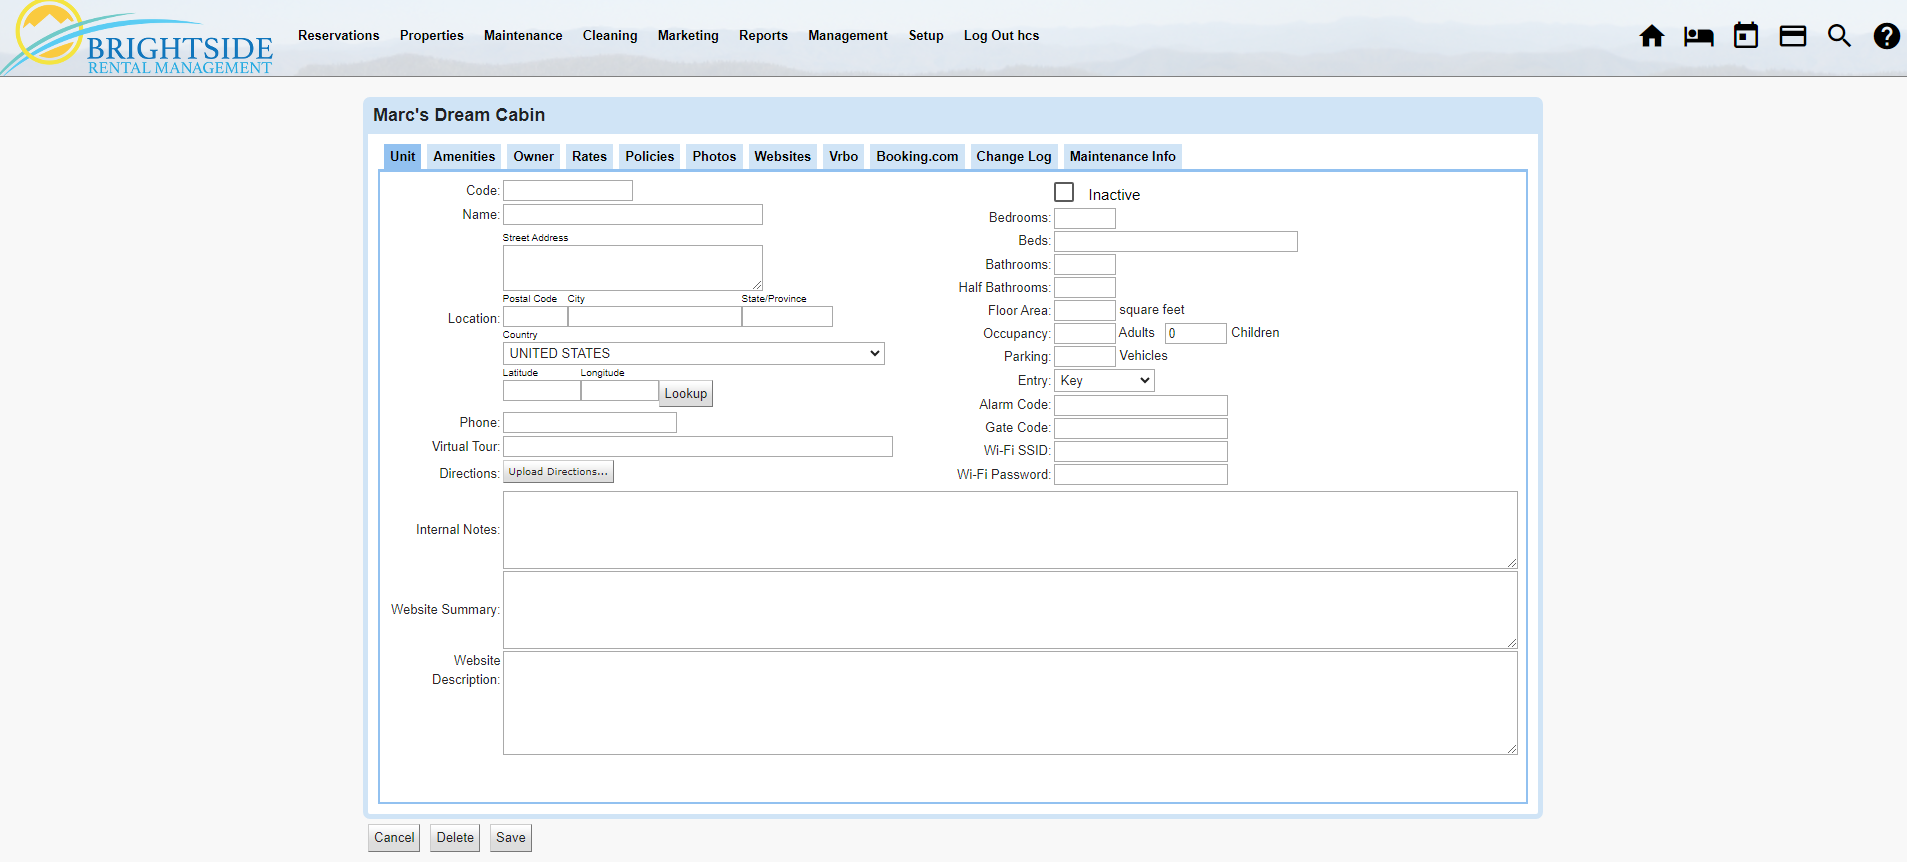
When you get ready to add a unit to your account, begin here. Follow these basic steps and you should be up and running in no time.
- Code: Some property managers assign codes to each property for easy reference. Everyone has their own preference and system. You may use up to ten characters in your code.
- Name: The name you use here is the default that will show up on your website and OTAs. This can be overwritten if needed for Airbnb, VRBO, etc.
- Street Address: Enter the street address of the property. If you do not enter it, OTAs could hinder your ranking since they do not know where the unit is located.
- Location: Enter the zip code, city, and state where the unit is located. This is important! If you do not enter this information, OTAs will not know where your property is located and may not show your unit in search results.
- Phone: Enter the phone number of the unit if one exists, although most do not have a landline anymore.
- Virtual Tour: If you have a website where guests can take a virtual tour of your unit, enter the URL here.
- Directions: Upload a PDF file with directions to the unit. This can be used in guest letters as an attachment.
- Internal Notes: Notes entered here are not shown to the public.
- Website Summary: Write a short description of the property. This excerpt is used on some, but not all websites, when a short description is needed.
- Website Description: Use this area to develop a long-form description of the unit. Share details about the bedrooms, bathrooms, kitchen, hot tub, and just about anything that will cause your guest to want to book your property. This information will show up on your website and is used as the default description for OTAs.
- Bedrooms: Enter the number of bedrooms.
- Beds: Enter the number of beds. You do not need to enter descriptions here, do that in the Maintenance Info tab. NOTE: Do not neglect to go to the Maintenance Info tab and complete the form. This is where you show OTAs what type of bed is in each room and whether it has a private bathroom.
- Bathrooms: Enter the number of full bathrooms.
- Half Bathrooms: Enter the number of half bathrooms.
- Floor Area: If you know the square footage, enter it here. Some OTAs show this to guests in search results.
- Occupancy: The first field is for adults and the second is for children. Enter the number your unit accommodates.
- Parking: Enter the number of vehicles for which you have parking spaces.
- Entry: Several options for entry types are available. Does your unit use a key, a key code, lock box, or one of the electronic remote access locks? Indicate it here.
- *Alarm Code: Enter the alarm code here.
- *Gate Code: Enter the gate code here.
- *Wi-Fi SSID: Enter the name of the Wi-Fi network.
- *Wi-Fi Password: enter the Wi-Fi password.
- Real Unit: For advanced users. Please contact customer support to learn how to use this feature.
Do not forget to save your information!
*HINT: This information is shareable through email and text using dynamic text via the BrightSide Guest Messaging system.
Adding a Unit / Property
Click on Image for Enlarged View
Amenities
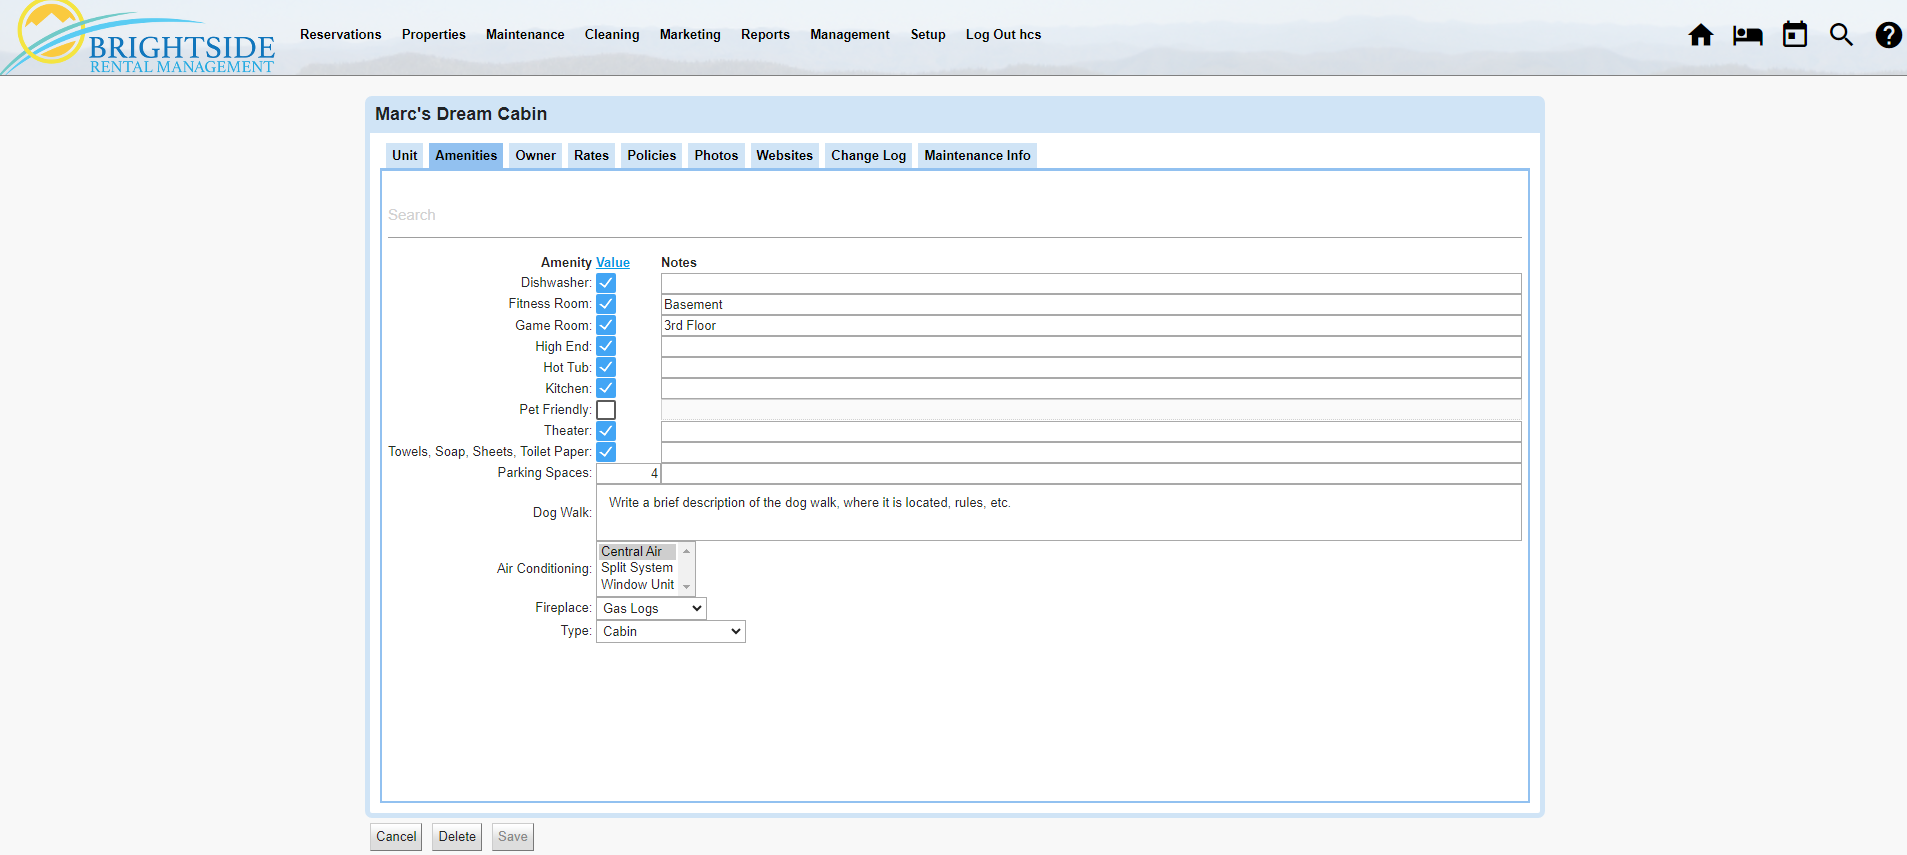
Assigning amenities to individual units is critical to helping your agents and online travel agencies match properties to guests’ needs and wants. If you have not created a master list of amenities in BrightSide already, do that first. You need that list completed so you will have amenities to assign here. Learn how to add amenities to your BrightSide account.
- Amenity: Tick the box next to the appropriate amenities for this unit. If your unit has it, tick it.
- Notes: Add any optional internal notes that may be helpful to your reservationist.
- Numerical: Some amenity types allow for entering a number to indicate how many you have, like in our “Parking Spaces” example.
- Text: The text block allows you to type a description or other type of note, as in our “Dog Walk” example.
- List with Multiple Choices: The “Air Conditioning” example allows you to choose more than one item from the list. In Windows OS, press Ctrl+Click to select/deselect each option that applies.
- List with Single Choice: When you only allow a single choice, you may use the dropdown list to select, as in our “Fireplace” example.
- Type: Select which type of property this unit can be identified.
Do not forget to save your information!
HINT: Keeping your amenities consistent across all of your properties makes mapping them to Airbnb, VRBO, and Booking.com an easier and cleaner process.
Adding Amenities to a Unit / Property
Click on Image for Enlarged View
Owner
Entering the owner’s information for each unit is easy. Click on the “Owner” tab and complete the form. In BrightSide, there are four areas you need to complete: the owner contract details, homeowner’s insurance information, preferred contractors, and the owner’s personal information.
Owner Contract
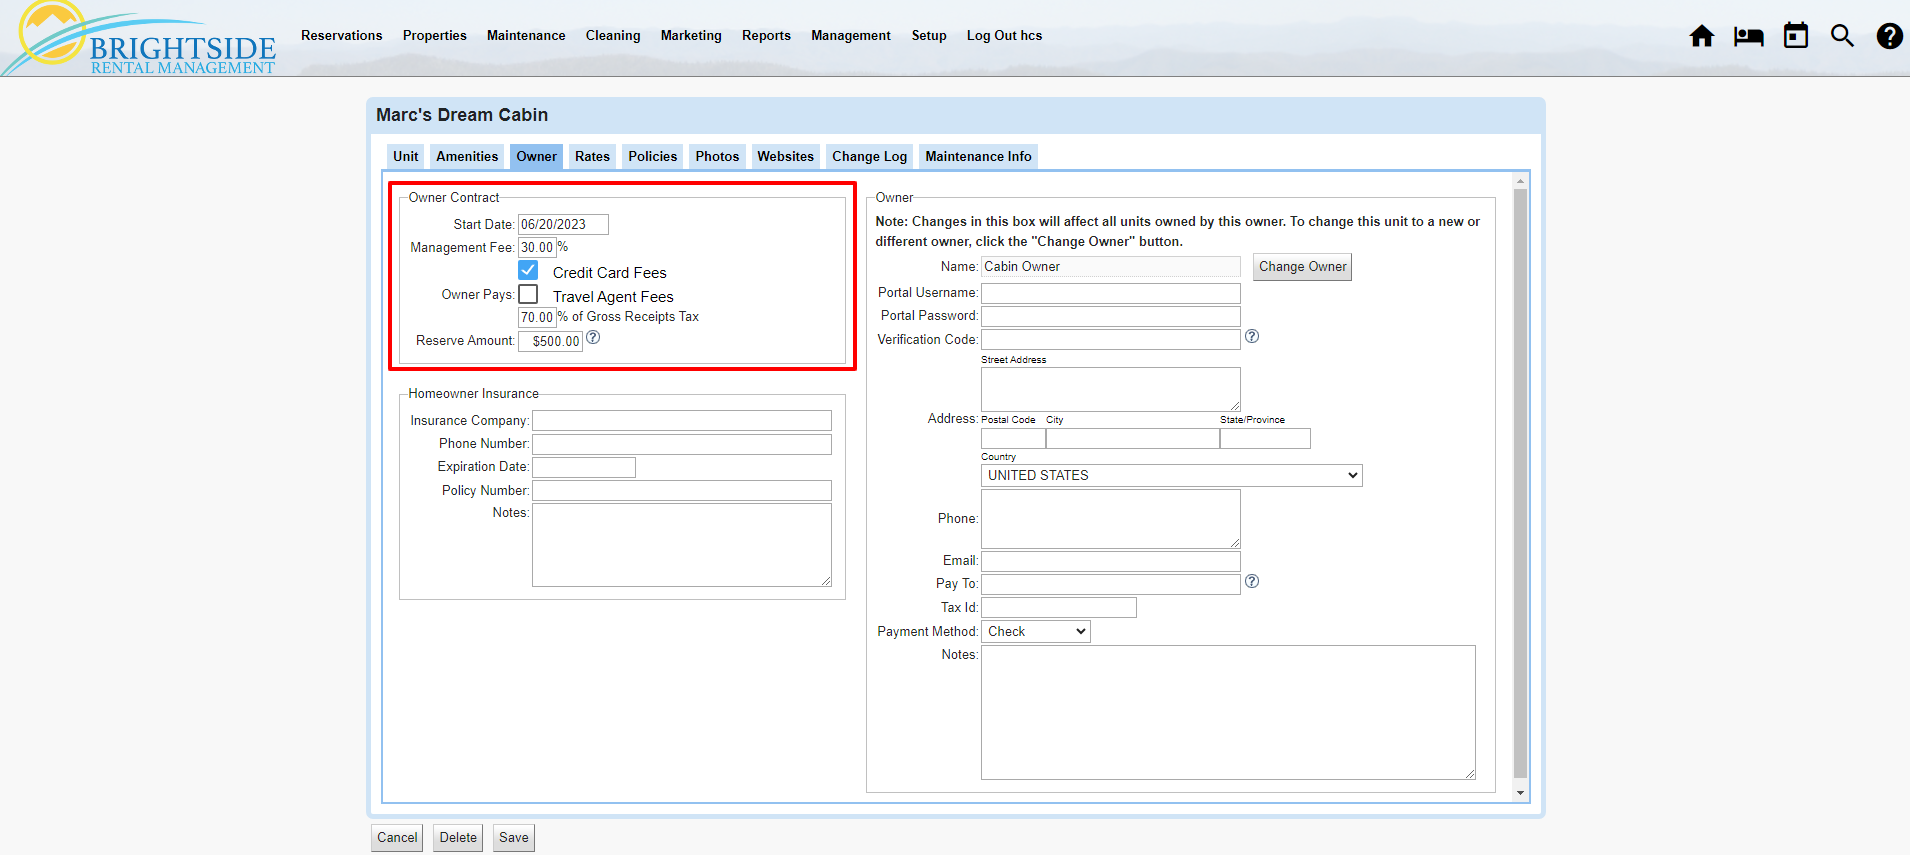
In this section, you will enter the contract details between you and the unit owner. These settings impact the finances of both the property management company and the owner. Be sure to complete this accurately. If you have any questions, please contact BrightSide customer support.
- Start Date: Enter the start date you began managing the property for this owner.
- Management Fee: Enter the percentage you charge the owner to manage the property.
- Credit Card Fees: Tick this box to pass the credit card fees to the owner. Credit card fees will be deducted from the owner’s payout each month and will be reflected on the Owner’s Statement. Set up the credit card percentages in Setup > Settings > Accounting > Payment Types (tab).
- Travel Agent Fees: OTA’s charge you a fee when a guest books your property using their website or app. If you want the owner to pay this fee out of his/her percentage, tick this box. If you create an OTA “Markup Fee” in Fees and Charges, there is no need to tick this box. That fee goes directly to the property management company. We highly recommend creating “Markup Fees” specific to Airbnb, VRBO, and Booking.com to offset the expense of listing on their booking engines.
- Gross Receipts Tax: Enter the percentage of the gross receipts tax that the owner will pay. IMPORTANT!: As the owner of the property management company, you may be responsible for paying 100% of the gross receipts taxes to your local tax authority. Even though you charge a 30% management fee, you may still be responsible for paying the gross receipts taxes on 100% of the revenue. To keep from shouldering the tax burden alone, property managers generally pass on a percentage of the taxes to the owners. This number usually coincides with the revenue split. For a manager charging 30%, you would enter 70% here. In addition to these settings, please enter the Gross Receipts Tax rate provided by your tax authority (see Rates section). NOTE: BrightSide does not offer tax advice. Please seek advice from your CPA, lawyer, or tax authority for answers to your specific situation.
- Reserve Amount: Property managers may want to keep a small cash reserve on hand for expenses normally charged to owners. Enter an amount here and it will be kept in reserve instead of being paid to the owner.
Do not forget to save your information!
Owner Contract for Unit / Property
Click on Image for Enlarged View
Homeowner Insurance
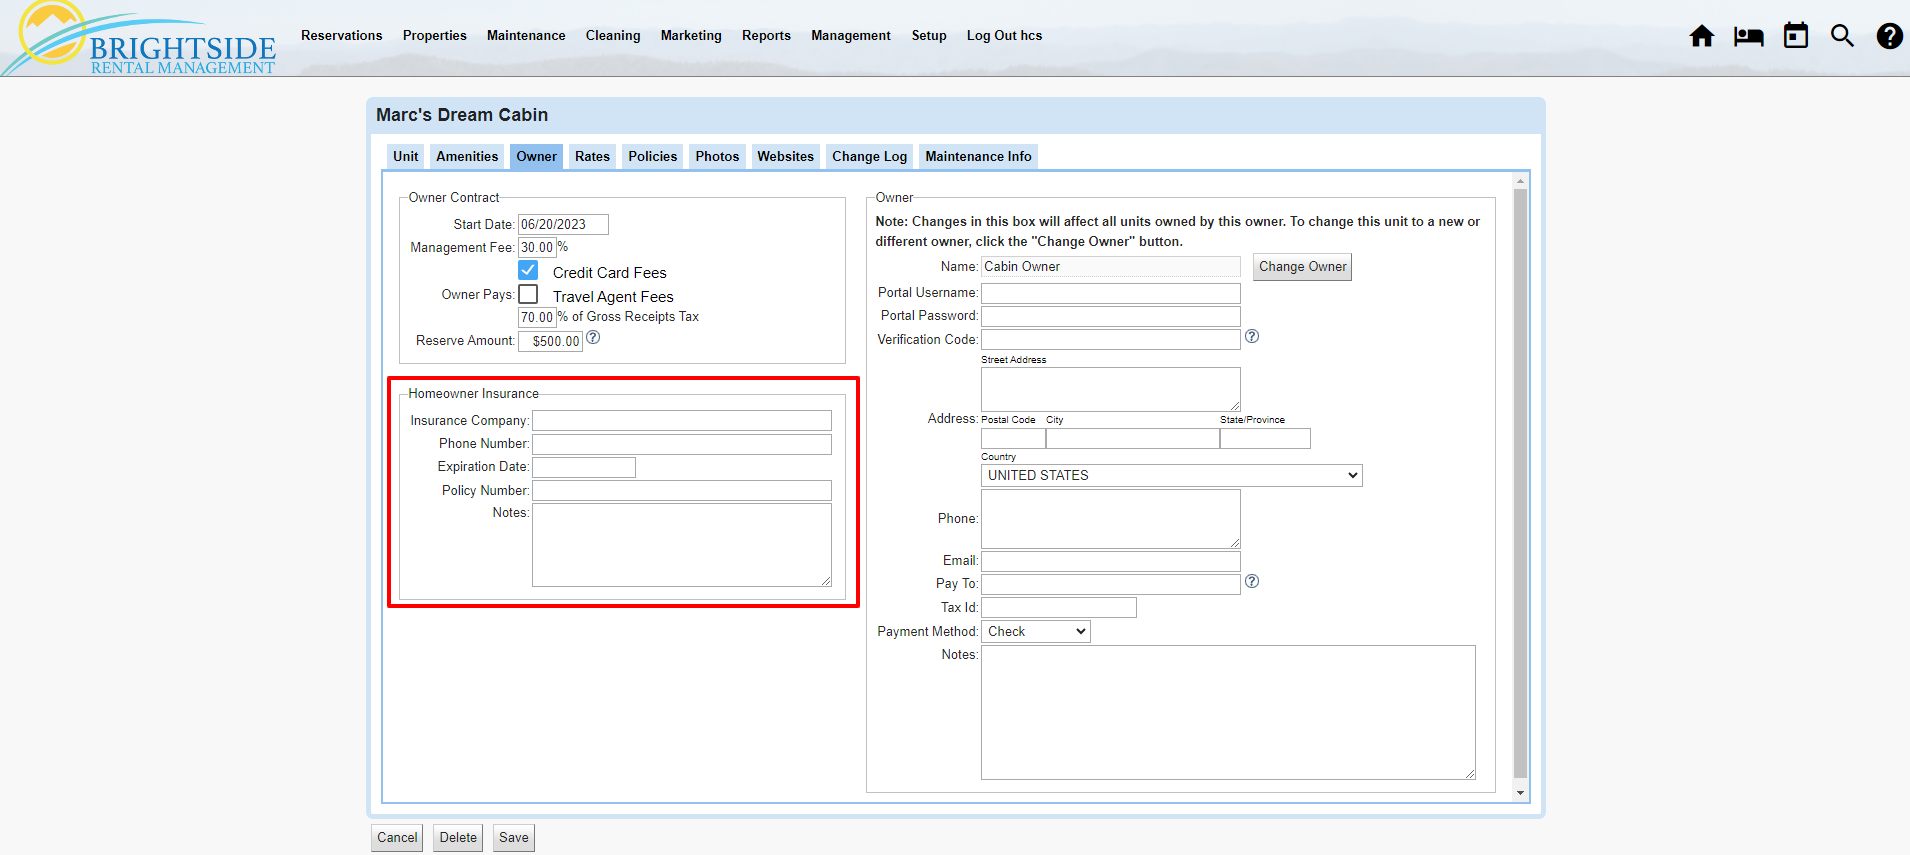
Most home owners are required to carry homeowner’s insurance. Keep a record of the current policy and agency here.
- Insurance Company: Enter the name of the property owner’s insurance company.
- Phone Number: Enter the phone number for the insurance company or agency.
- Expiration Date: Enter the expiration date of the current policy.
- Policy Number: Enter the policy number for the current policy.
- Notes: Enter any notes about the homeowner’s insurance coverage.
Do not forget to save your information!
Homeowner's Insurance for Unit / Property
Click on Image for Enlarged View
Preferred Contractors
You may or may not see this option on your screen. If you set up your maintenance or cleaning “Issue Types” to “Varies by Unit”, your unit Owner tab will include a section for choosing preferred contractors. Choose contractors from the dropdown list(s). You could have one or both of these, depending on how you set them up.
If you did not set up your Issue Types to Varies by Unit, you will not see this option in your Owner tab.
- Cleaning: Select the preferred contractor to clean the unit.
- Maintenance: Select the preferred contractor to perform maintenance on the unit.
Do not forget to save your information!
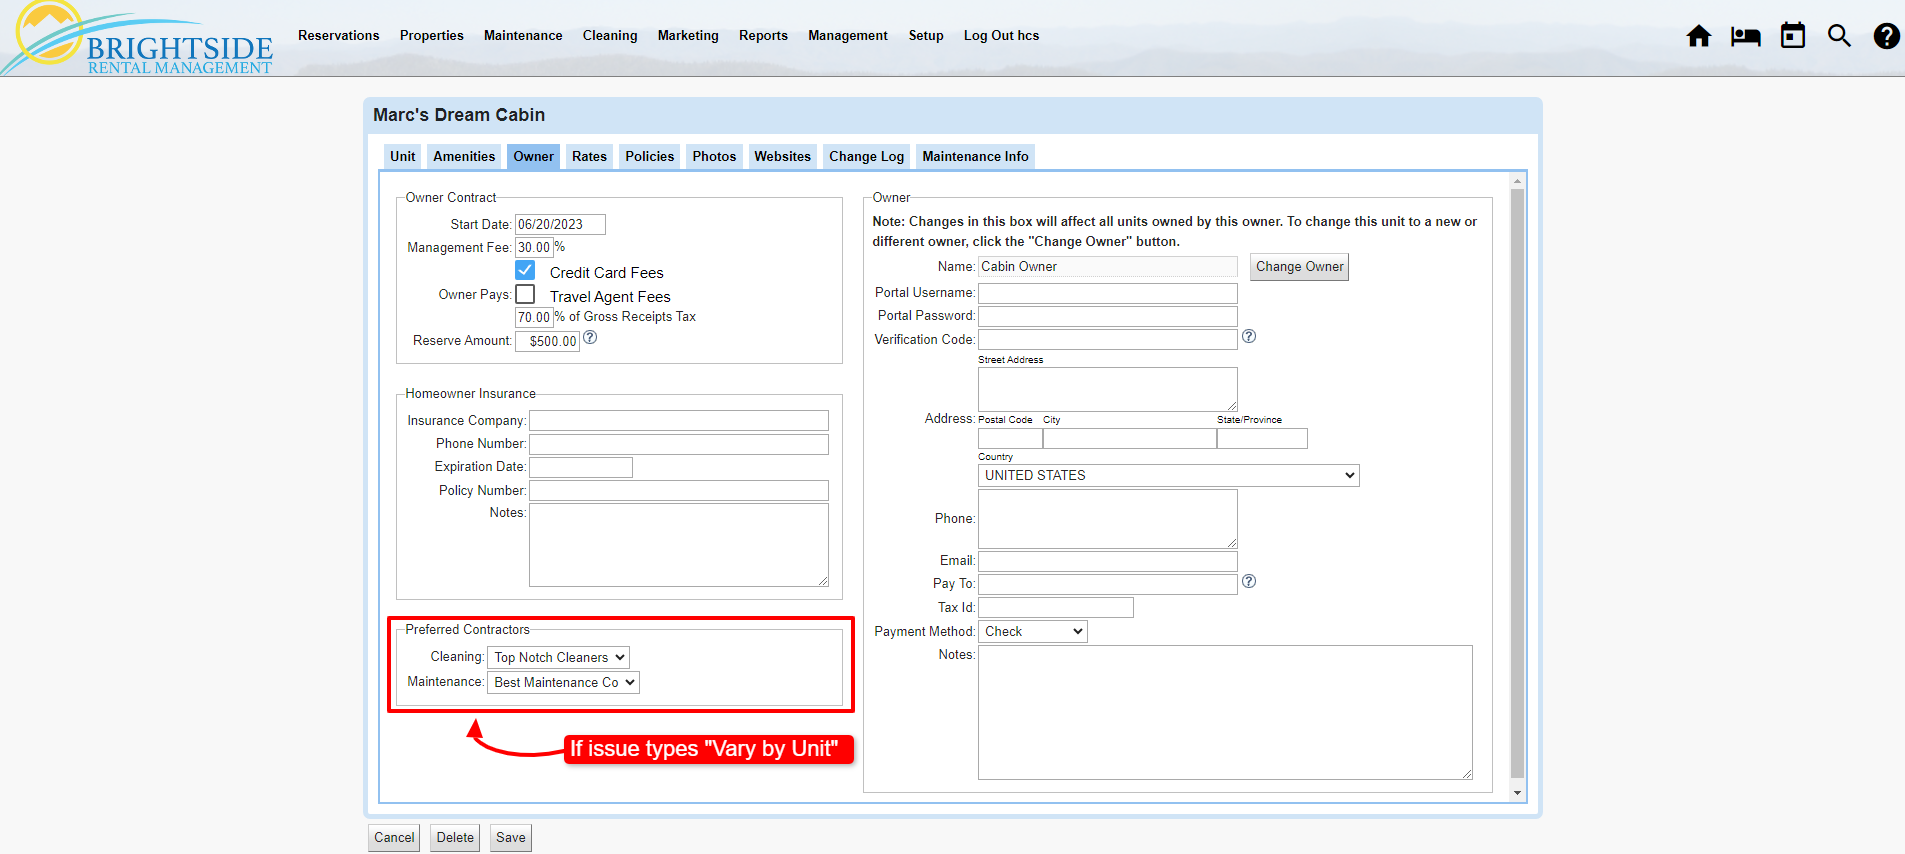
Unit Owner | Preferred Contractors
Click on Image for Enlarged View
Owner
In this section of the Owner tab, you need to enter the legal information for the official owner of the unit. Changes in this box will affect all units owned by this owner. To change this unit to a new or different owner, click the “Change Owner” button.
- Name: The name may be either an individual, two or more people, or a company. Put the legal name of the owner(s) here. For example, Bob Smith, Bob and Mary Smith, or Condo Owners LLC. If you make a mistake, and need to edit the NAME of the current owner AFTER SAVING IT, you MUST go to Properties > Owners, and click on the name of the owner. Edit the owner’s name and save it. IMPORTANT!: DO NOT click the “Change Owner” button in an attempt to edit the owner’s name! Doing so will end the contract for the current owner and reassign ownership to a new owner. This is irreversible by the user and will need to be corrected by a member of our support team.
- Portal Username: Owners may sign into their owner portal to see the owner’s statements and a number of other items, depending on your settings. Assign their username here.
- Portal Password: Assign a password by entering it here.
- Verification Code: You may assign a PIN so if the owner calls in, you can ask for the number to verify it is them or a representative.
- Address: Enter the owner’s legal address. If you mail checks and/or 1099’s, this is where they will be sent.
- Phone: Enter the owner’s phone number. You may enter more than one number, but only one per line. If you enter a number and text, it could prevent text messages from working properly.
- Email: Enter the owner’s email address.
- Pay To: Enter the name that will show on the 1099 and checks, if different from owner.
- Tax ID: Enter the Social Security Number of the owner or the FEIN if a business.
- Payment Method: Enter the owner’s preferred method of payment.
- Notes: Enter any notes.
HINT: The “Change Owner” button is used only when you need to replace the current owner with a new owner. It is not used to edit the current owner.
Do not forget to save your information!
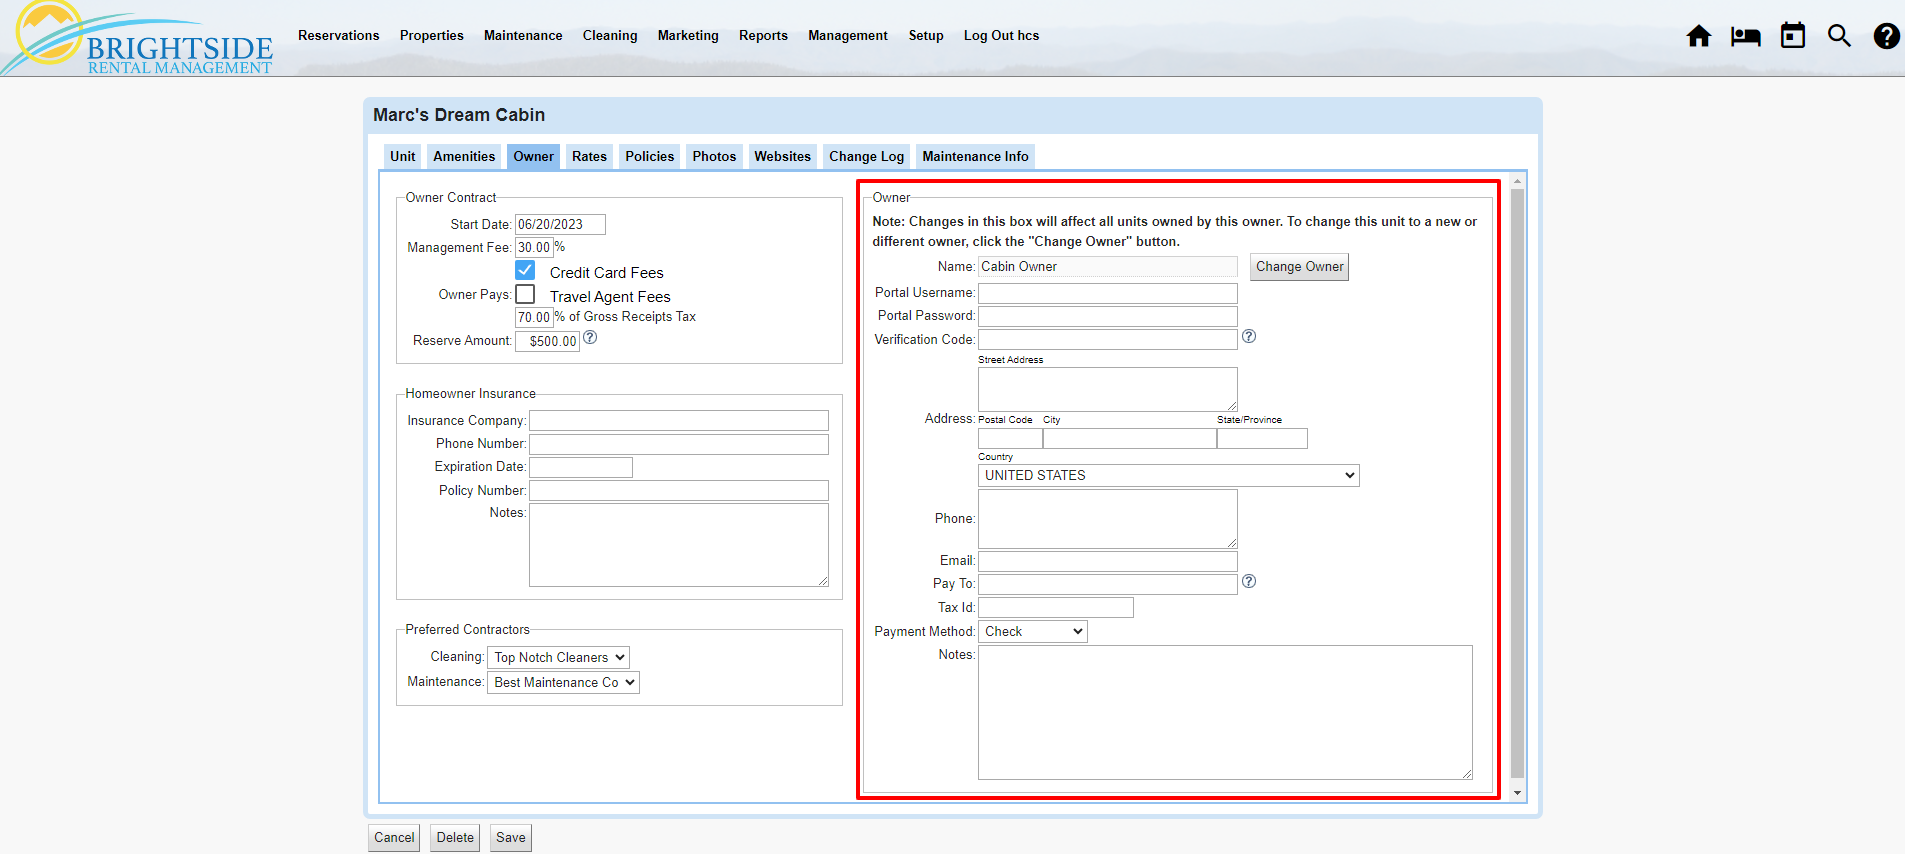
Unit Owner | Owner's Legal Information
Click on Image for Enlarged View
Rates
The rates tab is where you enter the defaults for a unit’s rental rates, cleaning charges, and deposit and balance due policies. The importance of entering these defaults is to make it easier to run reports and pay your cleaners, etc. These numbers will also impact guest charges on each reservation made for each unit.
Rates
- Rate: Any rate types previously set up will be in this list. The one in the example has a Summer Rate that was created in Rate Seasons.
- Nightly: Enter the default nightly rate for this unit. Nightly rates can be overridden using the following tools, Rate Overrides, Rate Seasons, Auto Rate Adjustments, and Unit Rates. You may edit any of the rates you see on your screen.
- Minimum Stay: Enter the default minimum nightly stays required. This can be overridden using Minimum Stay Overrides. If you choose a 7-nights minimum, you will be asked to indicate a changeover day, although it is not required. However, if you do not select a changeover day, you could have as many as six unbookable days between reservations.
- Changeover Day: If you require a minimum of 7 nights stay, in the summer season for example, you need to select a changeover day. This is the only day of the week when guests may check in and check out. NOTE: Only select a changeover day when using weekly rates.
- Base Occupancy: Enter the base occupancy for adults, children, and vehicles. By using base occupancy, BrightSide allows you to charge per person over the prescribed number of occupants. For example, if your unit sleeps ten, but you want to charge a per person fee over four guests, set the base occupancy at four. Then set up “Occupancy Charges” by going to Setup > Settings > Units > Options (tab). You may also use this to indicate the number of parking spaces available, and charge for additional vehicles.
Do not forget to save your information!

Unit / Rates
Click on Image for Enlarged View
Charges and Taxes
Additional options could be available here, depending on the charges you set up in your BrightSide account. The two listed here are defaults.
- Cleaning Fee: Enter the default cleaning fee to be charged to guests.
- Owner Cleaning Fee: Enter the default cleaning fee to be charged to the owner after an owner stay.
- Taxes: Tick the box(es) next to the tax rates to be used for this unit. Add tax rates at Setup > Taxes > Add.
Do not forget to save your information!
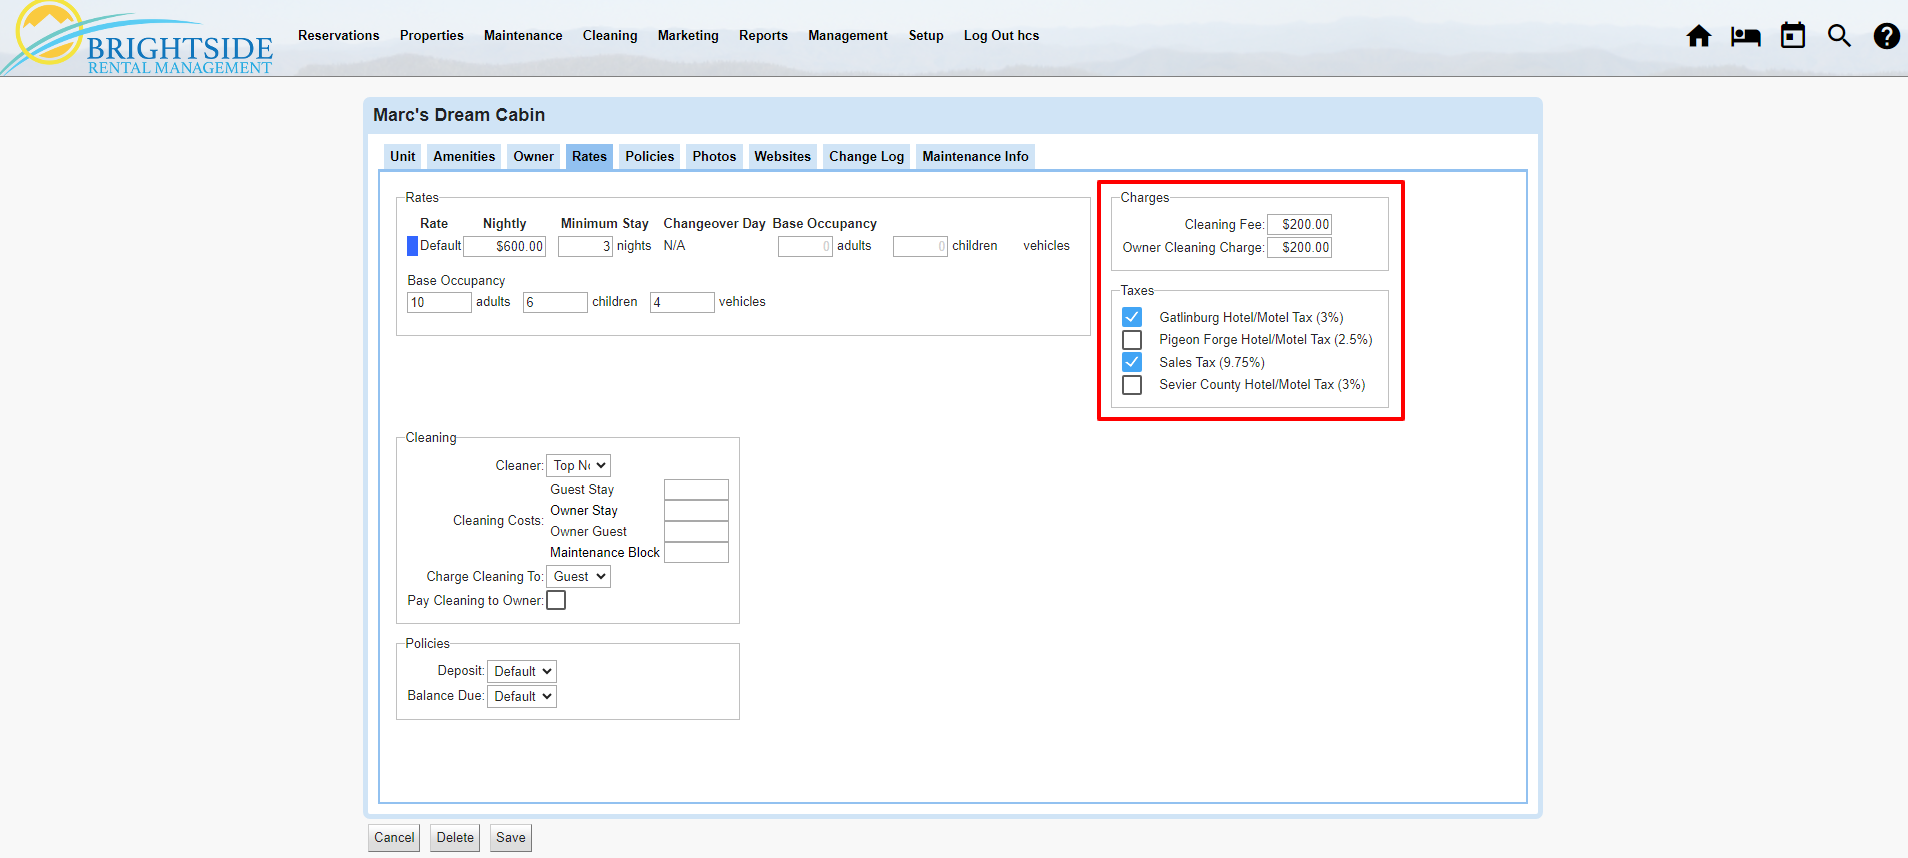
Unit / Charges and Taxes
Click on Image for Enlarged View
Cleaning
In this section, enter who cleans the unit, the cleaning costs, who pays for the cleaning, and if the owner receives the cleaning payment.
- Cleaner: Select from the dropdown which cleaner (contractor) you want to be responsible for this unit. To add a cleaner, follow these steps: 1. Add a User, 2. Add a Contractor.
- Cleaning Costs: Enter the amount you must pay to have the unit cleaned after each type of stay. Maintenance Block may be less if there is only a walk through involved.
- Charge Cleaning To: Select the person who will pay for the cleaning. This is almost always the guest.
- Pay Cleaning to Owner: Tick this box if you want the cleaning fee to be paid to the owner. This is rare, but if the owner pays the cleaners, you can pay the fee to the owner.
Do not forget to save your information!
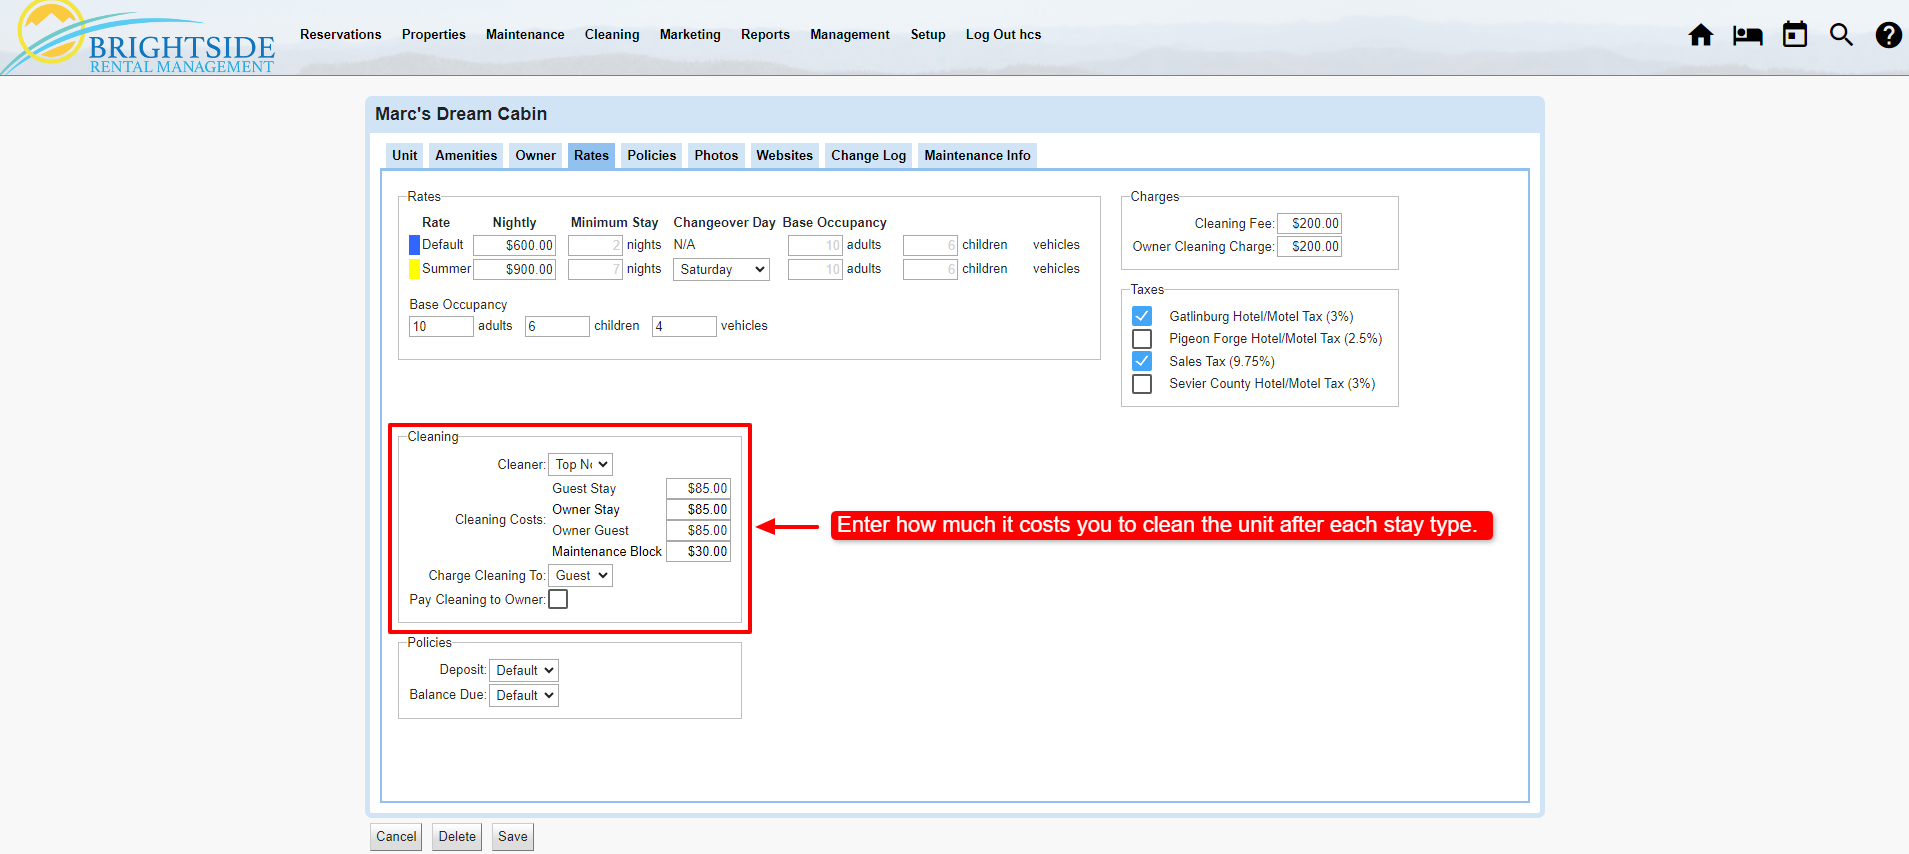
Unit / Cleaning
Click on Image for Enlarged View
Policies
In this section, select which deposit policy applies to this unit and when the balance due needs to be paid. If you haven’t already created these policies, go to Setup > Settings > Reservations > Policies (tab). You may add policies for deposits and balance due, as needed. For detailed instructions, refer to the Reservations Settings tutorial.
- Deposit: Select from the dropdown which deposit policy applies to this unit.
- Balance Due: Select from the dropdown which balance due policy applies to this unit.
Do not forget to save your information!
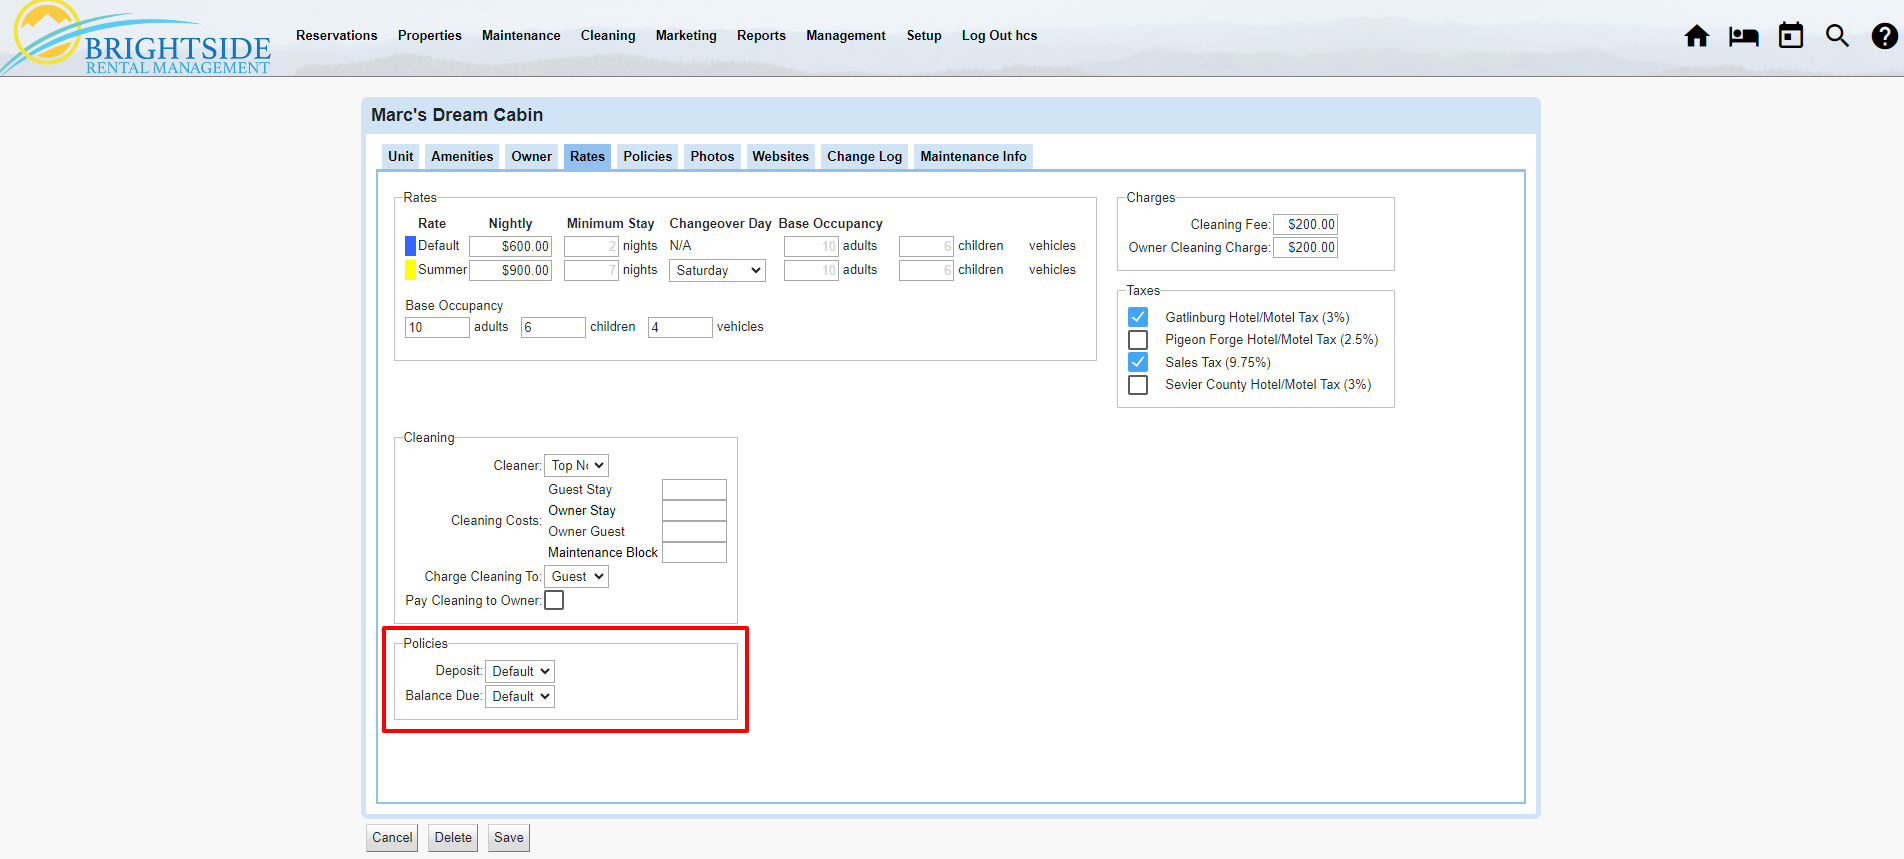
Unit / Policies
Click on Image for Enlarged View
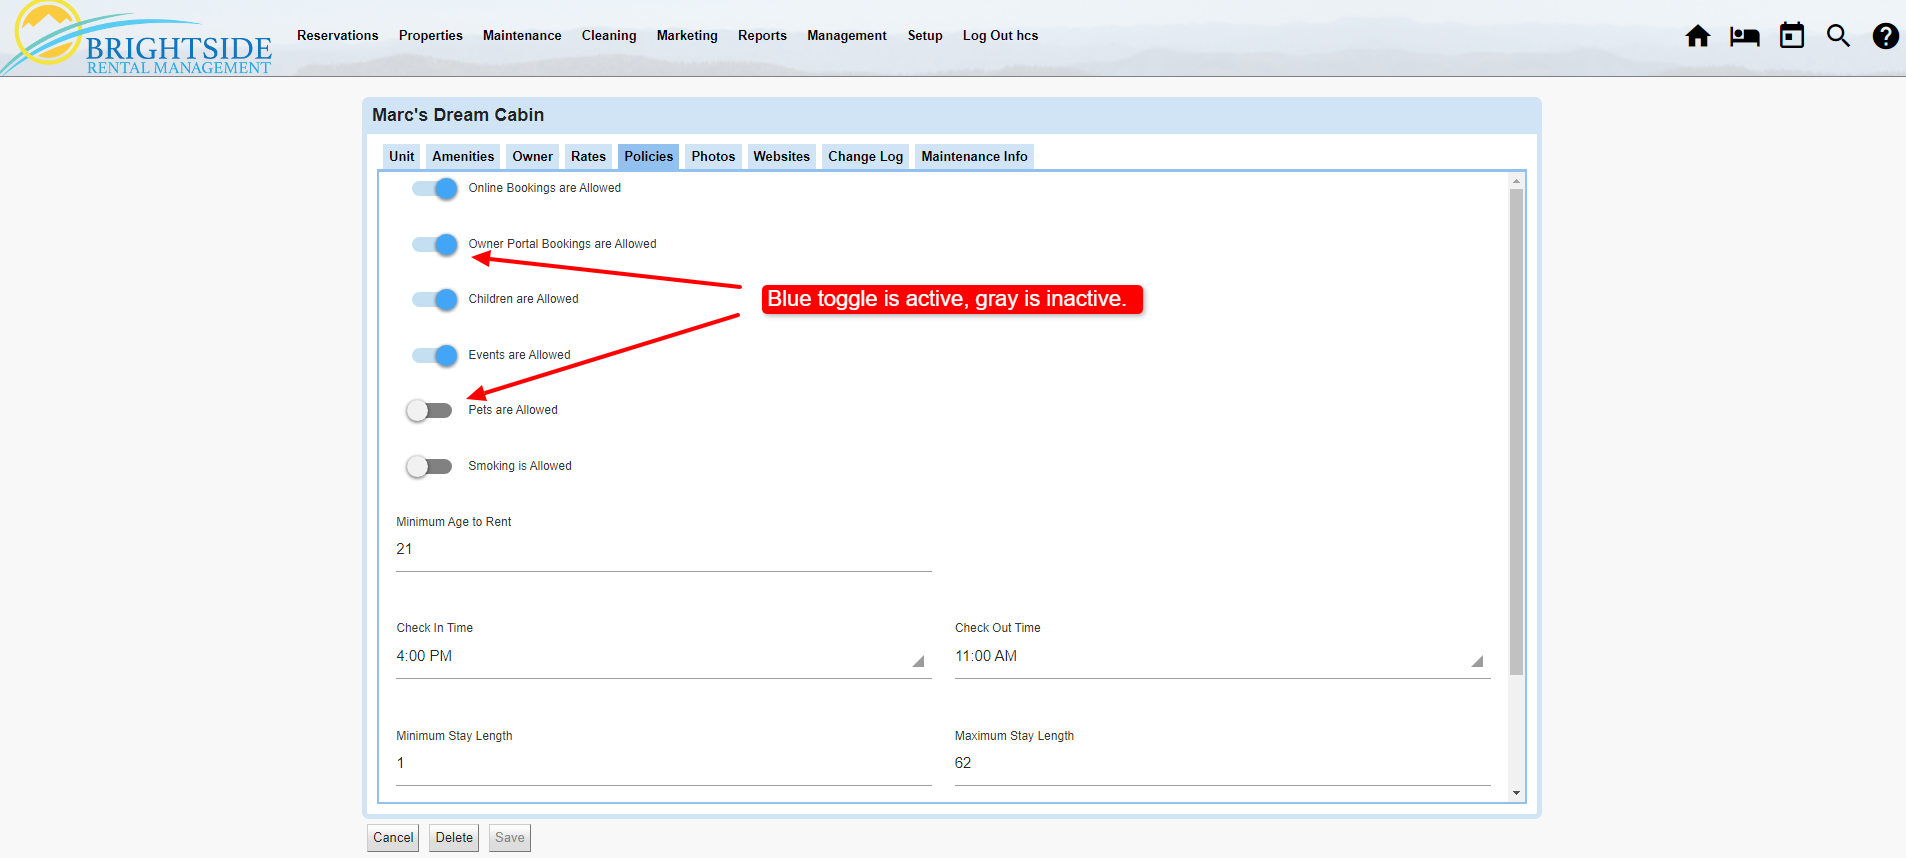
Policies
The Policies tab is where you will set the default policies for each unit. The policies set here are for online bookings, owner portal bookings, children, events, pets, smoking, minimum age to rent, and more.
HINT: When the toggle is blue, it is active. When the toggle is gray, it is inactive.
- Online Bookings are Allowed: Toggle to blue if you want to make this unit bookable on your website. This does not impact OTAs, only your company website.
- Owner Portal Bookings are Allowed: Toggle to blue if you want to allow owners to book reservations for themselves and/or their non-paying guests. When an owner reserves their own unit, there are no rental charges. This does not allow owners to make reservations for paying guests.
- Children are Allowed: Toggle to blue if children are allowed to stay in the unit.
- Events are Allowed: Toggle to blue if guests are allowed to host events at the unit.
- Smoking is Allowed: Toggle to blue if guests are allowed to smoke inside the unit.
- Minimum Age to Rent: Enter the minimum age allowed for someone to rent the unit. The law in most states is 18 years of age, but many property managers set the minimum age to rent at 21 or 25 years of age.
- Check In Time: Enter the default check-in time for this unit.
- Check Out Time: Enter the default check-out time for this unit.
- Minimum Stay Length: Enter the minimum number of nights this unit may be rented.
- Maximum Stay Length: Enter the maximum number of nights this unit may be rented.
- Minimum Nightly Rate: Enter the minimum nightly rate you will accept. Setting this prevents any “Special” from reducing the nightly rate below an acceptable level.
Do not forget to save your information!
Unit / Policies
Click on Image for Enlarged View
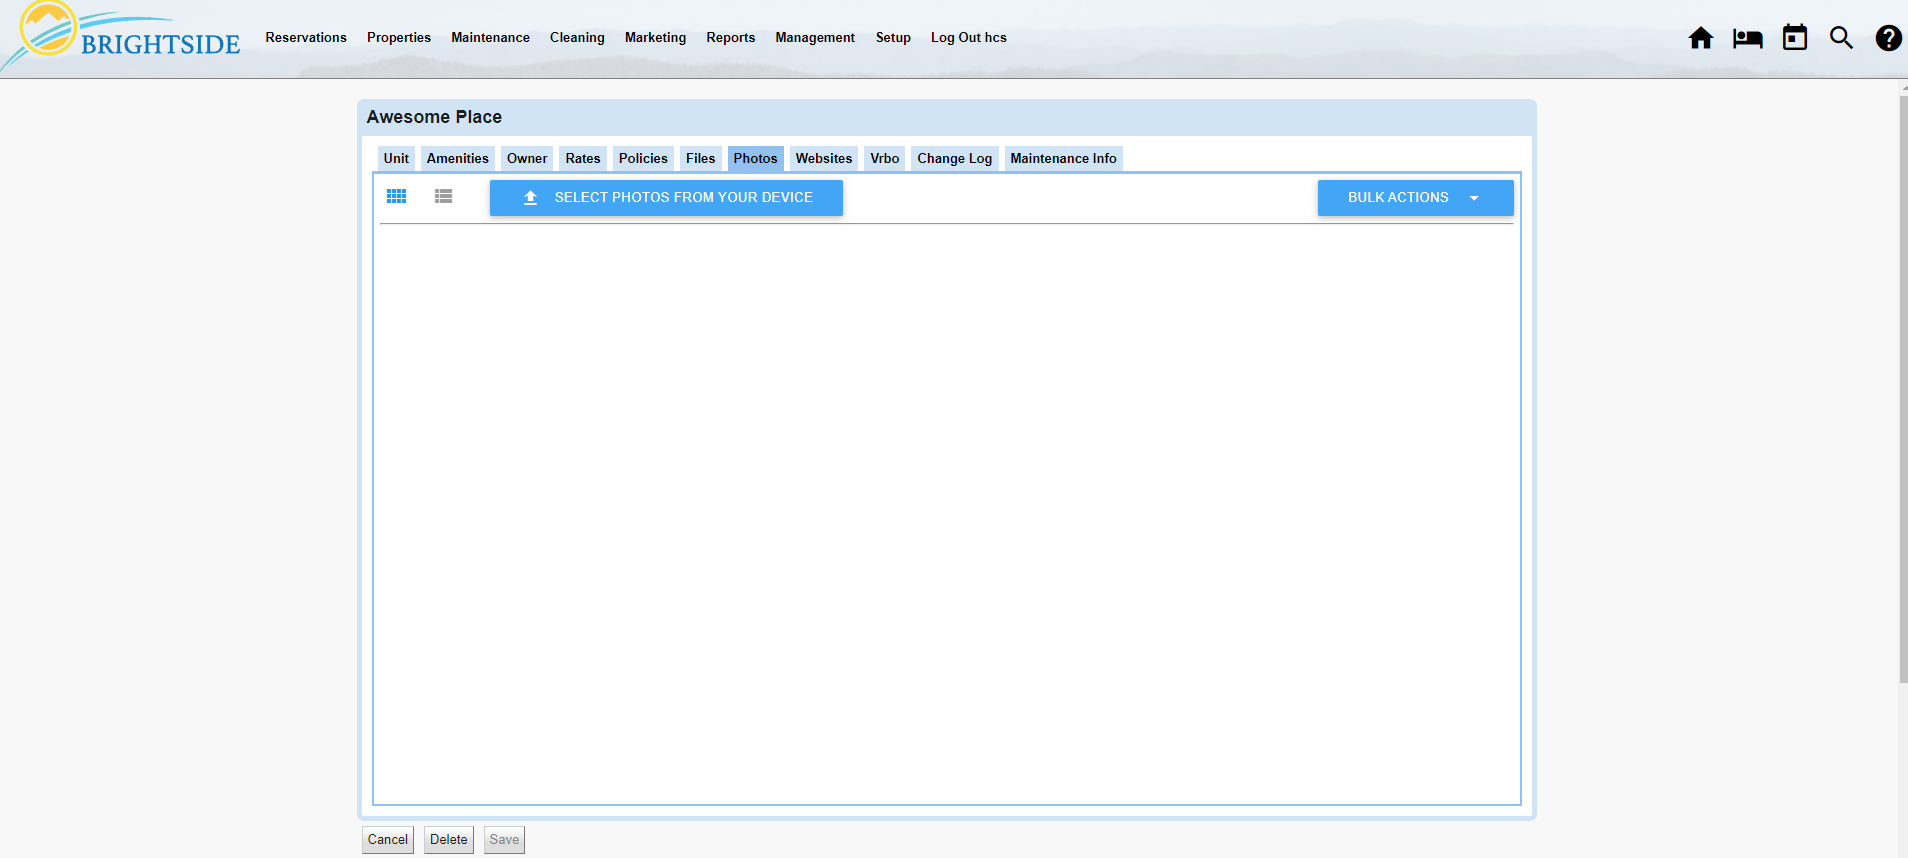
Photos
Upload Photos
Add high resolution photos to your unit listing. You should upload photos that are at least 1920 x 1080. When needed, BrightSide will automatically optimize your photos to a smaller size for use on your website.
Keep in mind that Airbnb does not allow photos smaller than 1920 x 1080. Photos smaller than that will be rejected and when you sync, may prevent your listing from going live on their site.
- Select Photos From Your Device: You can select bulk photos for importation by clicking on this blue bar.
- Bulk Actions: You may download all the photos or delete them all.
Adding Unit Photos
Click on Image for Enlarged View
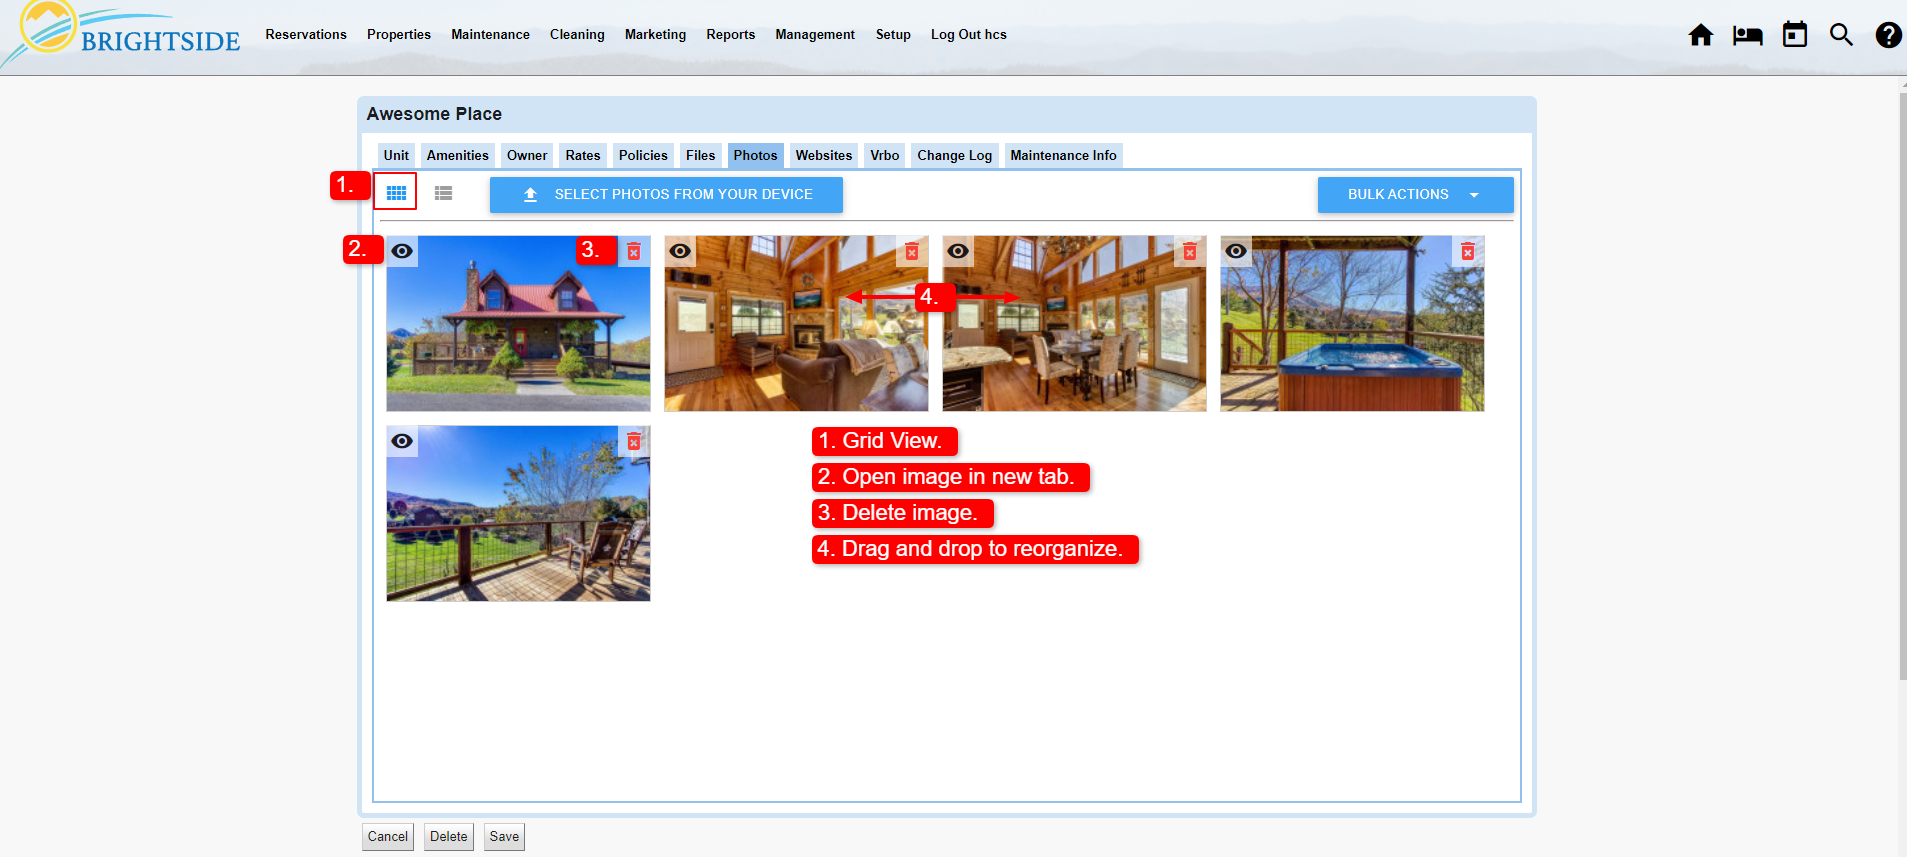
Grid View
After uploading your unit photos, take the time time organize them for presentation on your website and OTAs. The grid view is the best view for reorganizing the images. Just drag and drop.
- Grid View: The grid view places the images in an easy to view format.
- View Image: Click on the eye icon to open the full size image in a new tab.
- Delete: Delete individual images by clicking the trash can with an X.
- Reorganize: Just drag and drop the images in the order you want them to appear on your website and the OTA websites. If connected, the first five are usually featured on your Airbnb and VRBO listings.
- Save: Do not forget to save your information!
Organizing Unit Photos
Click on Image for Enlarged View
List View
The list view is the best way to edit the meta data for your photos. Add descriptions, Alt Text, and indicate if the photos should be shown on your websites or OTAs.
- List View: The list view makes it easy to edit meta data.
- Descriptions and Alt Text: Be sure to give them a descriptive name and provide ALT text to describe the photo. This will help with SEO and also help the sight impaired.
- Websites & OTAs: Designate on which sites the photos appear. If you have photos with company logos, or Xplorie pictures, OTAs do not allow them. Simply deselect OTAs for these photos and they will not show up on the OTAs. If you have photos you only want to appear on OTAs, deselect Websites.
- Save: Do not forget to save your information!

Adding Descriptions and Alt Text
Click on Image for Enlarged View
Websites
Next to Maintenance Info, the “Websites” tab is probably the least utilized in your dashboard. However, it is very useful when needed. When is it needed? If you have more than one website or when websites other than your own need to have access to your properties. If this is the case, BrightSide support staff can add these websites to your account and they can be monitored here.
After this is set up, you can include or exclude individual units from being displayed on your own website, or websites operated by others. If you do not have more than one site, or you always display every active unit, this may not be worth setting up.
HINT: OTAs like Airbnb, VRBO, and Booking.com are not impacted by the settings here, they are activated/deactivated in their own tabs (not shown).
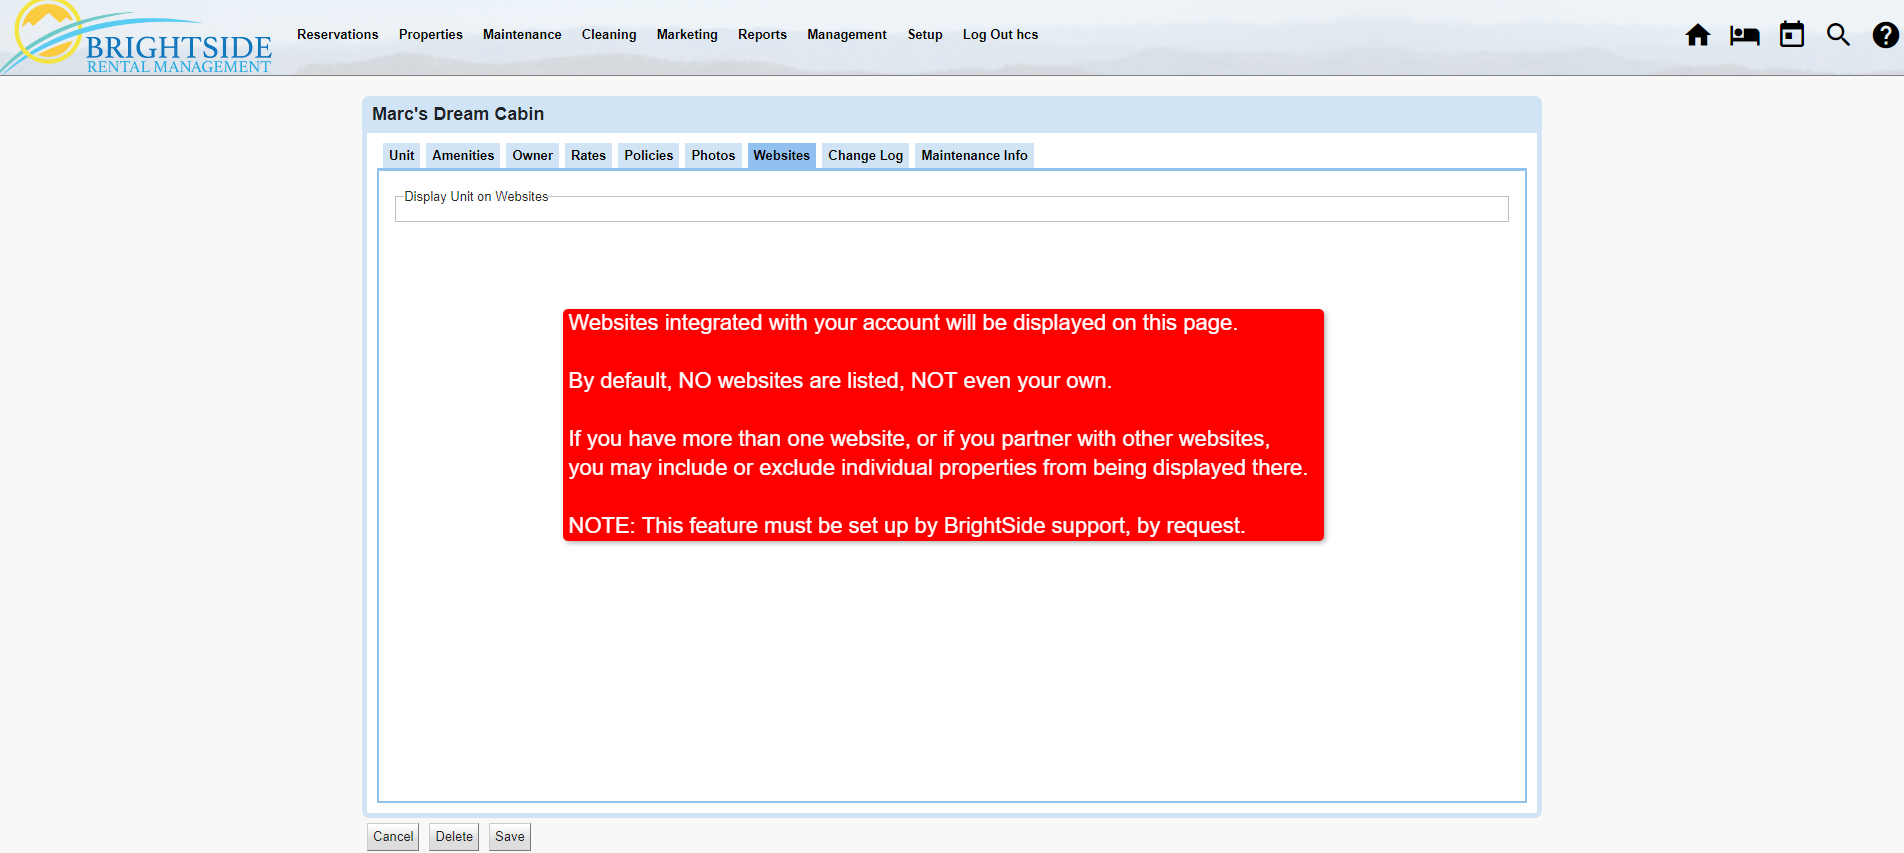
Unit / Websites
Click on Image for Enlarged View
Change Log
The change log shows who made changes to the settings in the unit, when they made the changes, and what they changed. When more than one person can make changes, having a log of all the changes can be handy. Most likely, you will not use this screen very often, unless there is a problem.
HINT: The support team may use the change log to track down issues that come up from time to time. It helps to know what changes were made and when.
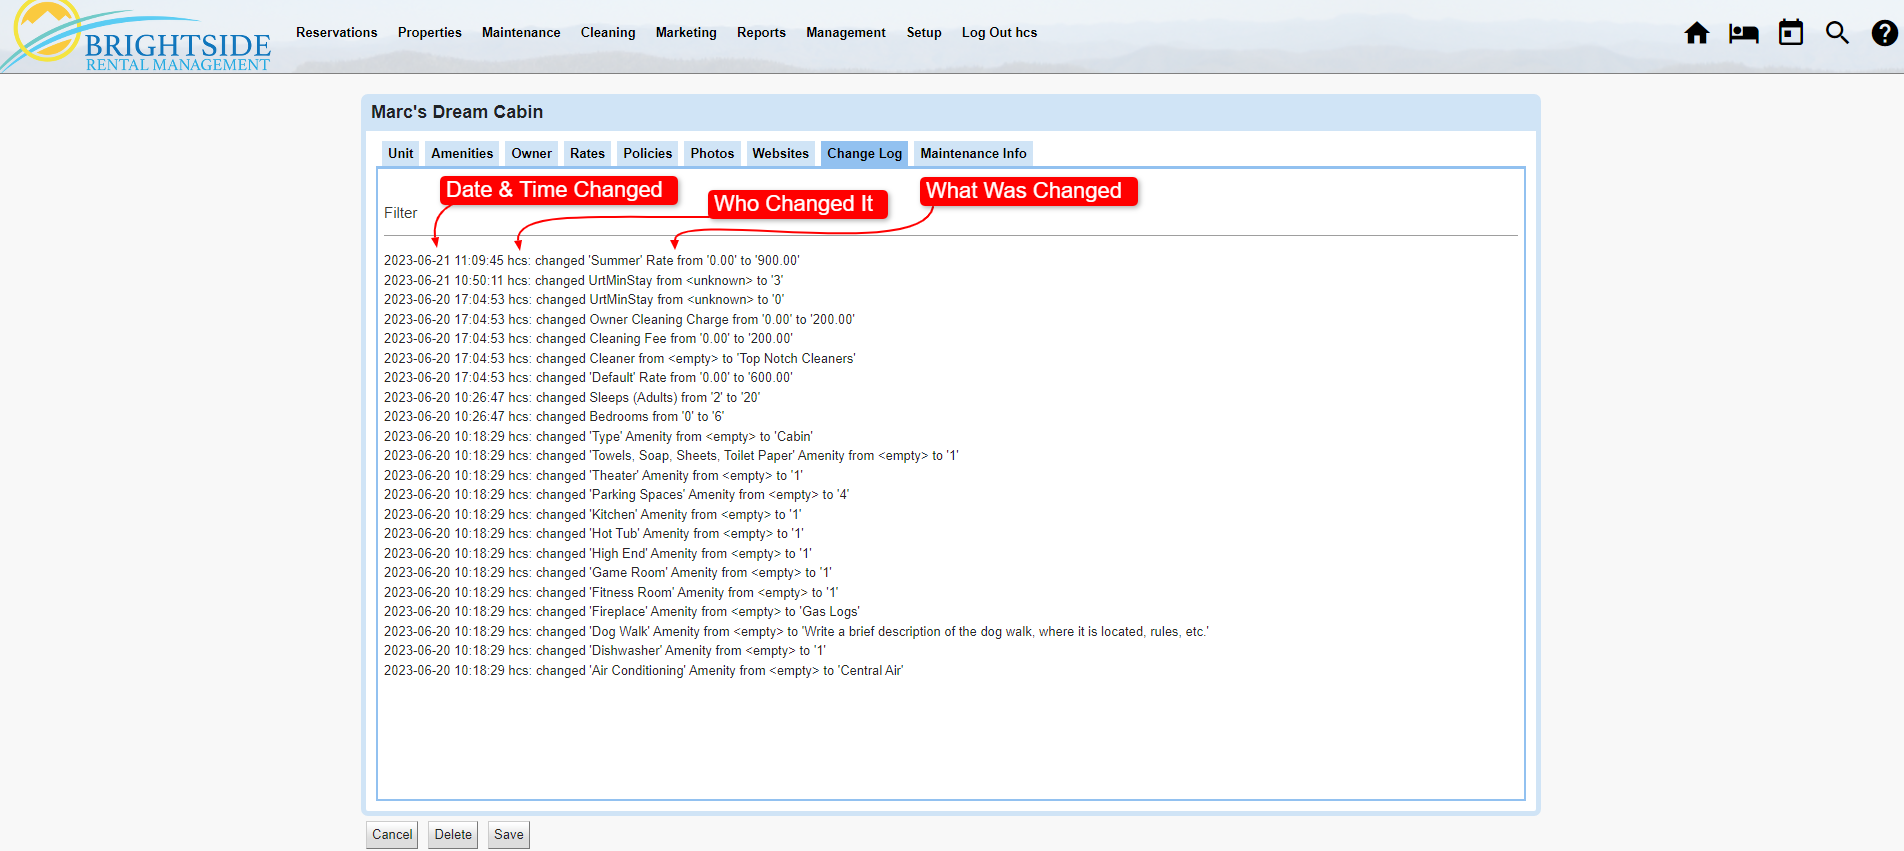
Unit / Change Log
Click on Image for Enlarged View
Maintenance Info
“Maintenance Info” is probably the most misunderstood and under utilized component in all of BrightSide, probably due to its name. Putting that aside, let’s look at what you can do, and should do, in this tab.
The purpose of the Maintenance Info tab is to help you track miscellaneous, but important, information about each unit. For example, you can create a tracking system for all the appliances in the unit. You can keep track of the brand, serial number, location, color, etc.
Do you want your reservationists to know where the breaker box is located? Do you want to keep up with how many televisions are in the unit, the brands, the sizes, and the serial numbers? How about keeping up with how many air filters are needed, the sizes, and where the returns are located? You can do all this and more in Maintenance Info.
Bedrooms
“Bedrooms” is the only default item in maintenance info. Adding the bedrooms, bathrooms, and bed types in this section is critical to your integrations with OTAs. This is where you let them know the specifics of where people sleep, the type of beds they sleep in, and if there is an attached bathroom. OTAs pull this information to display on their websites.
HINT: In the Unit tab, you only enter the NUMBER of bedrooms, full bathrooms, and half bathrooms. This is where you enter the details about each bedroom, i.e.: what type of bed is in each bedroom, which bedrooms have a private bathroom, etc.
- Name: You can choose how you want to name the bedrooms, but give them a name. Bedroom 1, Bedroom 2. etc., works well. If you want to distinguish the primary bedroom from the others, name it accordingly.
- Type: Select from the dropdown whether the room is a bedroom, a studio/loft, or other.
- Private Bath: Tick this box if the room has a private bathroom; one that is accessible only through the bedroom.
- King, Queen, Full, etc.: Enter the number of each type of bed in the room. The example in the screenshot shows the “Master Bedroom” has a king size bed. “Bedroom 2” has a queen size bed, “Bedroom 3” has a twin and a bunk bed.
- Notes: The notes feed out to OTAs, so if you add any notes here, be aware that they are public.
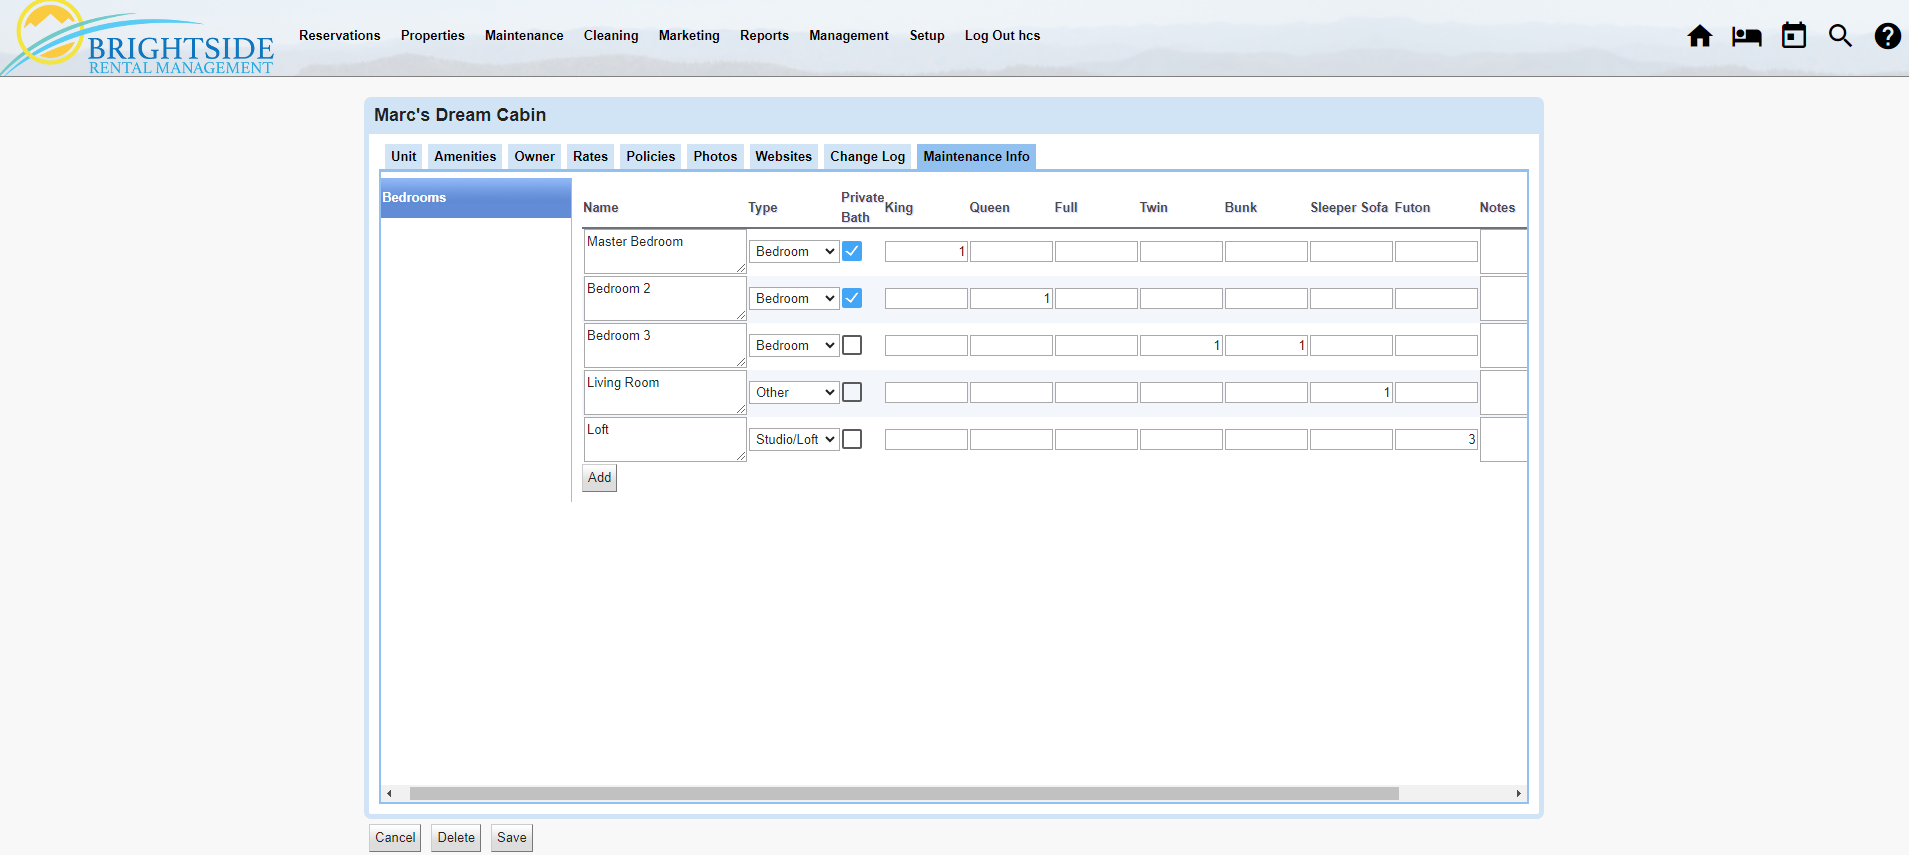
Unit / Maintenance Info / Bedrooms
Click on Image for Enlarged View
Adding New Maintenance Info Items
Bedrooms is the only default item in Maintenance Info. To add additional items go to: Maintenance > Setup Unit Maintenance Info > +Add. Below are several examples of how you can use the Maintenance Info to keep track of information in each unit.
Televisions
The screenshot below is a custom information form to keep up with the televisions in a unit. In this example, we created fields for the brand, size screen, model, serial number, and location. You may add additional fields if needed.
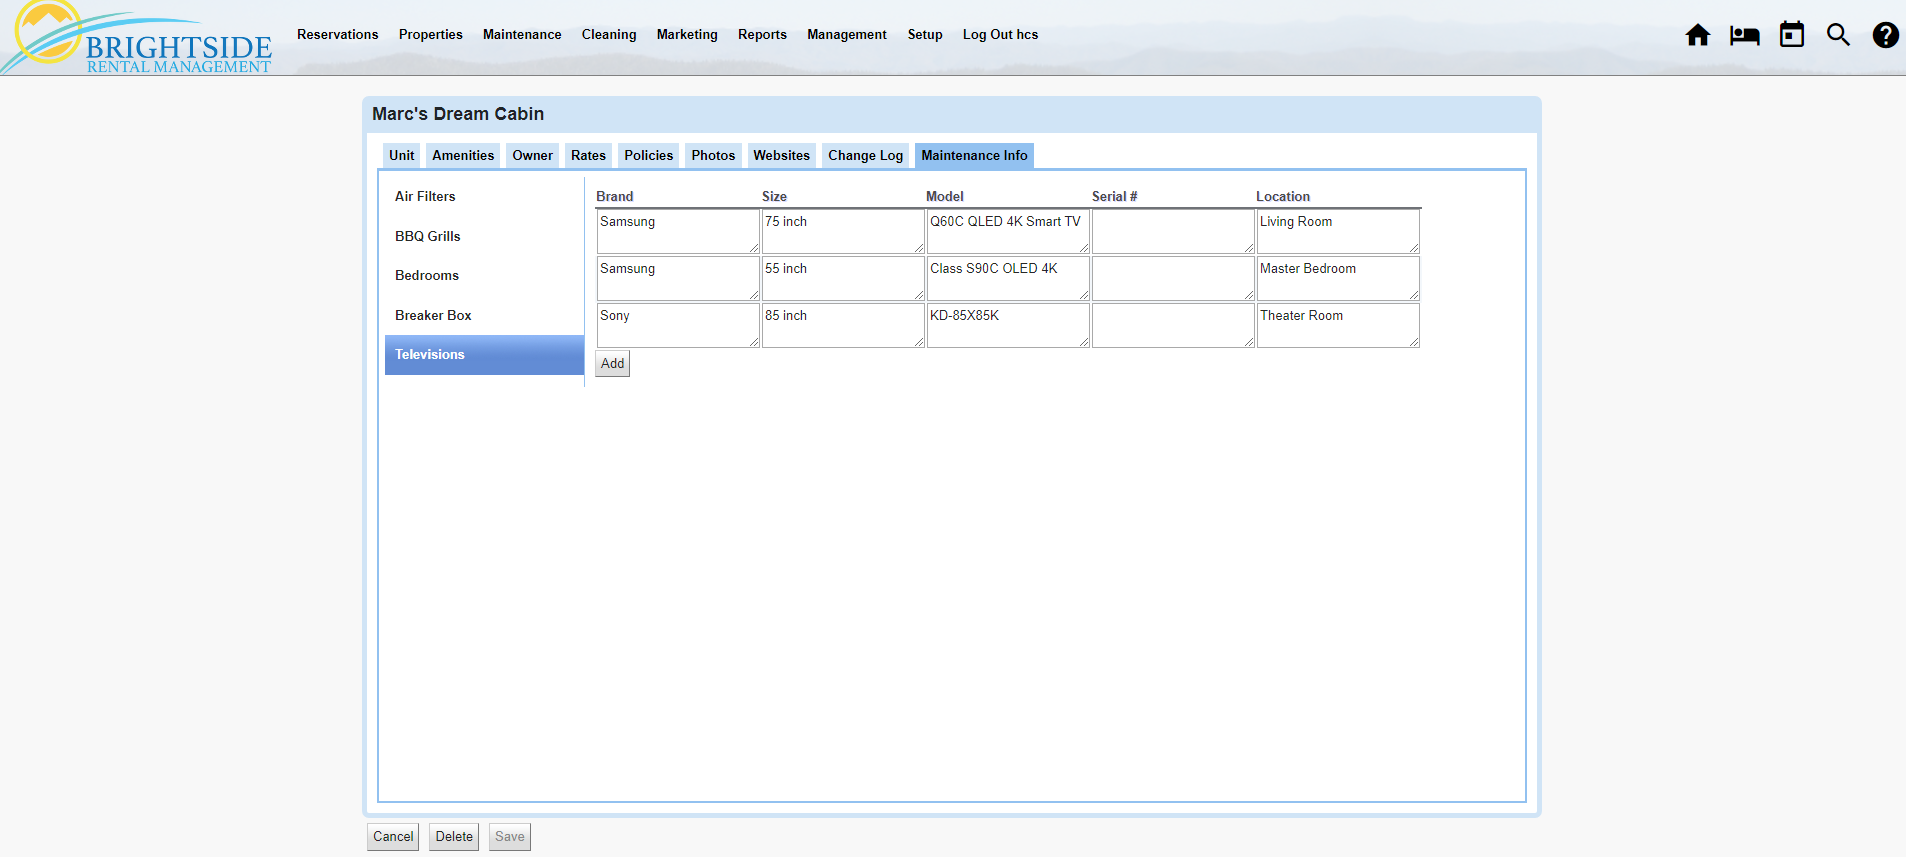
Unit / Maintenance Info | Televisions
Click on Image for Enlarged View
Air Filters
The screenshot below is a custom information form to keep track of the HVAC air filters in the unit. You can enter the sizes and the locations. If you want to add a field for the number of each size needed, you can do that too.
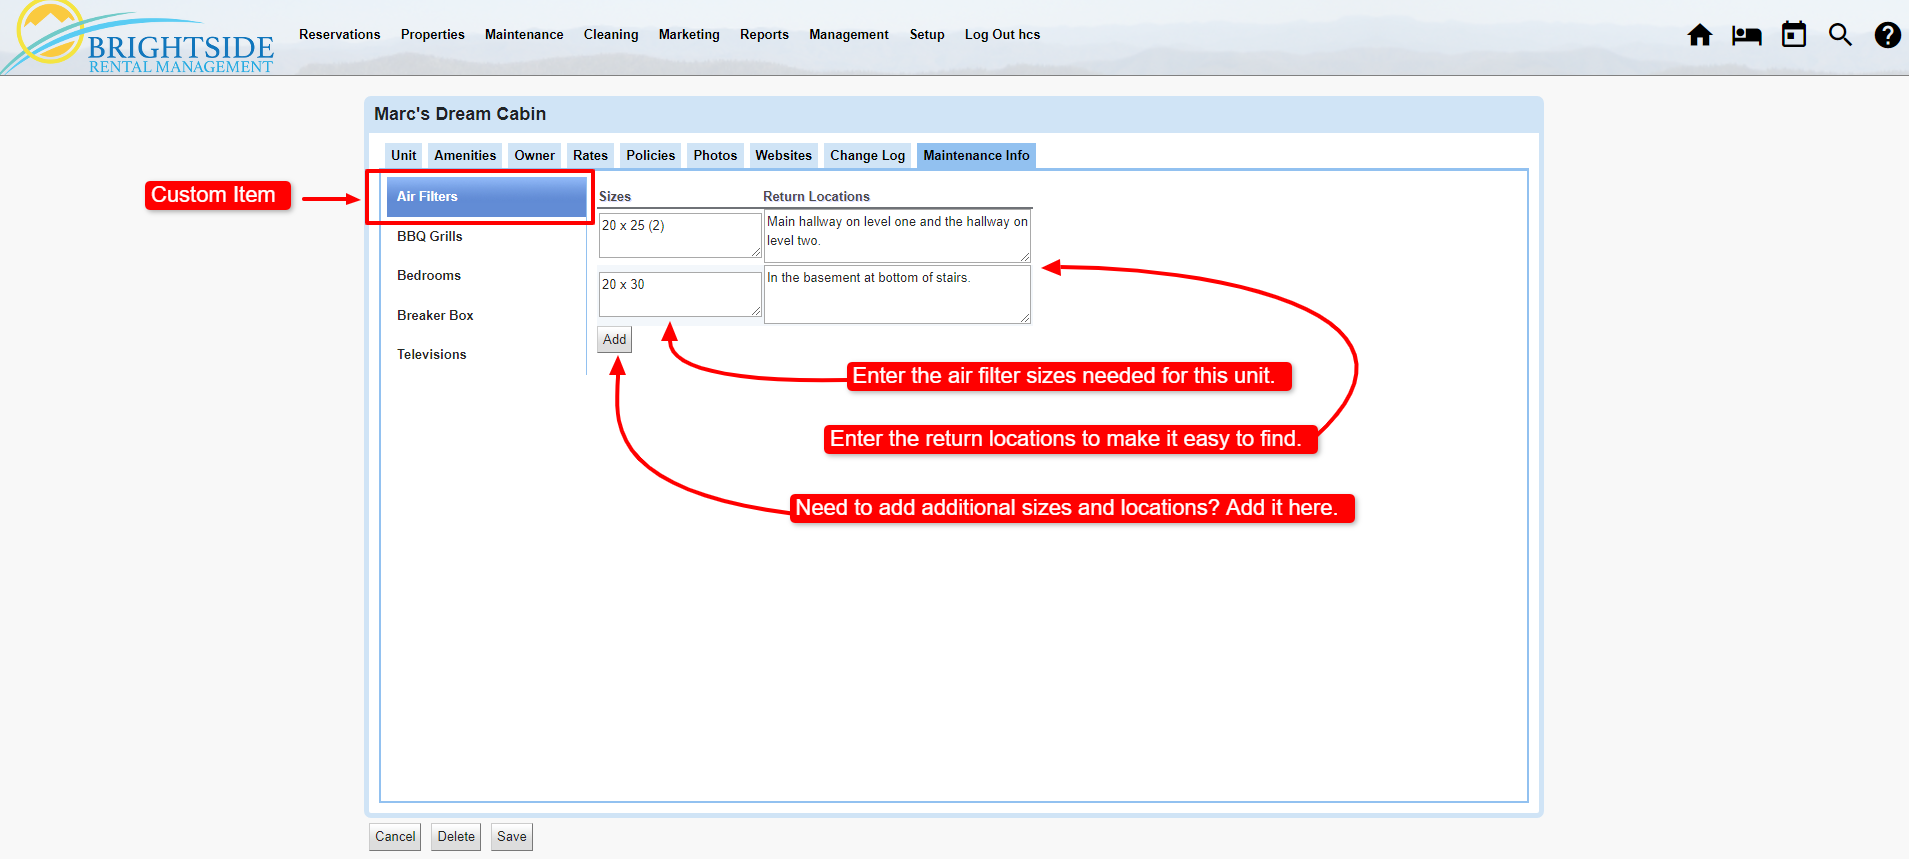
Unit / Maintenance Info / Air Filters
Click on Image for Enlarged View
BBQ Grills
The screenshot below is a custom information form to keep track of BBQ grills at the unit. You may add custom fields for the brand, age, or any other information you want to record.
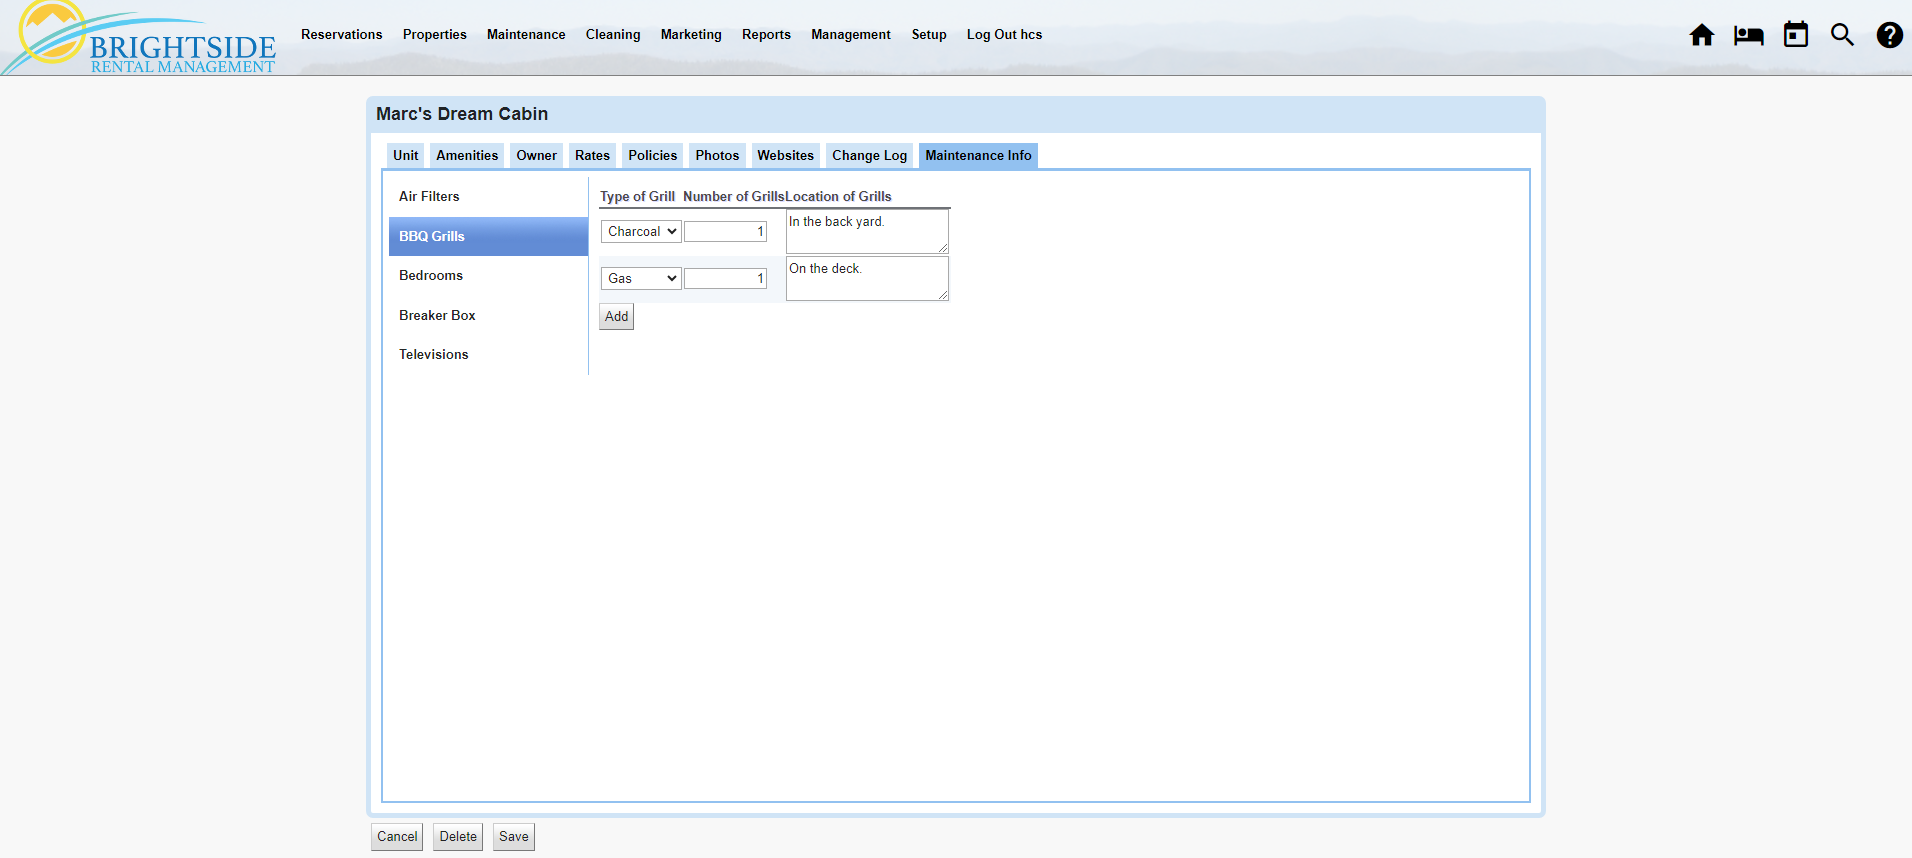
Unit / Maintenance Info / BBQ Grills
Click on Image for Enlarged View