Summary
In this tutorial we will discuss how to select the default settings for new reservations, both for online booking and within BrightSide. These settings impact all reservations.
Navigate to: Setup > Settings > Reservations
HINT: The “Reservations” section of the setup page is found in the left hand column, just below “Email” and above “Guests.”
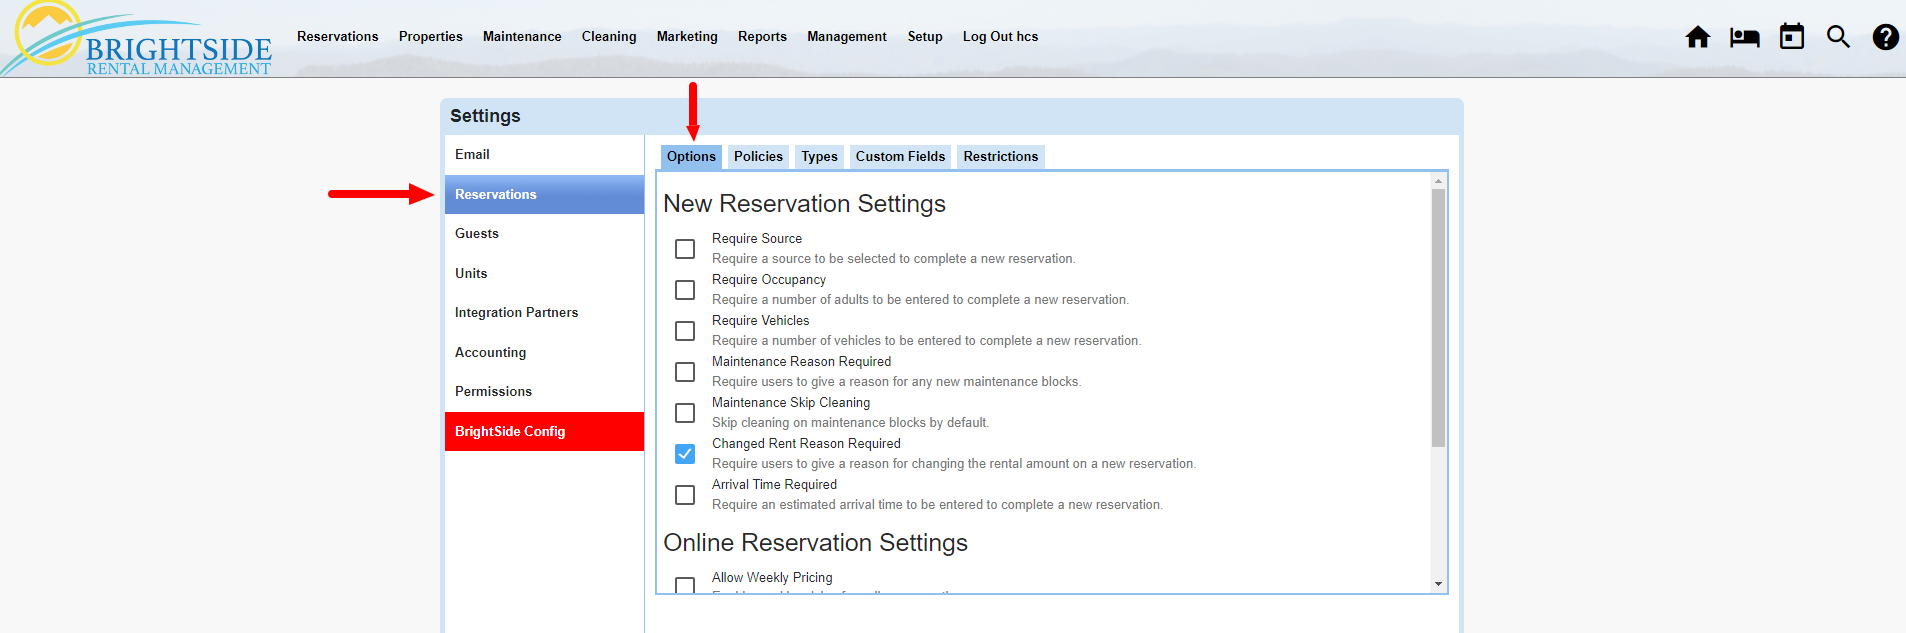
Options Tab
The reservation settings chosen here determine the requirements needed for each booking. For example, if you want to require the source of the reservation to be input, select that option here. This helps you track where the reservation came from; a phone call, Airbnb, VRBO, or some other source.
HINT: These settings can be changed when needed.
Click on Image for Enlarged View
New Reservation Settings
The following requirements have tick boxes next to them. If you want to make it a requirement for every reservation, just tick it to activate.
- Require Source: require a source to be selected to complete a new reservation. Common sources used include Airbnb, VRBO, Phone Call, Booking.com, Walk-In, Online, etc. When you require this, you can utilize reports letting you know where your reservations originate.
- Require Occupancy: require a number of adults to be entered to complete a new reservation. If your property sleeps six, you need to know if they intend to have 16 guests. If they have more guests than the current unit accommodates, you can refer them to a larger capacity unit.
- Require Vehicles: require a number of vehicles to be entered to complete a new reservation. If you have parking for two vehicles, they need to let you know how many they intend to park at your property.
- Maintenance Reason Required: require users to give a reason for any new maintenance blocks.
- Maintenance Skip Cleaning: skip cleaning on maintenance blocks by default.
- Changed Rent Reason Required: require users to give a reason for changing the rental amount on a new reservation. If your reservationist, or someone else, changes the posted rental fee, require them tell you why they did it.
- Arrival Time Required: require an estimated arrival time to be entered to complete a new reservation.
Online Reservation Settings
- Allow Weekly Pricing: this enables weekly pricing for online reservations.
- Allow Monthly Pricing: this enables monthly pricing for online reservations.
- Enable Test Card: enable a one time use of Visa test card # 4111-1111-1111-1111 on the website.
- Advance Notice: To prevent same day online bookings, enter the number of hours prior to the end of the arrival day required to book. Usually 24 hours or more.
- Max Advance Notice: Limit the number of days in the future guests are able to book online. For example, if you don’t want bookings a year in advance, this is where you limit it.
NOTE: Airbnb does not accept arbitrary numbers here. If you enter 547 days for 18 months, they will round this DOWN to one year. If you want to offer more than a year on Airbnb, etc., just enter “0” here, and guests will be able to book the maximum 24 months in advance. Those are your two choices for Airbnb, one year (or less) or two. Keep in mind, this will impact reservations on your own website also.
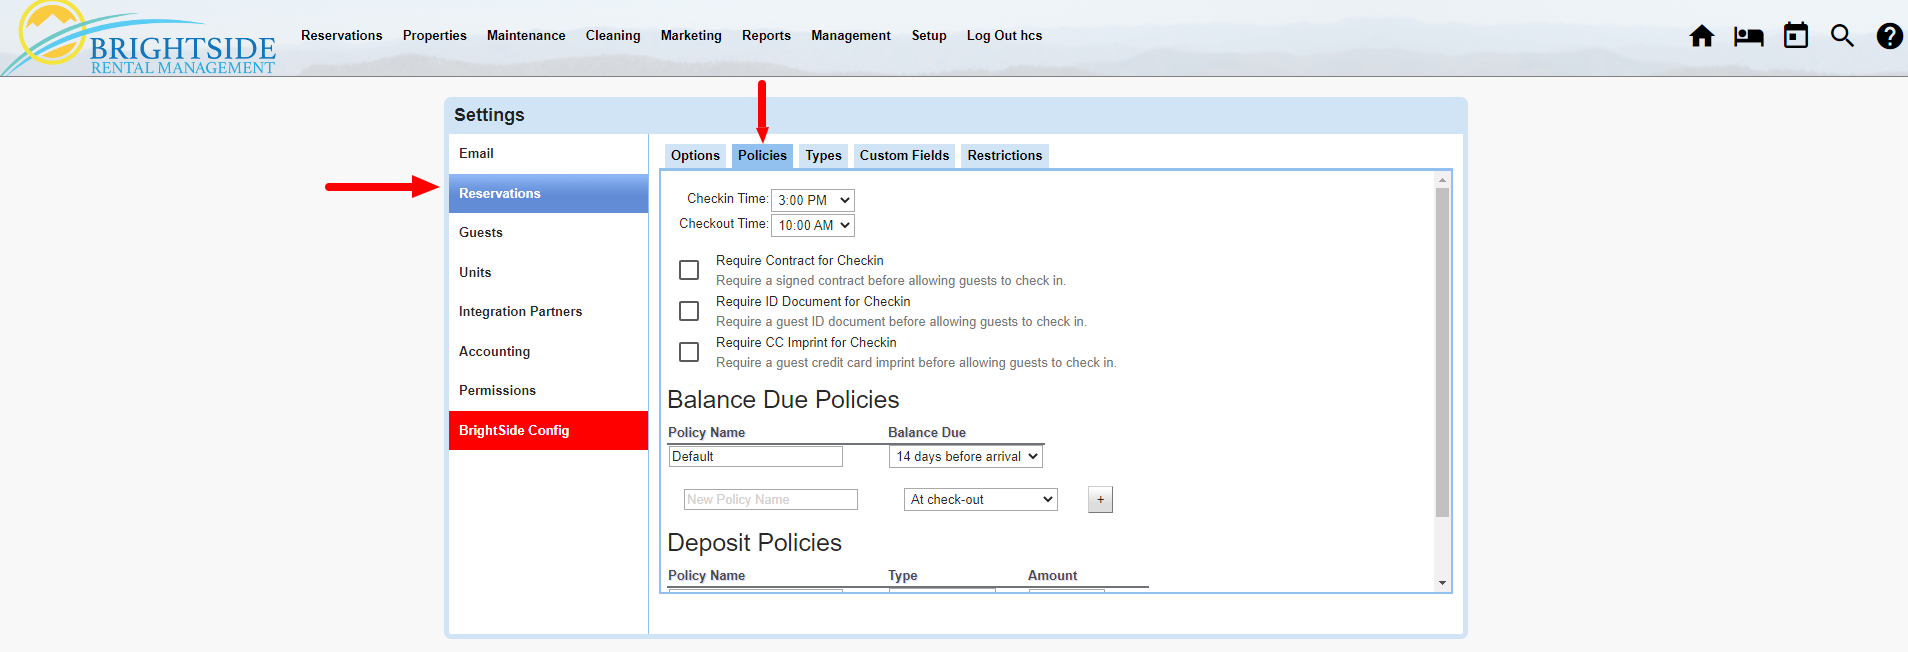
Policies Tab
Policies are critical to allow BrightSide to work as intended. Every channel you utilize, from your company website, to Airbnb, VRBO, or your front office, need the policies to be set here.
HINT: Airbnb, VRBO, and Booking.com will all reference your policies to determine how much of a deposit you require and when balances are due from guests.
Click on Image for Enlarged View
Check-In / Check-Out Times
Set the default check-in and check-out times here. This time will show up in your guest letters, website, and a host of other places. You may override this setting in the setup for an individual unit if it has a different check-in and check-out time.
Required Documents for Check-in
- Require Contract for Check-In: require a signed contract before allowing guests to check in.
- Require ID Document for Check-In: require a guest ID document before allowing guests to check in.
- Require CC Imprint for Check-In: require a guest credit card imprint before allowing guests to check in.
Balance Due Policies
You can create a number of balance due policies, depending on your needs. Most property managers use only one for all their properties. However, if you want to have separate balance due policies for various units, set them up here. When you add units/properties in BrightSide, you will choose which of these policies applies to that unit.
- Policy Name: if you have more than one balance due policy, give them a distinguishing name. For example, if you require the balance due 15 days before arrival on some properties, name it “15 Days Before Arrival.” If you have other units requiring the balance due 30 days prior to arrival, name it “30 Days Prior to Arrival”.
- Balance Due: select from the dropdown menu when you want the balance to be paid. You can select from 90 days prior to arrival, at check-in, check-out, or any number of days in between.
HINT: You may apply only one balance due policy to any given unit.
Deposit Policies
Most management companies use only one deposit policy. However, just like balance due policies, you may create more than one policy if needed.
- Policy Name: if you will have more than one deposit policy, give it a distinguishing name, like 50% Deposit.
- Type: select which method of determining the deposit you want to use. You may choose from Flat Fee, % of Total, % of Charges, and # Nights Rent.
- Amount: enter the deposit amount required according to the method chosen. If you chose Flat fee, enter the amount here. If you chose % of Total, enter the percentage you require; for example, 50.00. For a number of nights rent, enter the number of nights you want to charge up front.
HINT: You may apply only one deposit policy to any given unit. Currently, we do not have a feature allowing for multiple deposits to be made at timed intervals.
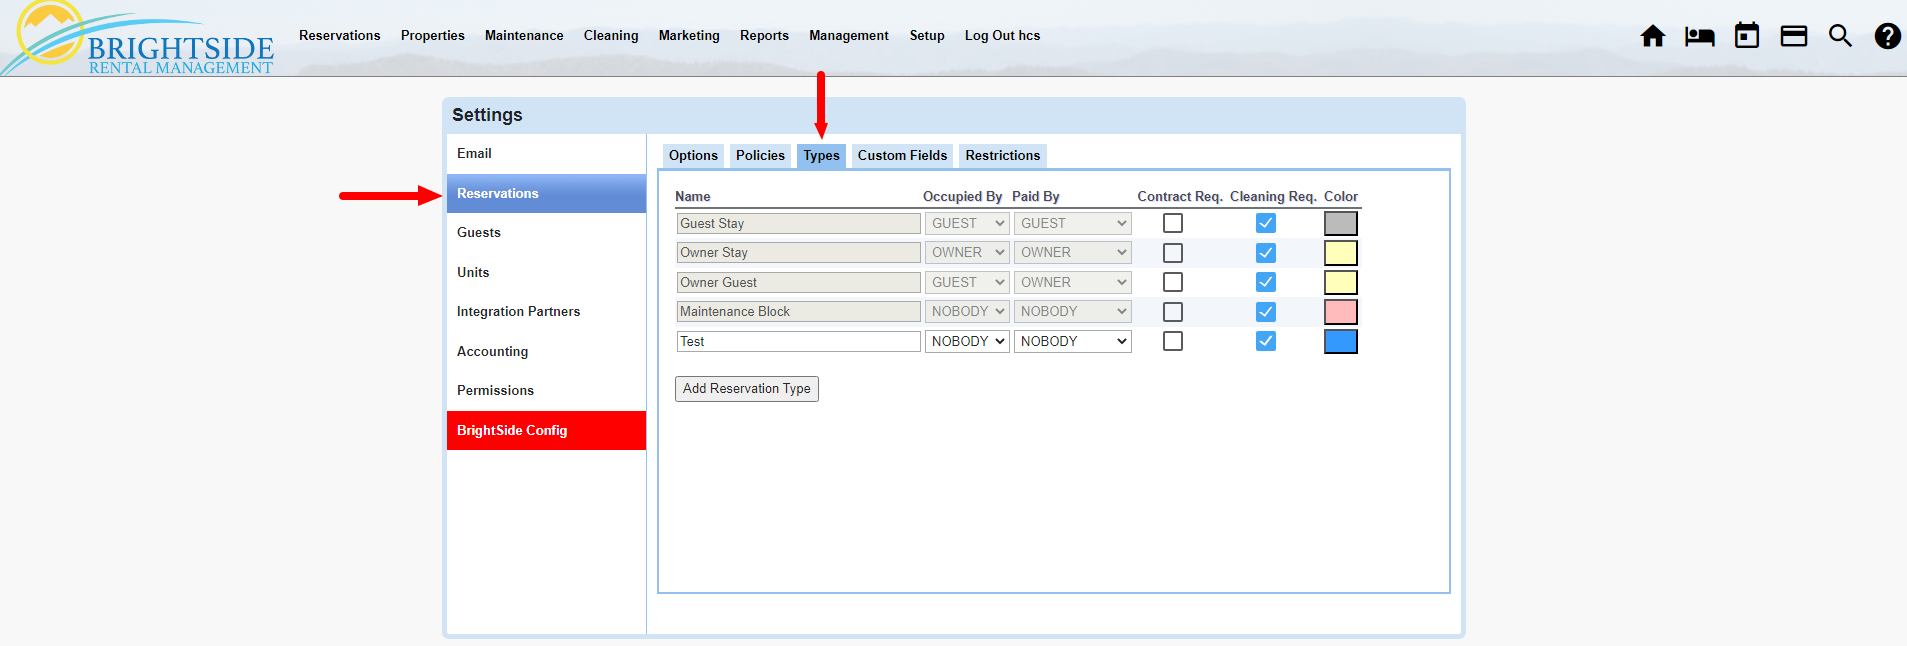
Types Tab
A number of reservation types are inherent to BrightSide. Since not all reservations are paying guests, BrightSide gives you options to block off days and assign them a “type.” The most common types are “Owner Stays” or “Maintenance Block.” Another type of reservation is an “Owner Guest.” You may create your own type if needed.
Click on Image for Enlarged View
Types of Stays
The four types of stays already in your BrightSide account are Guest Stay, Owner Stay, Owner Guest, and Maintenance Block. If you need other types, you may add them here.
- Name: if you need an additional stay type, name it here.
- Occupied By: let the system know who will be staying in the unit, if anyone.
- Paid By: who will be paying for this stay, a guest, the owner, the owner’s guest, or nobody.
- Select if a contract is required for this stay, if cleaning is required for this stay, and a color to show on the calendar.
HINT: If you deselect “Cleaning Required” for any of these stays, the unit will not be marked as dirty when they check out. If an owner chooses to clean their own unit after a stay, you may make adjustments in the unit’s Rates tab. Depending on how you manage it, cleaning may not be required after a maintenance block, so you can deselect it here.
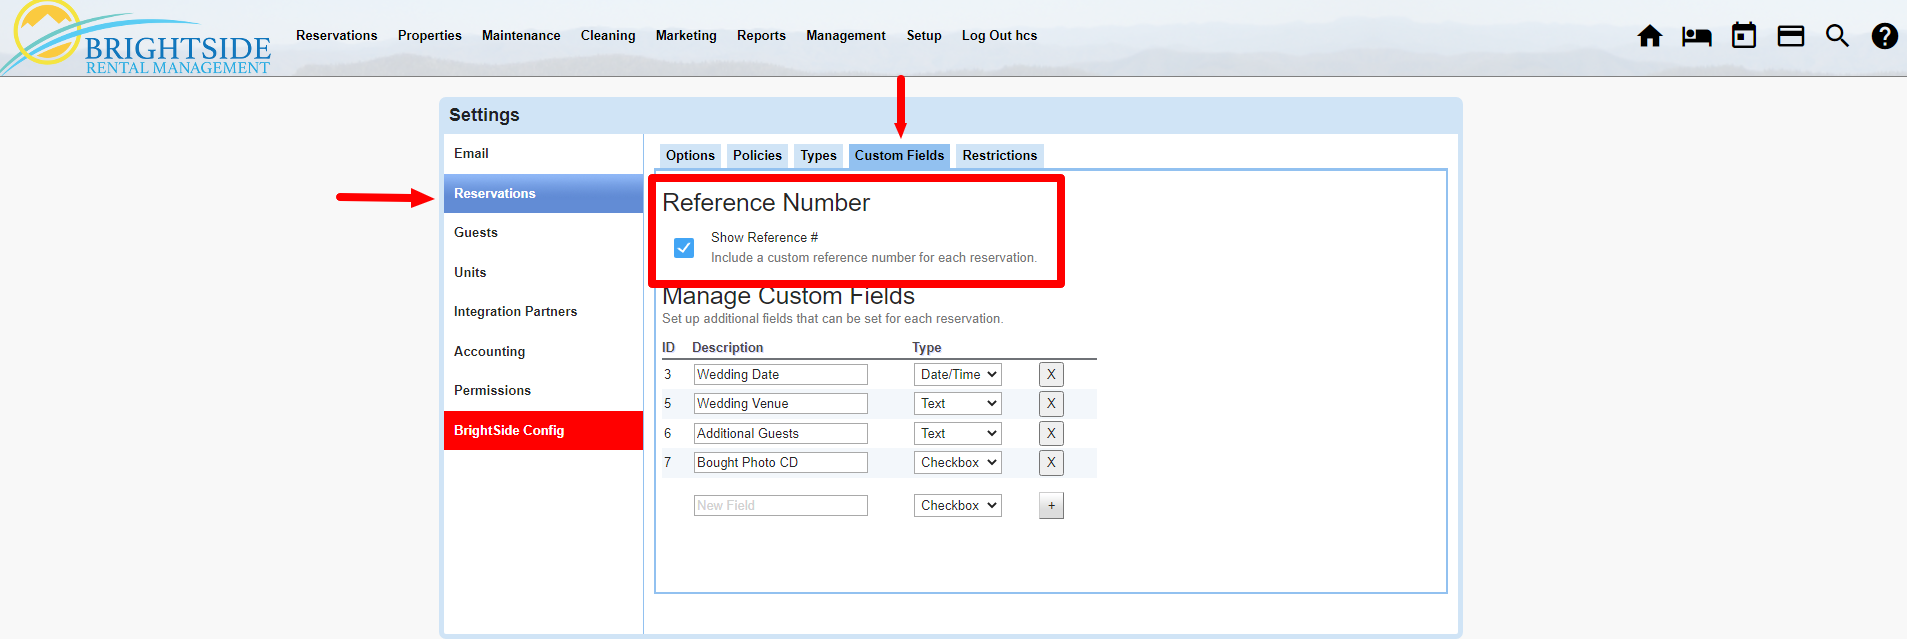
Custom Fields Tab
Reference Number
Reservations are assigned a unique confirmation number, automatically generated by BrightSide, regardless of the source of the reservation. When reservations are booked through OTA channels, like Airbnb or Booking.com, their system sends over a reference number that is stored in BrightSide. That unique number can be found inside the reservation, identified by “Reference #”.
- Show Reference #: to activate the reference field in your reservations, tick this box (highly recommended).
Click on Image for Enlarged View
Alternative Uses for the “Reference #” Field
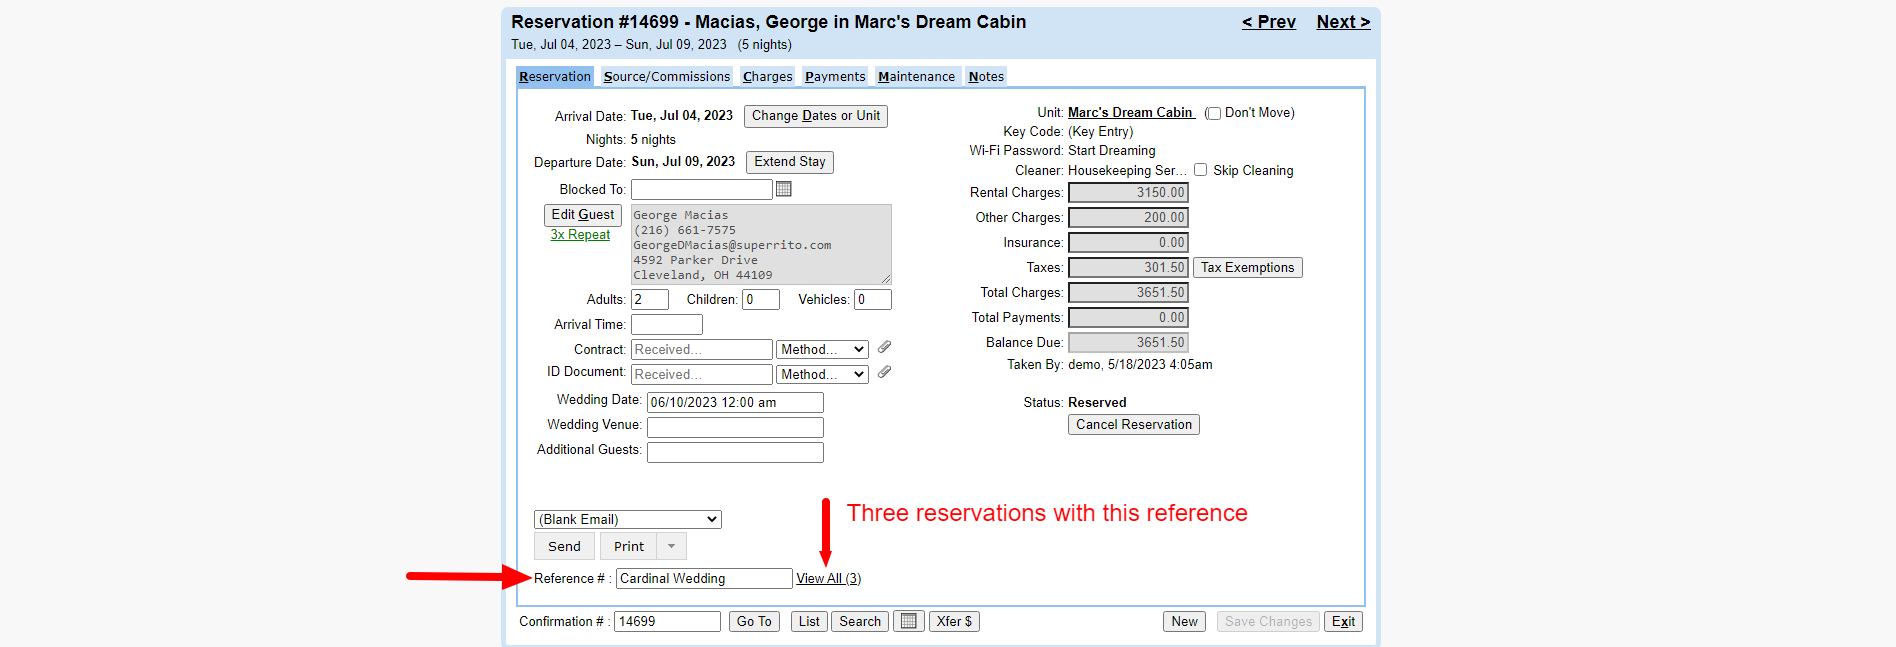
If a reservation is booked through an OTA, their reference number will populate this field in BrightSide and cannot be removed. If, however, the reservation is booked from your website or by phone, the reference field goes unused and you can use it in other ways.
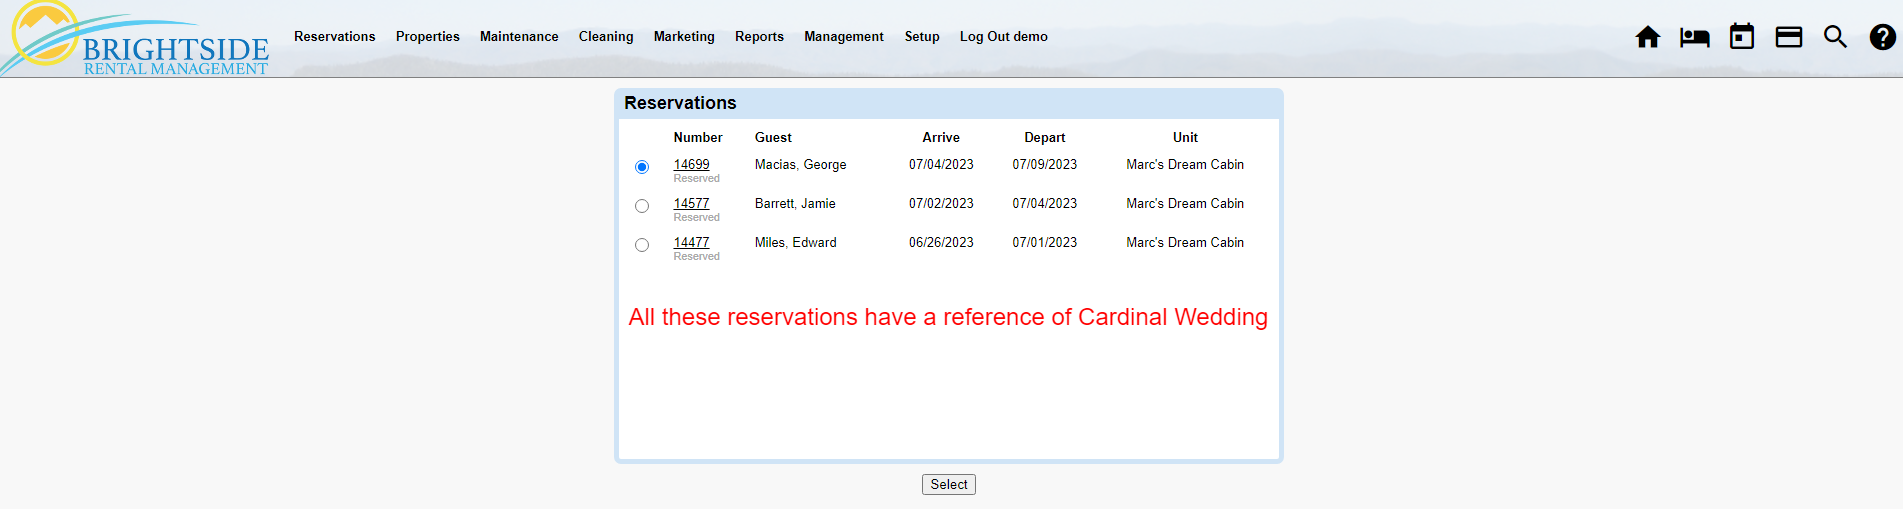
For example, you could use it to connect multiple reservations for a singular event, like a wedding. The screenshot below is a reservation that includes the Reference #: Cardinal Wedding. Any other reservation using that same reference can be viewed as a list.
Click on Image for Enlarged View
Click on Image for Enlarged View
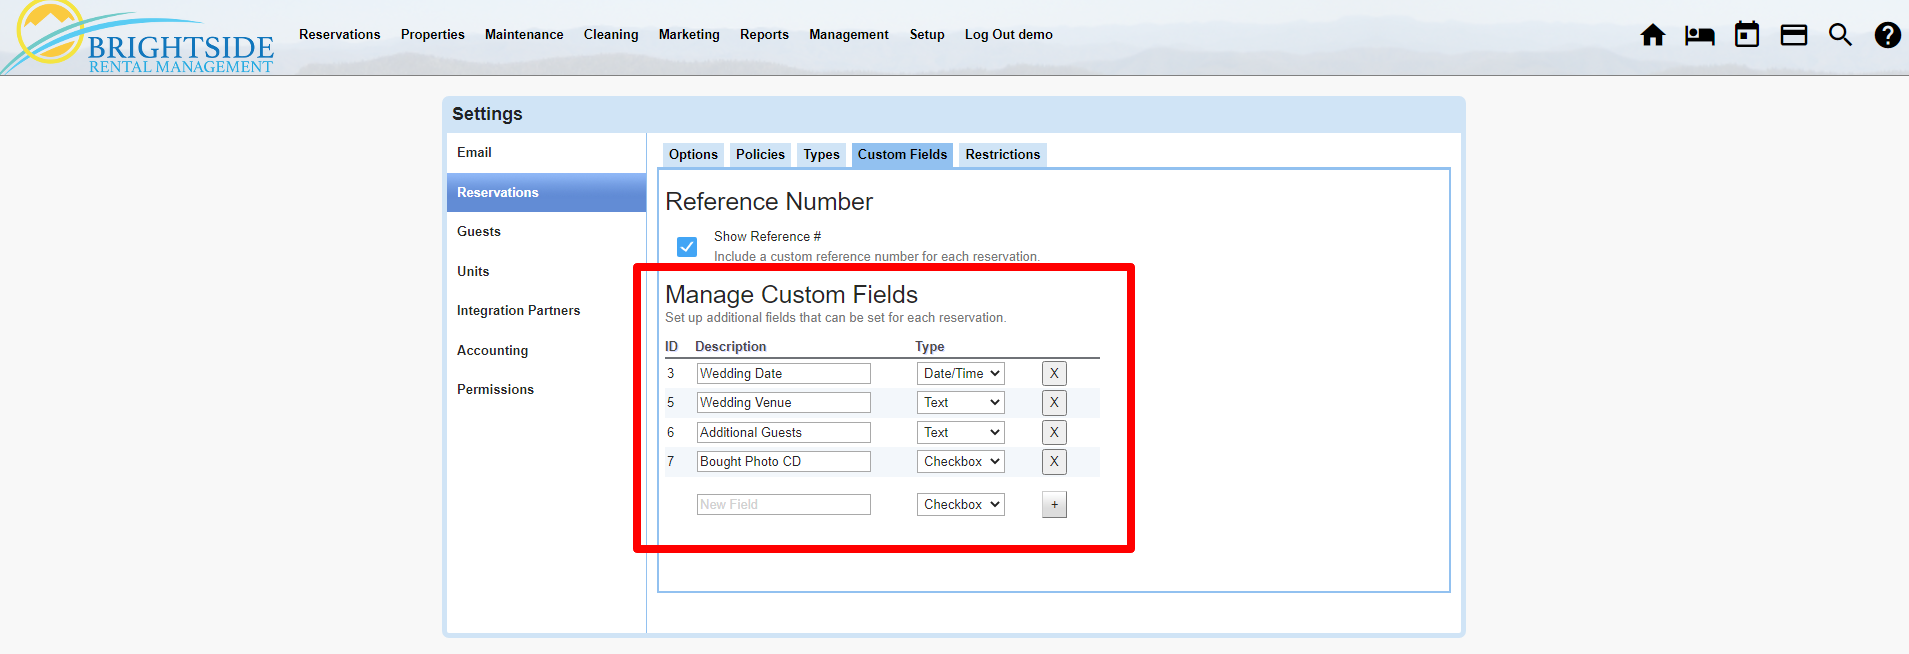
Manage Custom Fields
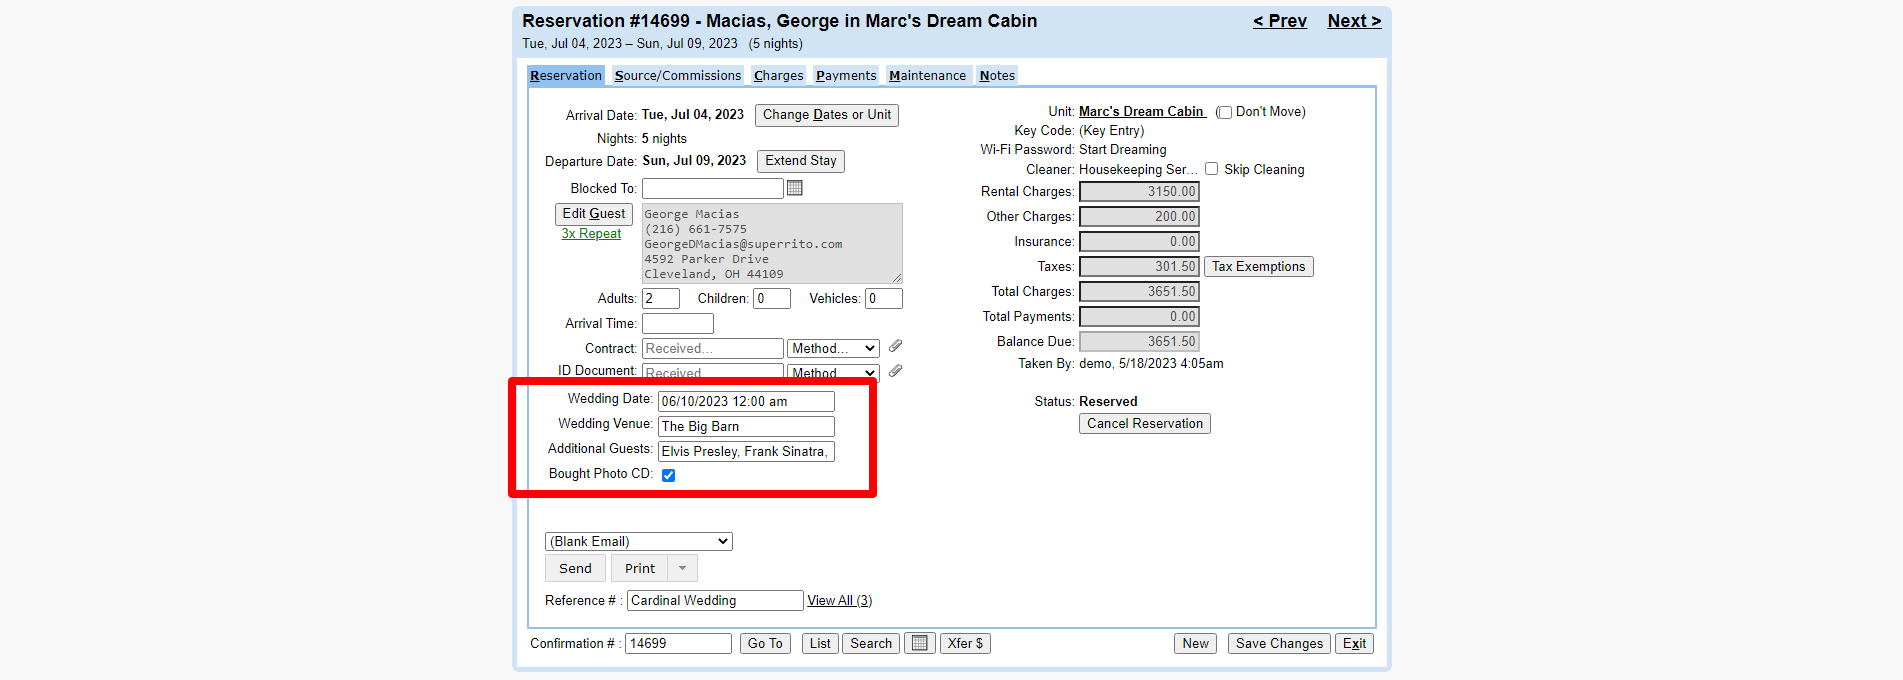
You may want to add a custom field on your reservation form for easy reference. For example, if you have units people rent frequently while attending weddings, you could set up custom fields to add the wedding information. In the screenshot below, we added custom fields for the wedding date, wedding venue, additional guests who may be staying in the unit, and a tick box to indicate if they purchased a photo CD.
A number of custom fields may be created from three different types; Date/Time, Text, or a Checkbox. This example shows all three available types of custom fields in use. Feel free to create custom fields that will help you.
HINT: These fields are not searchable and will not show up anywhere but on the reservation form.
Click on Image for Enlarged View
To create custom fields for reservations follow the steps below.
- Description: this description will show up in the reservation.
- Type: choose a type from the dropdown menu. You may choose from Date/Time, Text, or a Checkbox.
- After doing the first two steps, click the + box and it will be saved.
HINT: When you create these custom fields, they will show up on every reservation for every unit.
Click on Image for Enlarged View
Restrictions Tab
Occasionally, you may want to create a check-in or check-out restriction for one or all of the units in your portfolio. In this section, we will show you how to create a restriction.
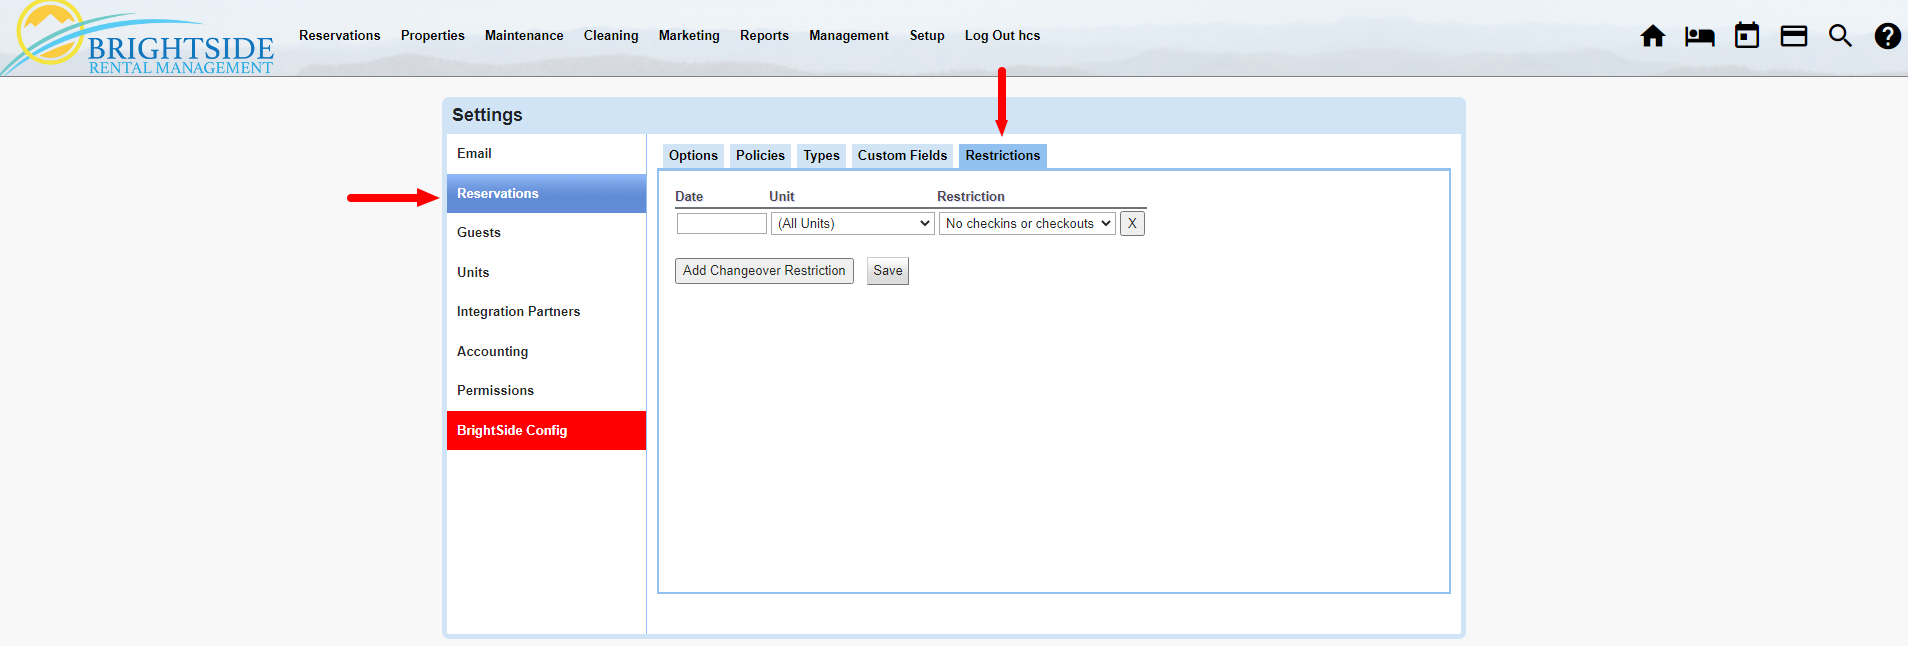
Click on Image for Enlarged View
What are Restrictions?
Restrictions are used for two purposes: to prevent check-ins on a specific day, to prevent check-outs on a specific day; or both. This is useful when you do not have any staff on hand to clean the unit, or perhaps it is a holiday and no one is in the office to check guests in or out.
Some property managers use this feature for Thanksgiving Day, Christmas Day, and July 4th. If you are available 24/7, year round, you likely will never use this feature.
Add Restrictions
- Date: enter the date you need to restrict a check-in and/or check-out.
- Unit: you may apply this restriction to one unit or all units. If you need to apply it to more than one unit, but not all, you need to create a separate restriction for each unit.
- Restriction: choose from “No check-in or checkouts,” “No check-ins,” or “No Check-outs.”
- Save
- If you need to add another restriction, click “Add Changeover Restriction.”
HINT: Restrictions do not autodelete after they expire. You need to delete expired restrictions manually to keep the list clean and current.