BrightSide Software logo

Short Term Vacation Rental Software
Hospitality PMS

Our cloud-based hospitality software is both powerful and easy to use. But more importantly, our support team is here for you, ready to help make your user experience the best it can possibly be.

  1. BrightSide is powerful and easy to use from anywhere you have Internet access.
  2. BrightSide’s API integrates directly with Airbnb, Vrbo, Booking.com, Google Vacation Rentals and others.
  3. BrightSide support responds to email requests in minutes or hours, not days or weeks. No AI, real people.
  4. BrightSide support answers the phone. If we can’t answer, leave a message and we will call you back. Really.
  5. BrightSide is affordable. We do not add charges for features; it’s all included in the subscription.

About BrightSide Support

This author has not yet filled in any details.
So far BrightSide Support has created 35 blog entries.

Create a New Reservation

2024-04-11T16:26:50-04:00

Summary

In this tutorial, we will go over the basics of creating a new reservation from within your BrightSide dashboard. You will learn how to:

  • Create a new reservation beginning with the main menu or the icon menu.
  • Search for available properties using stay dates.
  • Add search criteria for finding available properties.
  • Apply predefined specials.
  • Select the best property for the guests.
  • Add guest’s information to the reservation.
  • Enter referral information.
  • Review and/or change reservation charges.
  • Take a payment from the guest.

You may choose to create a reservation from the unit calendar if you prefer. The unit calendar provides a visual of availability across a full month for all units. Learn more about using the unit calendar.

Steps to Creating a New Reservation

This section of the tutorial focuses on creating a new reservation from the “main menu” in your BrightSide dashboard.

HINT: Instead of using the menu navigation illustrated below, you may click on the “Bed Icon” shortcut located in the upper righthand corner of your dashboard. It saves a step, and it takes you to the same place as the main menu.

Navigate to: Reservations > New Reservation

1. Search for Availability

Creating a New Reservation in BrightSide from Main Menu

Click on Image for Enlarged View

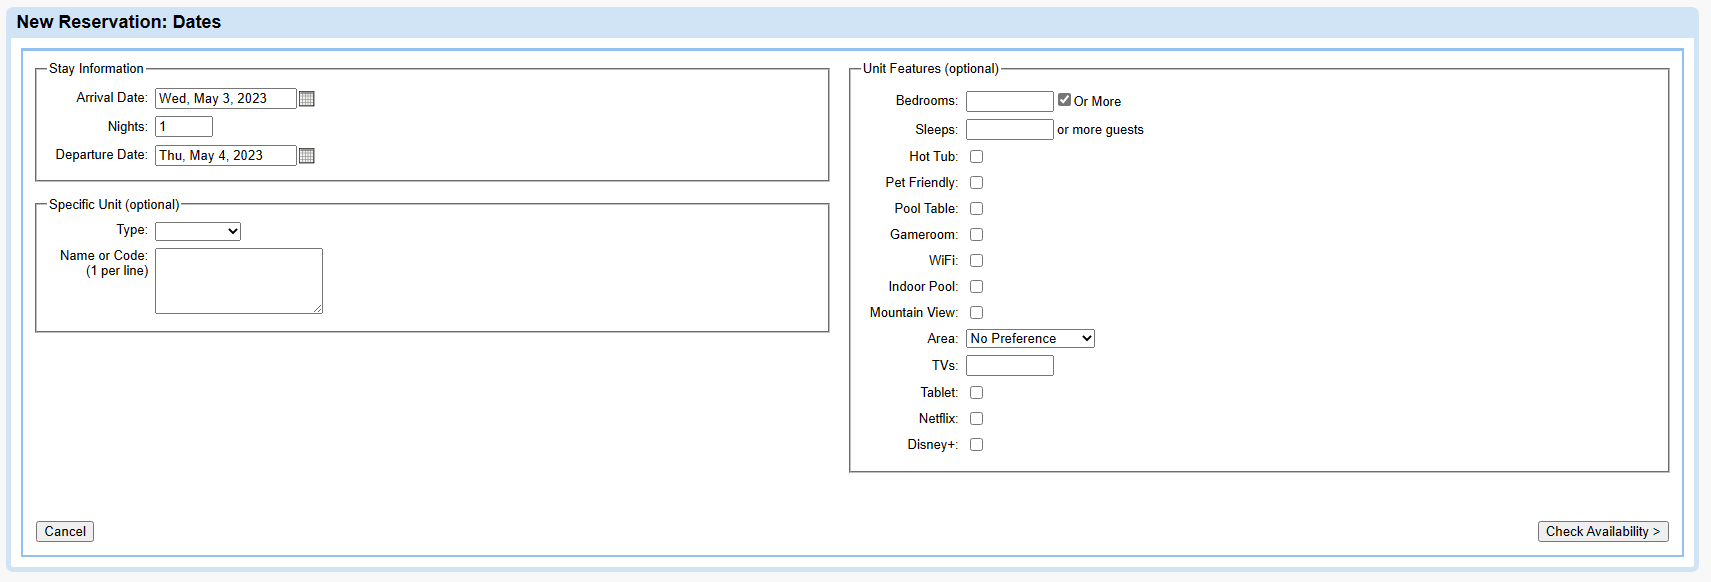
This page is basically a search form, using preferred dates, amenities, and more, to find an available property.

Stay Information

  • Begin by entering the arrival date your guests have chosen.
  • Next, you may enter the number of nights they want to stay OR enter the departure date.

HINT: At this point, you may bypass entering any further search parameters and click on “Check Availability.” This will return all available units for those dates without any further filtering. If you want to narrow it down, stay on the page and complete the following.

Specific Unit (optional)

  • Type: Choose which type of unit you want.
  • Name or Code: If you want a specific unit, enter the unit’s code or at least part of the unit’s name, or the whole name. Sometimes less is better, since you must enter the whole name exactly if you type it in. You may enter more than one unit but be sure to place each one on a separate line.

Unit Features (optional)

  • Choose which features the guest is requesting to have in their unit. These features should be a guest’s “must have”, since choosing too many will leave you with few options.

After filling out this form, find which units are available by clicking “Check Availability.” All the properties with the features you requested, and are available during the time selected, will populate the next screen.

2. Select a Qualified Unit

Select a Qualified Unit to Reserve

Click on Image for Enlarged View

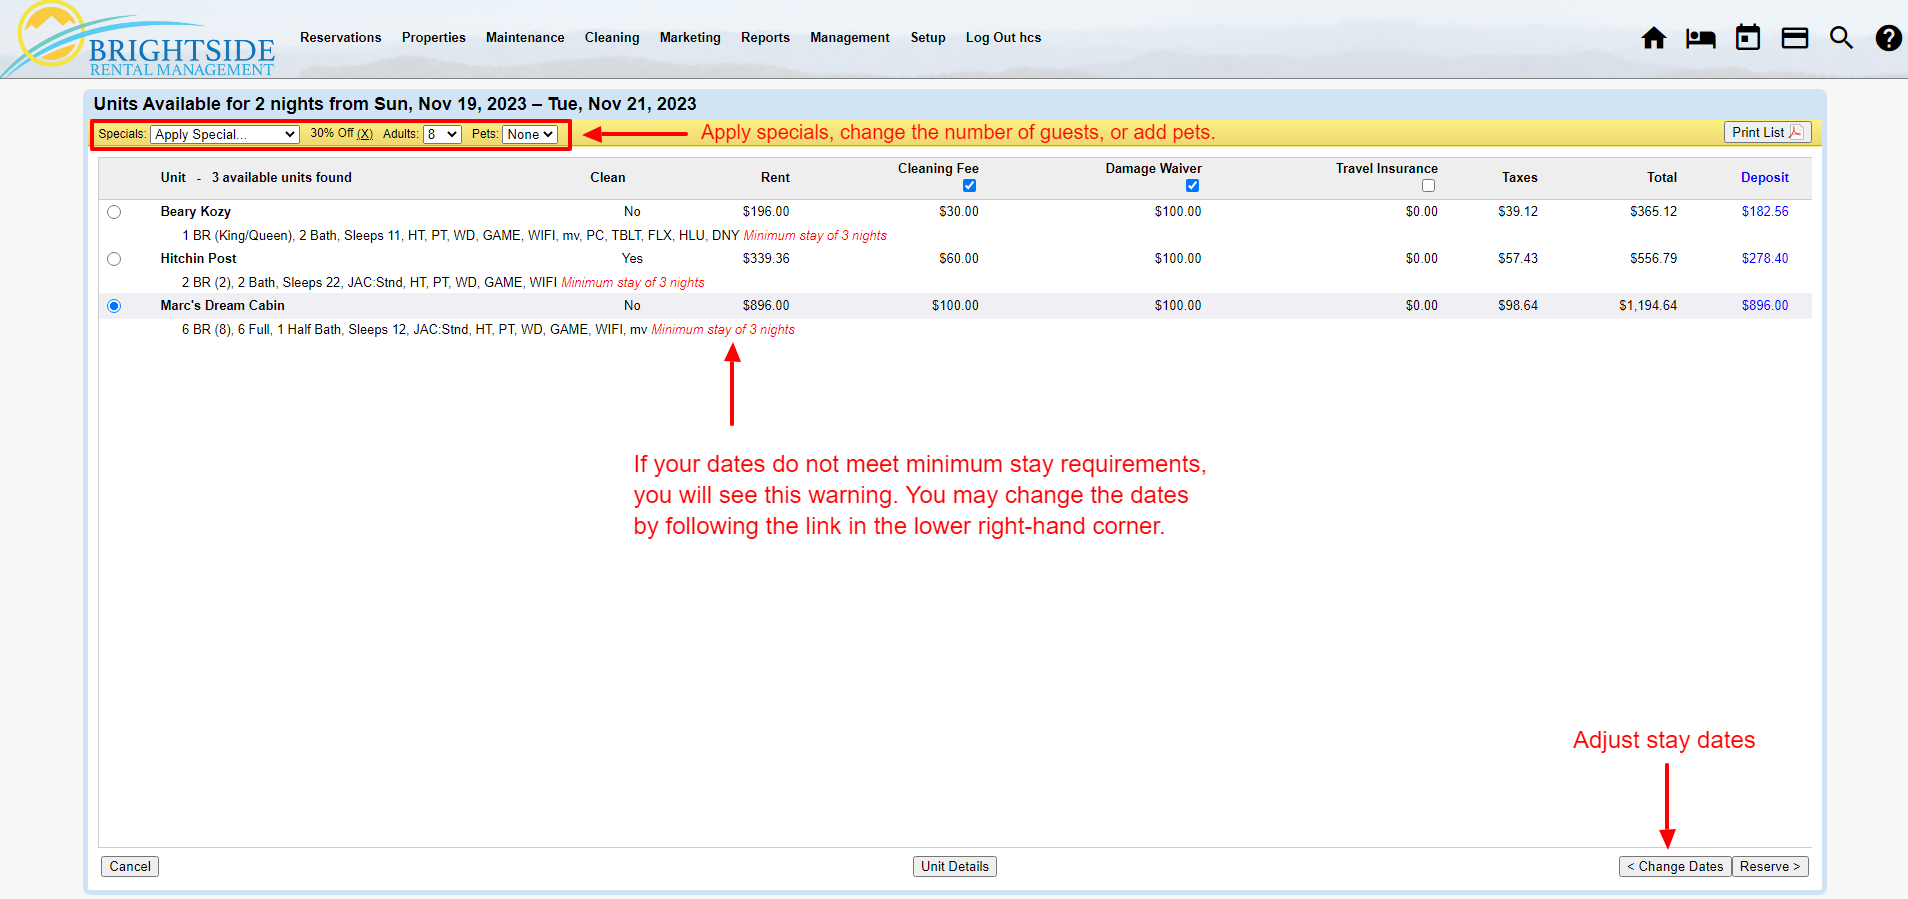
The second step in making a reservation in BrightSide is selecting the most qualified unit for the guest. This second screen provides search results from step one, although you may continue to narrow down options in this screen.

Review the Dates

  • Double check the dates at the top of the screen to make sure they are what you intended.
  • All of the available units are listed on this page. In our example, there are only three units fitting the criteria we set in step one.

HINT: If you need to adjust the dates, click on “< Change Dates” in the lower right corner.

Apply Specials (optional)

  • If you have created any Specials, you may apply them here. Specials can be based on percentages, free days, or repeat guest discounts. When you apply a special, the price will adjust automatically for each unit below.

Change Number of Guests

  • If you need to adjust the number of guests, you may do it on this screen. When you alter it, the available units may change depending on the occupancy levels of each unit.

Pets

  • Make sure to select the number of pets the guests will bring from the dropdown menu. Properties not accepting pets will be eliminated from the list of available units.

Review Available Units

  • The list of available units provides a summary of amenities for each. If there is a minimum stay requirement, a red notice will appear next to the description, giving you an opportunity to adjust the dates and book more nights. However, as a backend user, you may continue to create the reservation for less than the minimum stay requirement. A guest booking online will not be able to override the minimum stay requirement.
  • You may untick fees to remove one or add one if the fee is not mandatory, like taxes.

HINT: Placing your cursor over the dollar amount under the “Rent” column will show you a nightly breakdown of the rent, including any special you have applied.

Selecting a Property

  • When you and your guest have chosen a unit, tick the circle next to it and click the “Reserve >” button in the lower right corner and move on to the next step.

3. Guest and Deposit Information

Edit the Guest and Deposit

Click on Image for Enlarged View

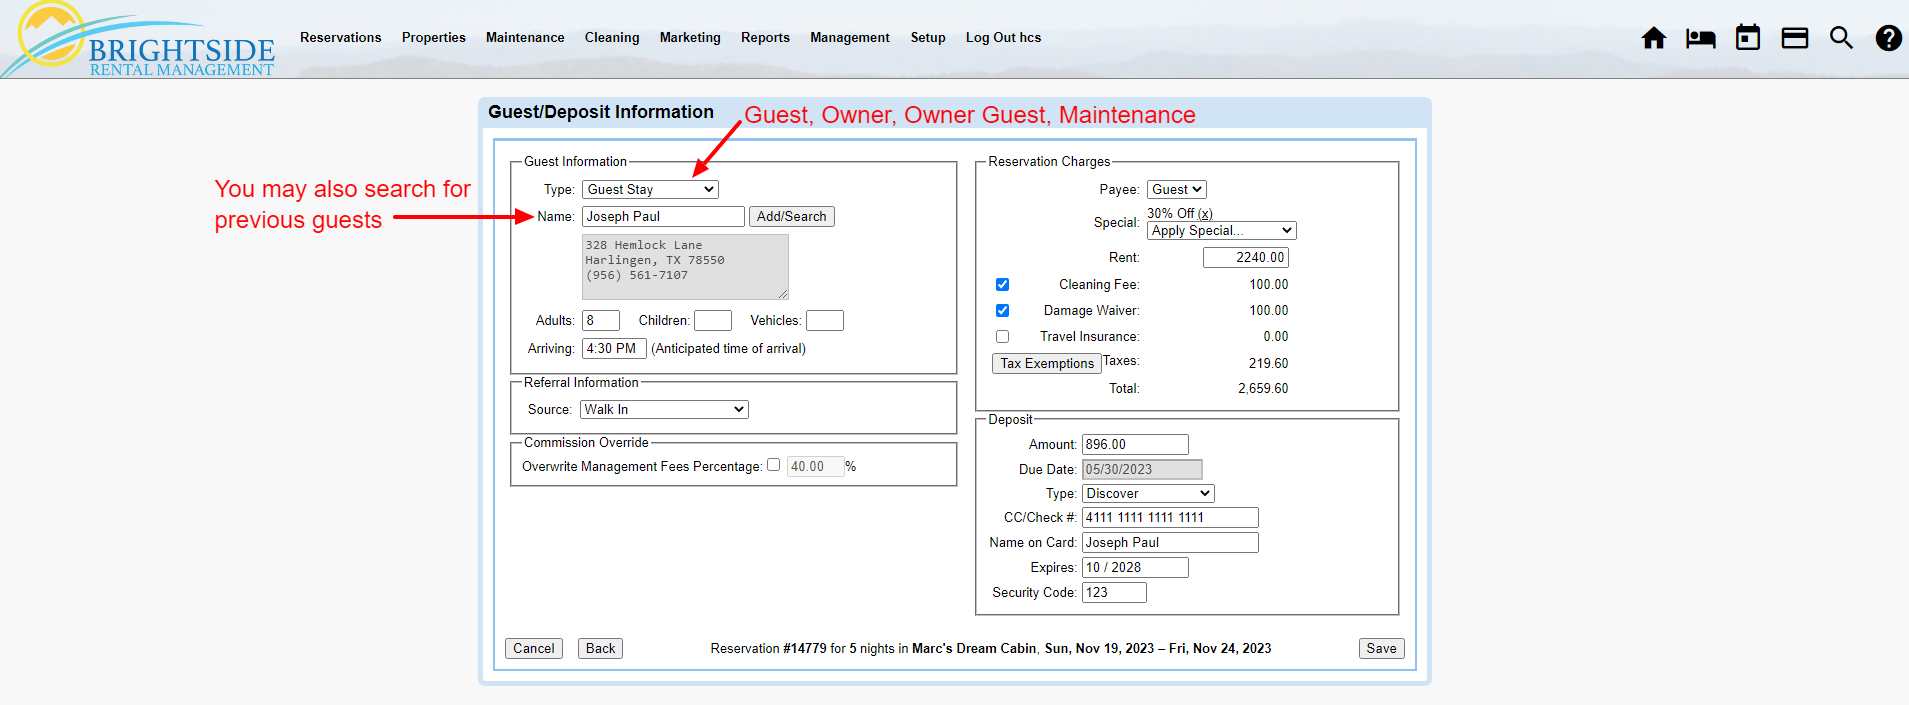
The third step in making a reservation involved gathering the guest’s information, reviewing the charges, and securing a deposit.

Guest Information

You must select which type of guest is making this reservation. Your choices are Guest Stay, an Owner Stay, an Owner-Guest Stay, or a Maintenance Block.

  • Type: Choose which type of guest is staying.
  • Name: You may add a new guest or search for a returning guest.
  • Miscellaneous: Confirm the number of adults, children, vehicles, and arrival time of the guests.

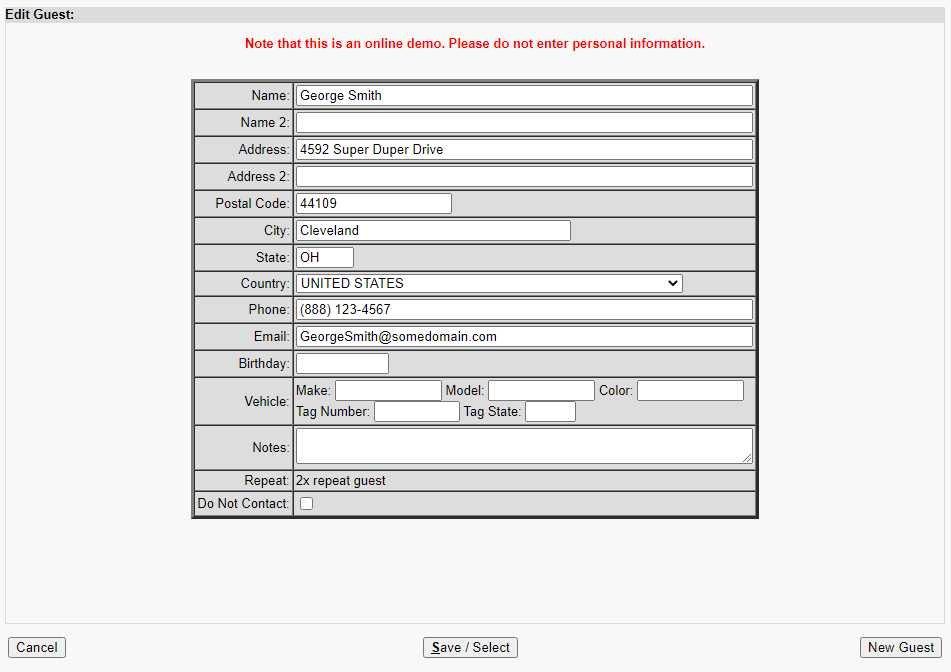
HINT: When adding a new guest, enter the first and last name into the “Name” field. The “Name 2” field is for the name of a second guest. Tick the “Do Not Contact” box to indicate that they are not to be contacted after they depart. This will prevent any marketing materials going out requesting reviews, etc. Checking this box will not impact any emails the system sends out regarding their reservations and stays.

Edit the Guest Information

Click on Image for Enlarged View

Referring Information

  • In order to track the source of your booking, select a referral source from the dropdown. This will come in handy when you want to run a report providing details of where your bookings are coming from.

Commission Override

  • You may change the management fees for this booking if needed.

Reservation Charges

  • Payee: Select who is paying for this reservation. In most cases, it will be the guest.
  • Specials: You can change the special on this reservation or remove it altogether.
  • Rent: Make a manual adjustment to the rent if needed.
  • Other Fees: Miscellaneous fees can be added or removed from the reservation. Some of the fees include cleaning, damage waiver, reservation guarantee, travel insurance, etc. If there is a tax exemption, you may apply it here.

HINT: Placing your cursor over the dollar amount next to “Rent” will activate a popup with the breakdown of the nightly rent, any specials applied, total savings, and average nightly rate.

Deposit

  • You may accept a deposit by entering the guest’s credit card information. If you have received a payment in another form (cash, check, money order, etc.), you may add it here as well.

Save

Saving the reservation will make the stay active in the system and block off the dates in all channels.

Create a New Reservation2024-04-11T16:26:50-04:00

Search for an Existing Reservation

2024-04-11T16:24:04-04:00

Summary

Learn how to find an existing reservation using our Reservation Search form. You can search using a number of criteria. Just enter the information in the corresponding field and then click “search.”

Navigate to: Reservations > Reservation Search

Reservation Search

You can search using any of the fields in the form. We recommend using only one field at a time. The more fields you use, the less likely you are to return a result.

Reservation Search Tool

Click on Image for Enlarged View

Search Types

  • Search by Confirmation Number: Each reservation is assigned a unique number assigned by BrightSide. If you have it, enter it here and search for the reservation.
  • Search by Reference Number: Some reservations have a reference number, either assigned by the reservationist, or by an online travel agency.
  • Search by Guest Name: Less is more. You may enter partial or incomplete names, then choose from the list of results.
  • Search by Guest Email: Enter the guest’s email address.
  • Search by Guest Phone: Enter the guest’s phone number.
  • Search by Arrival Date: Enter the arrival date.
  • Search by Departure Date: Enter the departure date.
  • Search by Unit: Enter the name of the unit.

Search for an Existing Reservation2024-04-11T16:24:04-04:00

Transfer Payments Between Reservations

2024-04-11T16:23:10-04:00

Summary

This tutorial explains how to move a payment from one reservation to another existing reservation. Once you know what you are doing, moving a payment can take as little as 10 seconds in BrightSide.

Transfer the Payment

Before starting, make sure you have the confirmation number, and/or the name of the guest on the second reservation, the one receiving the payment transfer.

Easy Steps

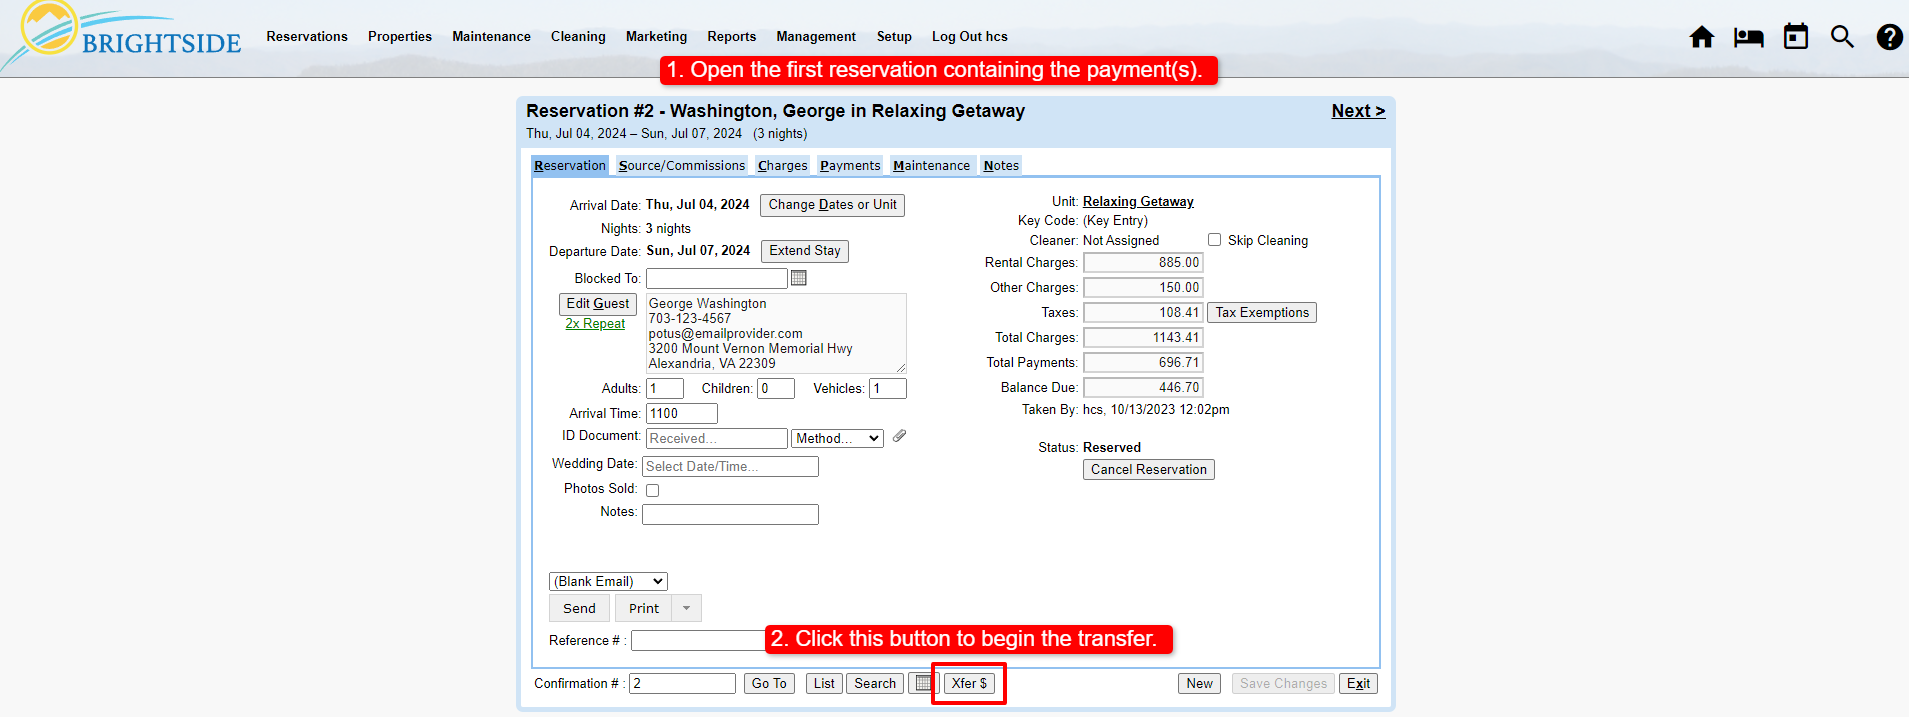
  1. Open: Begin by opening the reservation containing the payment you need to transfer.
  2. Xfer $: Click on the “Xfer $” button at the bottom/middle of the reservation card; a popup window will open.
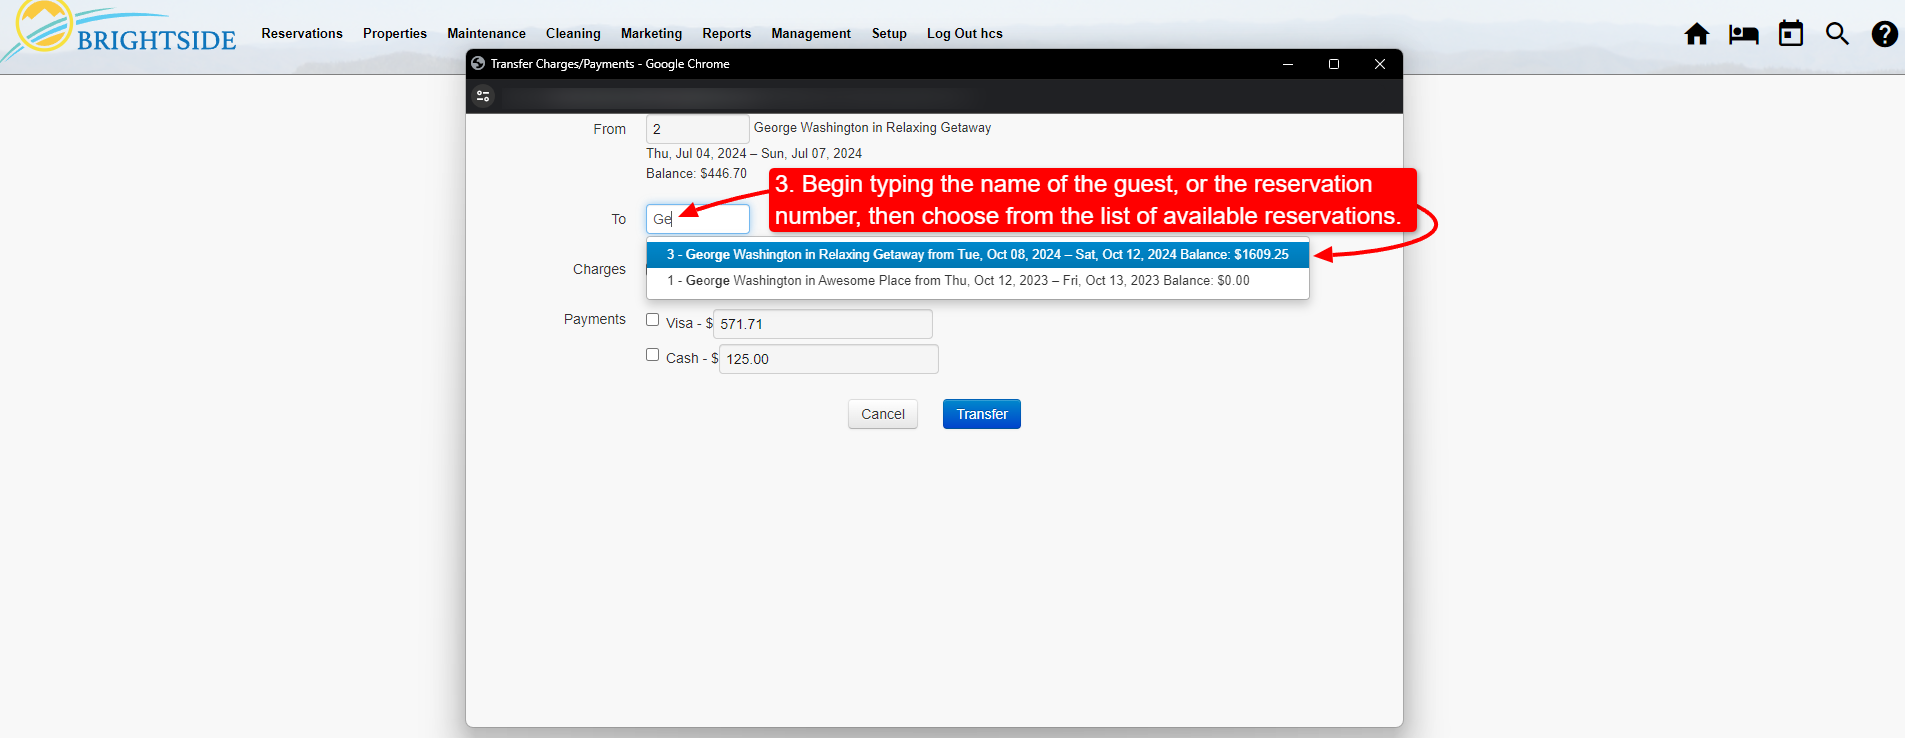
  3. To: In the “To” field, begin typing the name of the guest, or the confirmation number of the recipient reservation. BrightSide will provide options according to what you enter. Select the reservation you want to receive the payment transfer.
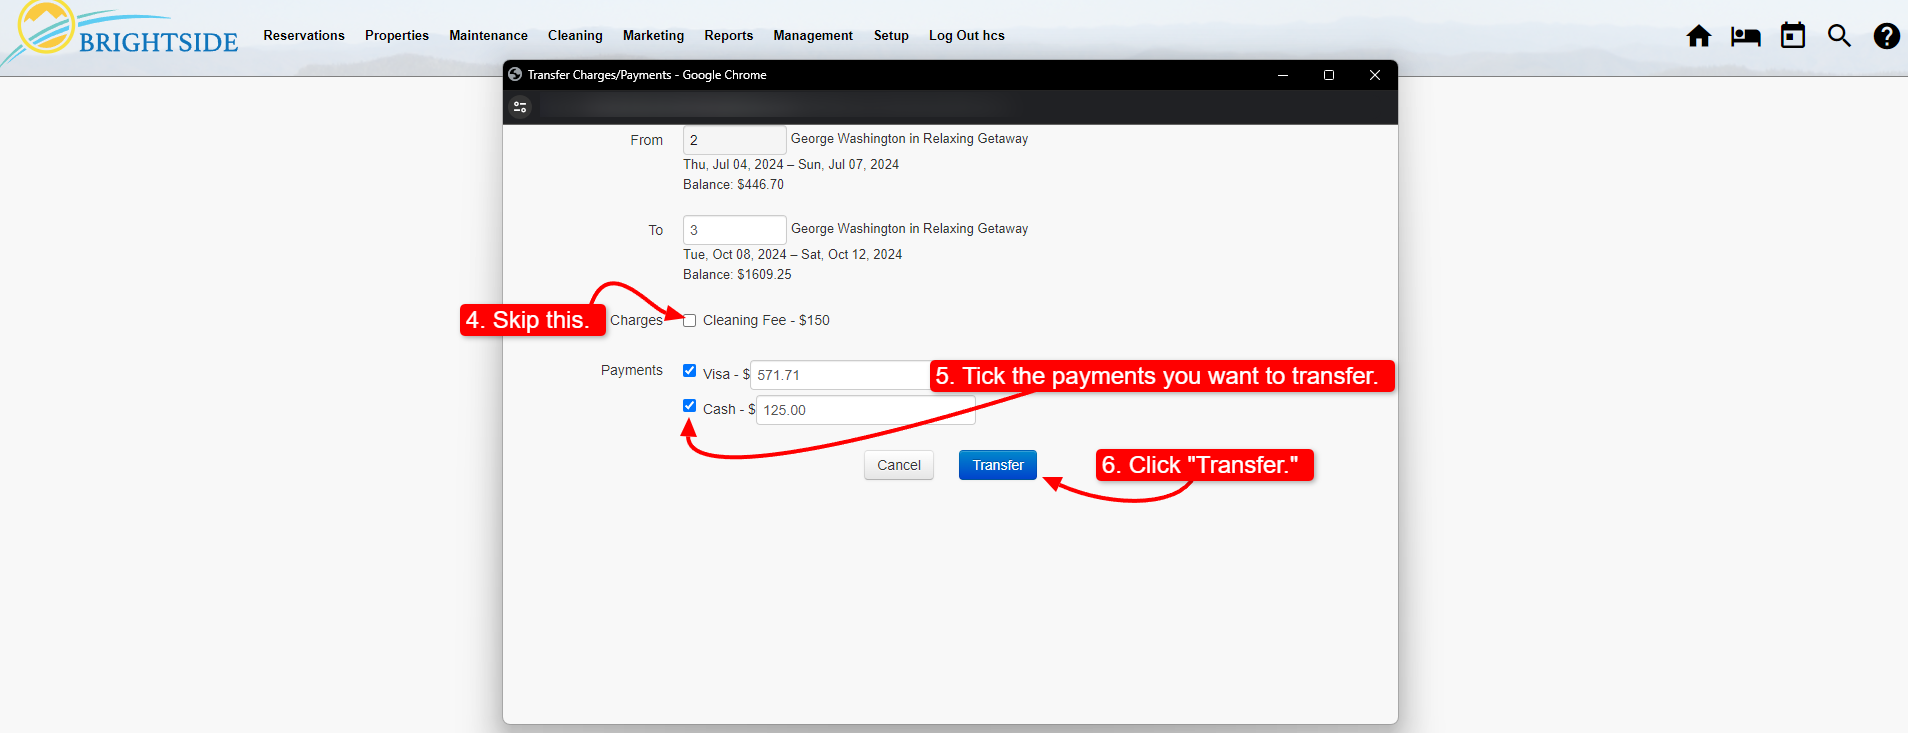
  4. Charges: DO NOT tick this box.
  5. Payments: Tick the box next to the payment(s) you want to transfer. If the guest made more than one payment, you may move one, or all, of the payments. You may even move a portion of a payment. In the sample reservation below, the guest made a credit card payment of $571.71. However, you may choose to move only a portion of that payment to the second reservation by selecting the payment, then editing the amount in the number field.
  6. Transfer: Click the transfer button to complete the transfer. The payment is now located in the second reservation.
Transferring Payments | Initiate the Transfer

Click on Image for Enlarged View

Transferring Payments | Select the Receiving Reservation

Click on Image for Enlarged View

Transferring Payments | Select the Transfer Amount

Click on Image for Enlarged View

Common Questions

  1. If I move a credit card payment from one reservation to another will I be able to charge the card again?
    • Yes, moving the payment moves the entire credit card transaction intact. When the next payment is due, you may charge the card.
  2. I don’t want to move the entire payment. How do I move just part of a payment?
    • Select the payment from the list. Change the dollar amount in the number field.

Transfer Payments Between Reservations2024-04-11T16:23:10-04:00

“Extend Stay” Tool

2024-04-17T15:00:30-04:00

Summary

After a reservation is booked, guests often ask to extend their stay by adding a single day, or more, to the beginning or end of a reservation. In this tutorial, you will learn how to add a day, or days, to a reservation by using the Extend Stay tool.

Navigate to: Open Reservation

Change Dates or Unit

When a guest wants to change their stay dates completely, or change the unit, you need to use the Change Dates or Units tool. That tools allows you to completely change the stay dates, the unit, recalculate rates, and add specials. Go to Change Dates or Unit tutorial for specific instructions.
However, if your guest just wants to add a night at the beginning or end of their existing reservation, use the Extend Stay tool.
Extend Stay Tool

This convenient tool allows you to easily add a day to a reservation. We recently updated this tool to allow you to pre-pend a day to a reservation, not just add a day to the end like before. If you offer guests a discount to fill gap nights, this is the perfect way to fill those nights without adding additional fees.

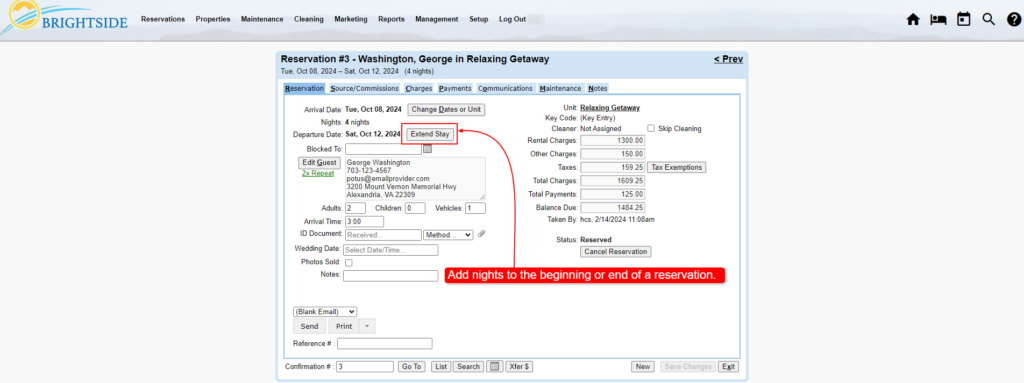
Open the reservation and click on “Extend Stay.” Then follow the next steps to easily extend the stay.

Extending a Stay | Extend Stay Button
Extend Stay Button

Click on Image for Enlarged View

Current Stay

The details in this section are for the current stay. The check-in and check-out dates are provided along with the rates for each night.

New Details

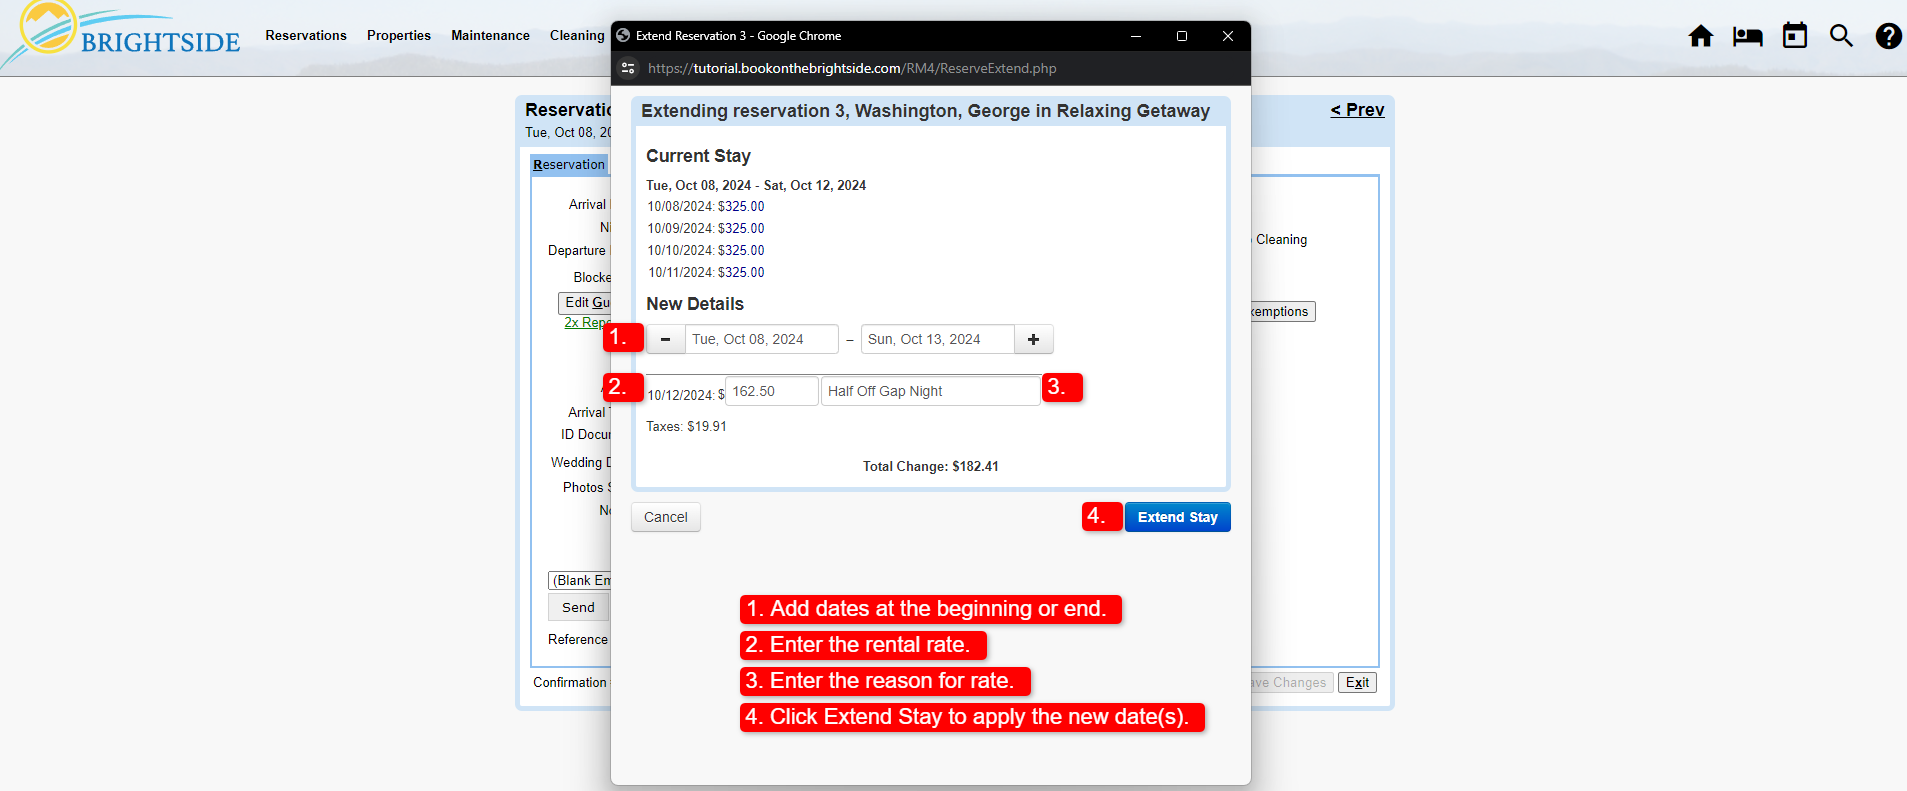
Follow these easy steps to add one night, or more, to a reservation.

  1. If you want to add a night at the beginning of the reservation, enter it in the first field. To add a night at the end of the reservation, enter it in the second field.
  2. You may use the default rate for the night, or change it if needed.
  3. Enter the reason for changing the rate, if changed.
  4. Click “Extend Stay” to apply the changes.
Extending a Stay | Extend Stay Process
Extend Stay Process

Click on Image for Enlarged View

“Extend Stay” Tool2024-04-17T15:00:30-04:00

Set Up Travel Insurance

2024-04-11T16:21:25-04:00

Summary

When you use a travel insurance program, you need to set it up in BrightSide. BrightSide accommodates both travel cancellation insurance and damage insurance.

  • Travel Insurance.
  • Damage Waiver Insurance.

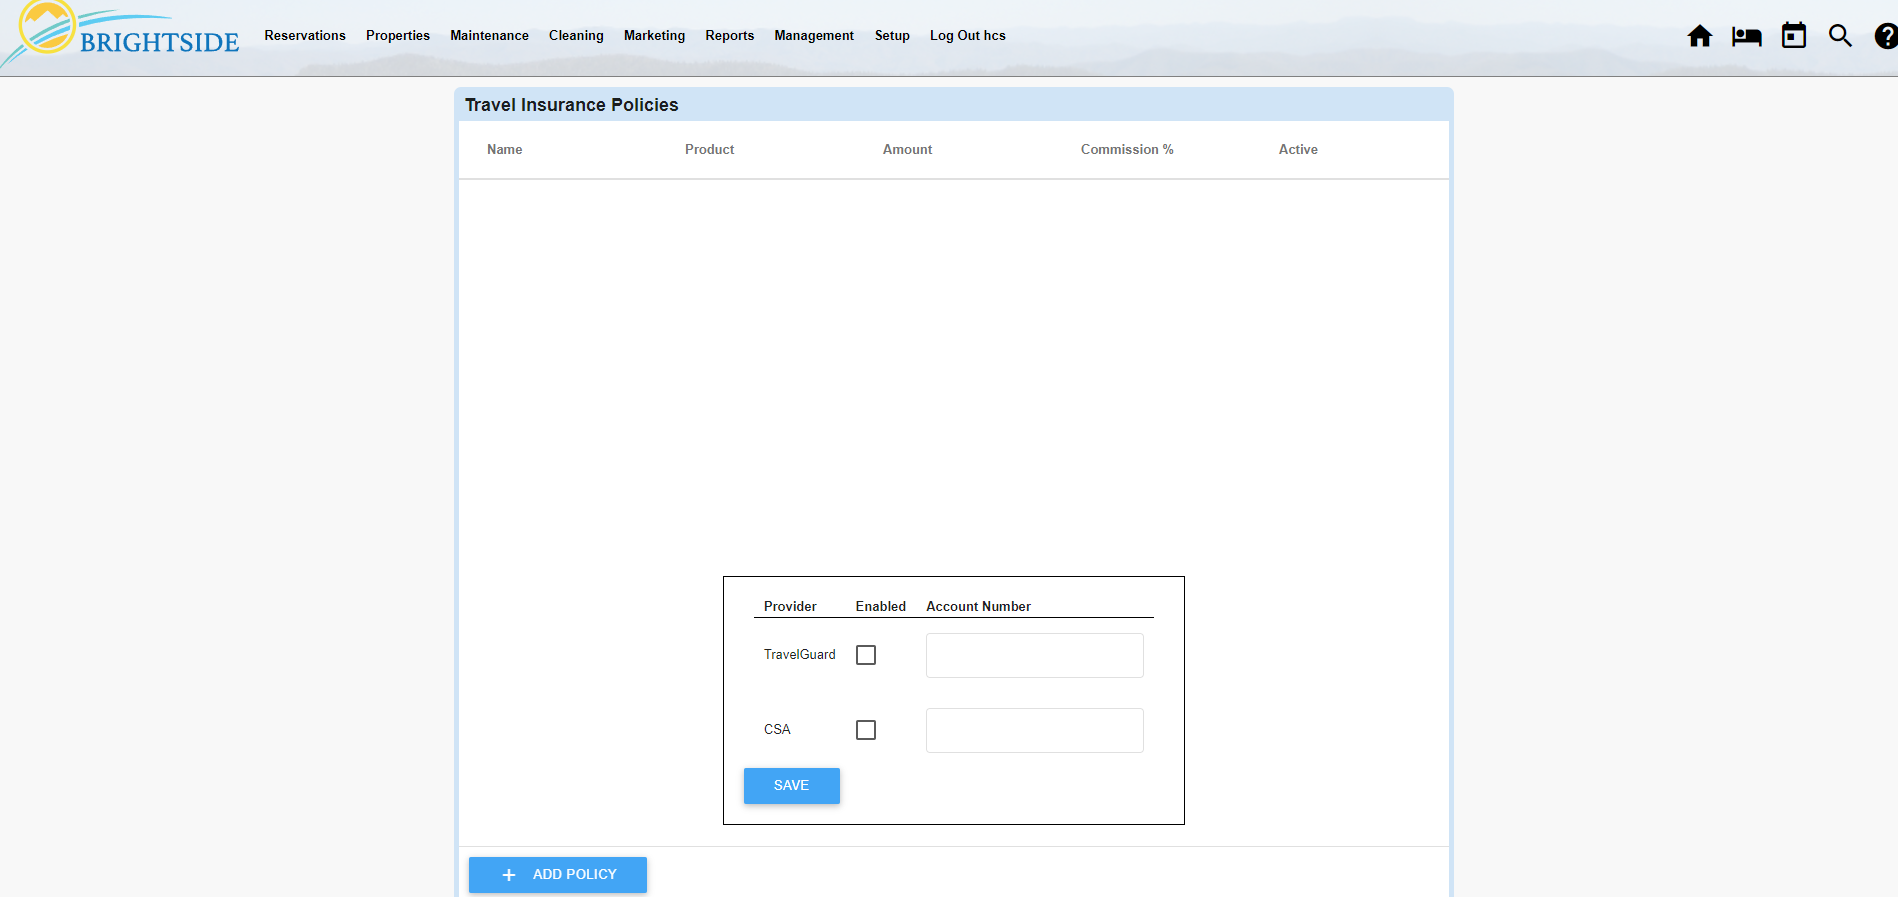
Navigate to:  Setup > Travel Insurance > Add Policy

Set Up Travel Insurance Policies

Click on Image for Enlarged View

Travel Insurance Policies

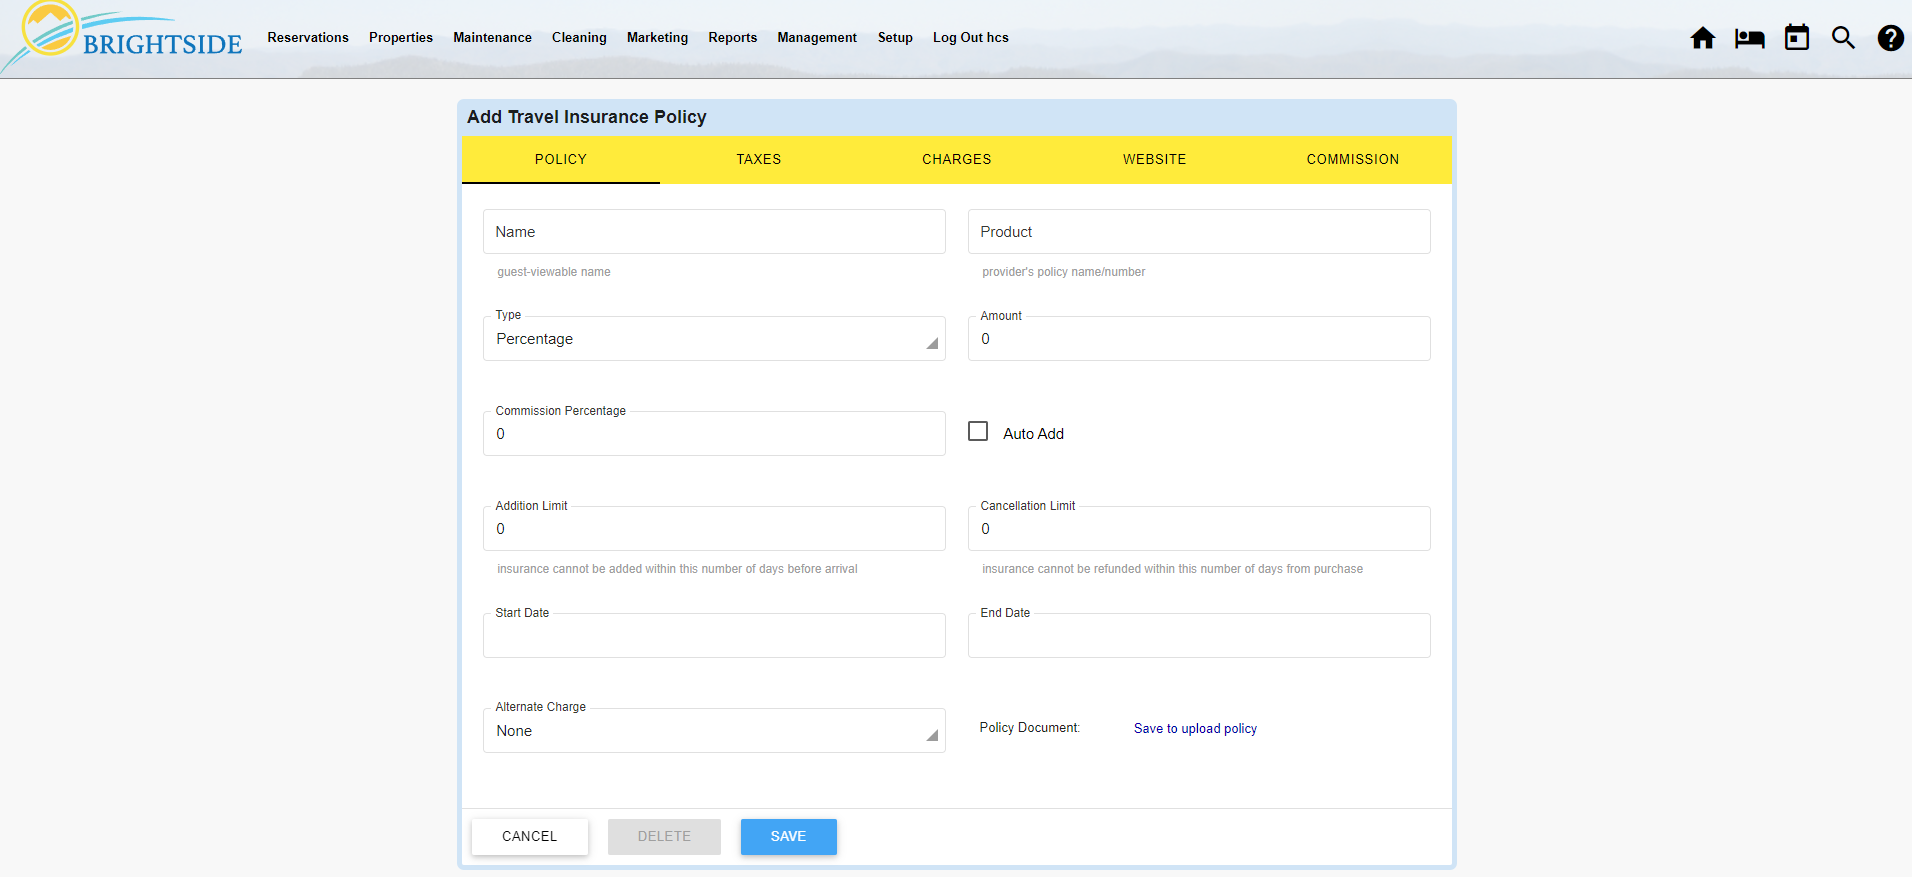
Add Travel Insurance Policy

Your insurance carrier will supply most of the information needed to complete this form. After you add this to your BrightSide account, the travel insurance can be offered to your guests on your website and via the backend.

Add Travel Insurance Policy

Click on Image for Enlarged View

Policy Tab

  • Name: Enter the name of the product. Guests can see this on your website.
  • Product: Enter the insurance company’s policy name and number.
  • Percentage or Amount: Enter the cost of the insurance. This is usually a percentage of the total. Some policies allow for a flat fee. Choose which form of premium you charge.
  • Amount: Enter a number representing the percentage or the fee you charge for the insurance.
  • Commission Percentage: Enter the percentage of the commission the insurance company pays you for selling this product.
  • Auto Add: Tick this box to automatically add this insurance to every reservation.
  • Addition Limit: Most insurance companies limit how late you may purchase a travel insurance policy. For example, they do not want guests to be able to purchase travel insurance near the arrival date. Enter the number of days before arrival when guest can no longer purchase insurance.
  • Cancellation Limit: Enter the number of days after purchase that guests may request a refund. After this number of days, a refund will not be granted.
  • Start Date: Enter the start date of the policy. This can be the date you begin selling it or the effective date the insurance company provides.
  • End Date: If your policy has an end date, enter it here.
  • Alternate Charge:
  • Policy Document: Upload the policy documents the insurance company provided.
  • Save
Add Travel Insurance Policy Taxes

Click on Image for Enlarged View

Taxes Tab

For self-funded cancellation protection, you may need to charge taxes. If so, select the proper tax rates. Check with your local tax authorities to see which rates apply. Often you will use the same rates as the unit. When this is the case, tick “Use Unit Taxes.”

True insurance products, underwritten by an insurance company, likely do not need to charge sales tax. Check with your insurance carrier to be sure. If you do not need to charge taxes for this product, do not tick anything.

  • Save
Travel Insurance Policy Charges

Click on Image for Enlarged View

Charges Tab

Select which charges to use when calculating the premium. The premium is based on a percentage of these fees. Ask your insurance carrier which fees need to be included.

  • Save
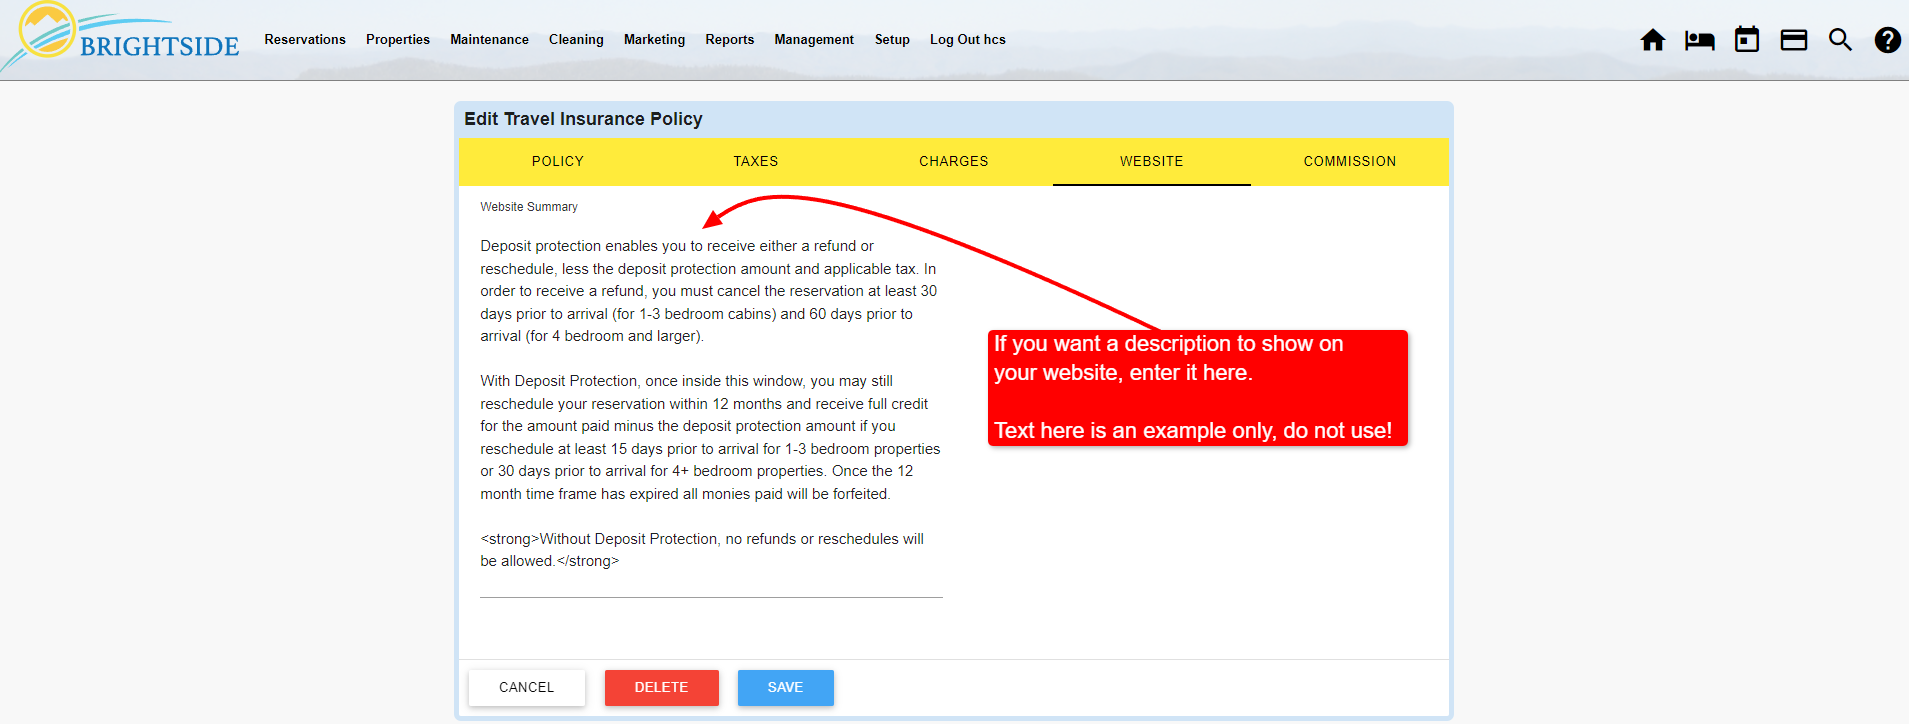
Travel Insurance Policy Description for Website

Click on Image for Enlarged View

Website Tab

To display a written description of what the travel insurance covers, enter it here. This will show up on your website.

  • Save
Travel Insurance Policy | Commissions

Click on Image for Enlarged View

Commissions Tab

Enter the amount of commission you want to pay your reservationists for selling the travel insurance.

  • Save

Set Up Travel Insurance2024-04-11T16:21:25-04:00

Move Guest to a Different Unit

2024-05-07T14:41:19-04:00

Summary

This tutorial explains how to move a guest from one property to another after the reservation is made. You may change the stay dates and adjust the rates as well.

HINT: If all you need to do is add a day or two at the beginning or end of a reservation, use the Extend Stay tool instead.

Navigate to:  Reservations > Reservation Search

Open the Reservation

Using the reservation search tool, or the reservation list, locate the reservation you need to change and open it. Once you have opened the reservation, follow the instructions below to move your guest to a different unit.

Image with details for how to search for a reservation

Click on Image for Enlarged View

Move the Guest

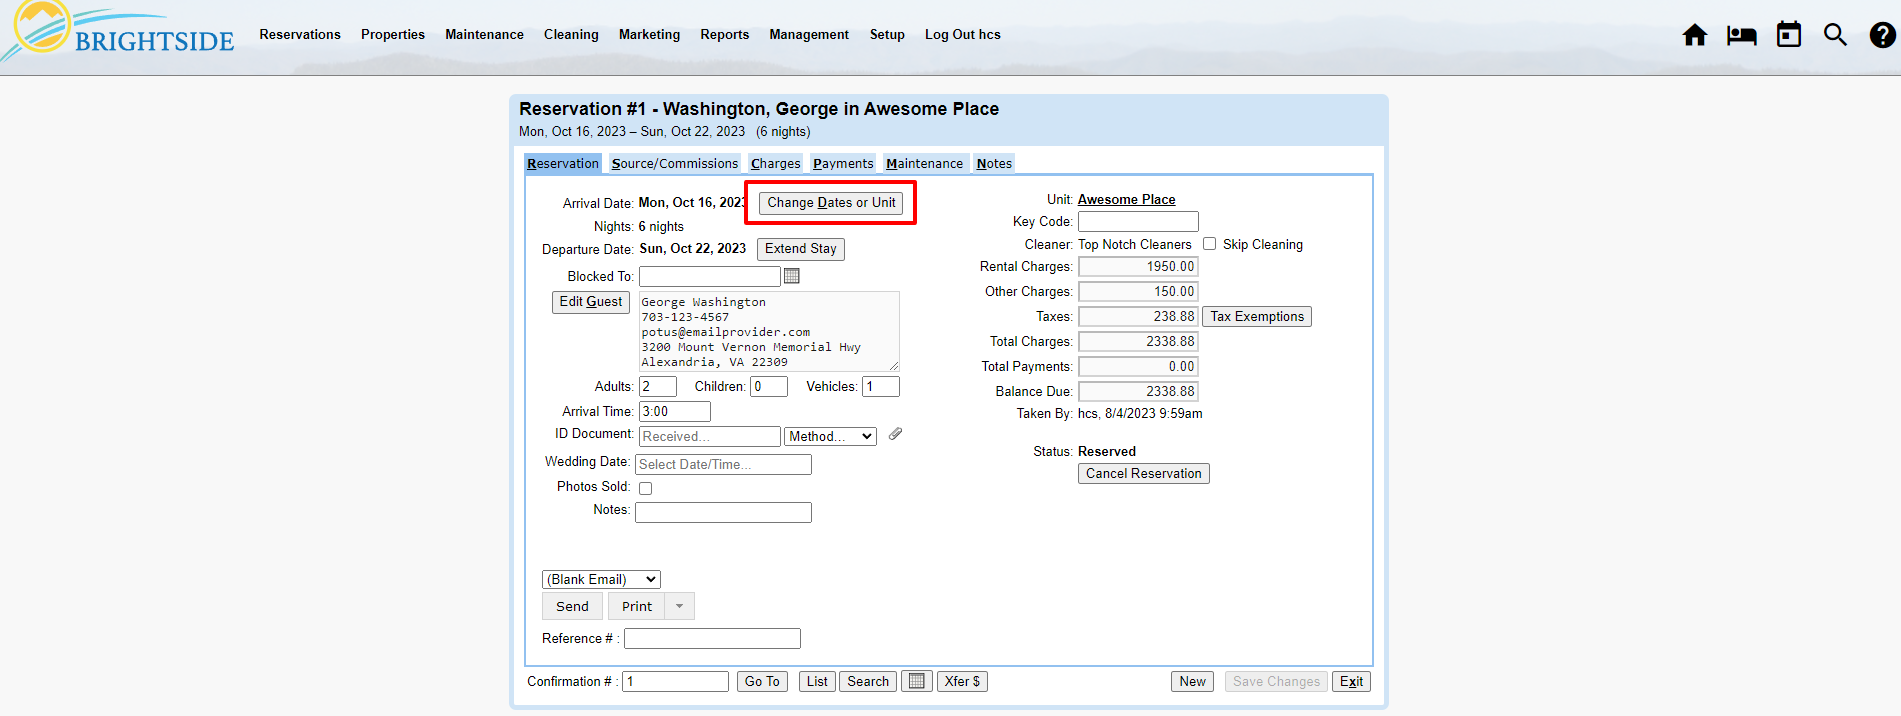
Change the Unit for a Reservation

Click on Image for Enlarged View

Change the Stay Dates or Unit

To change the unit for a guest stay and/or the dates, do the following.

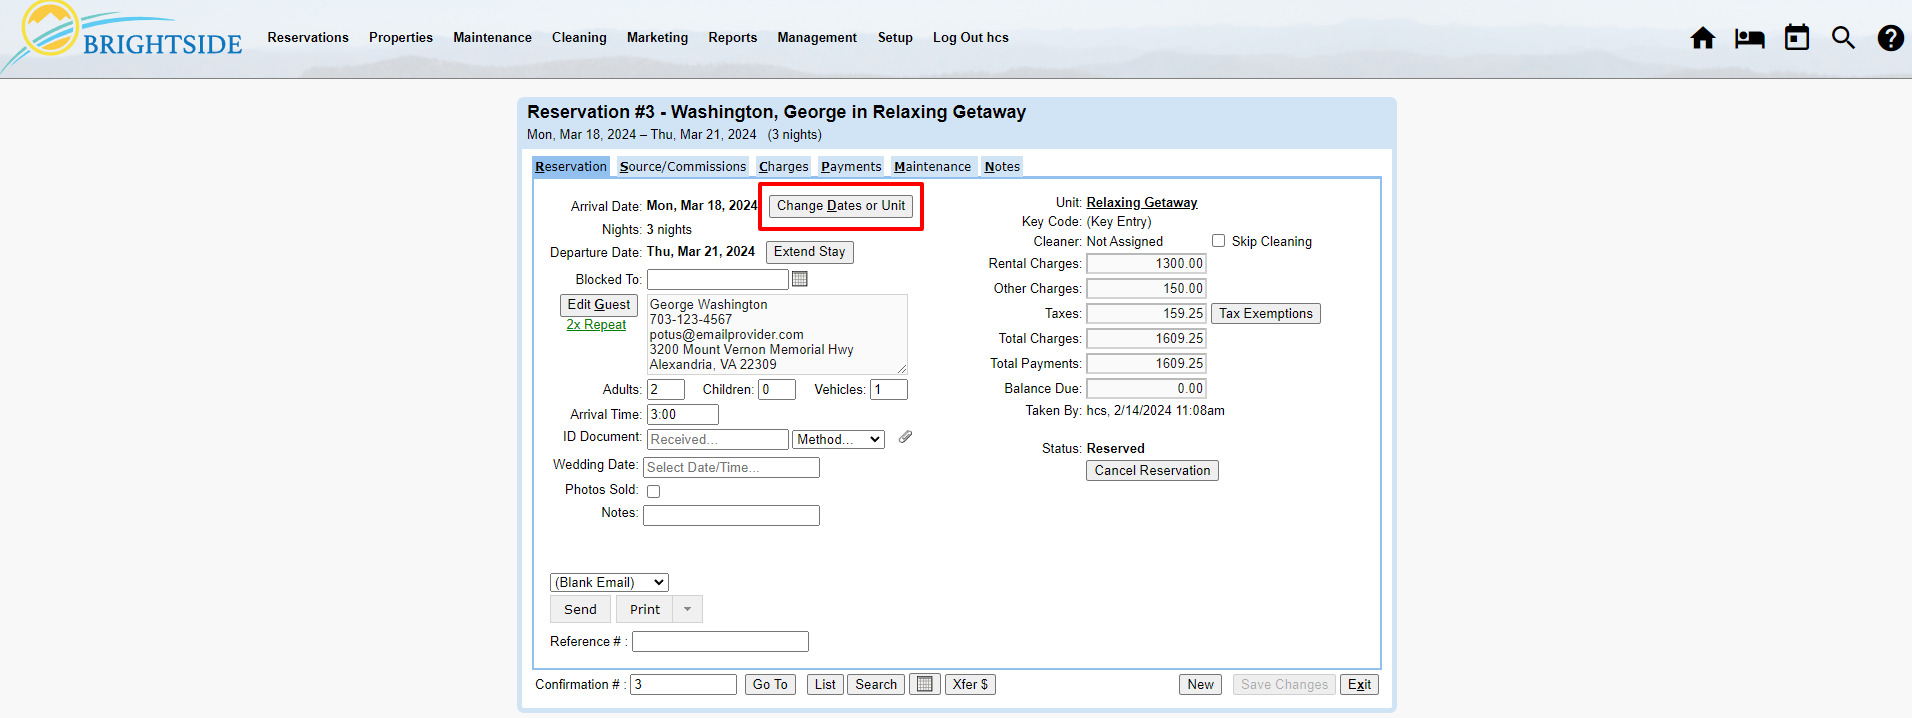
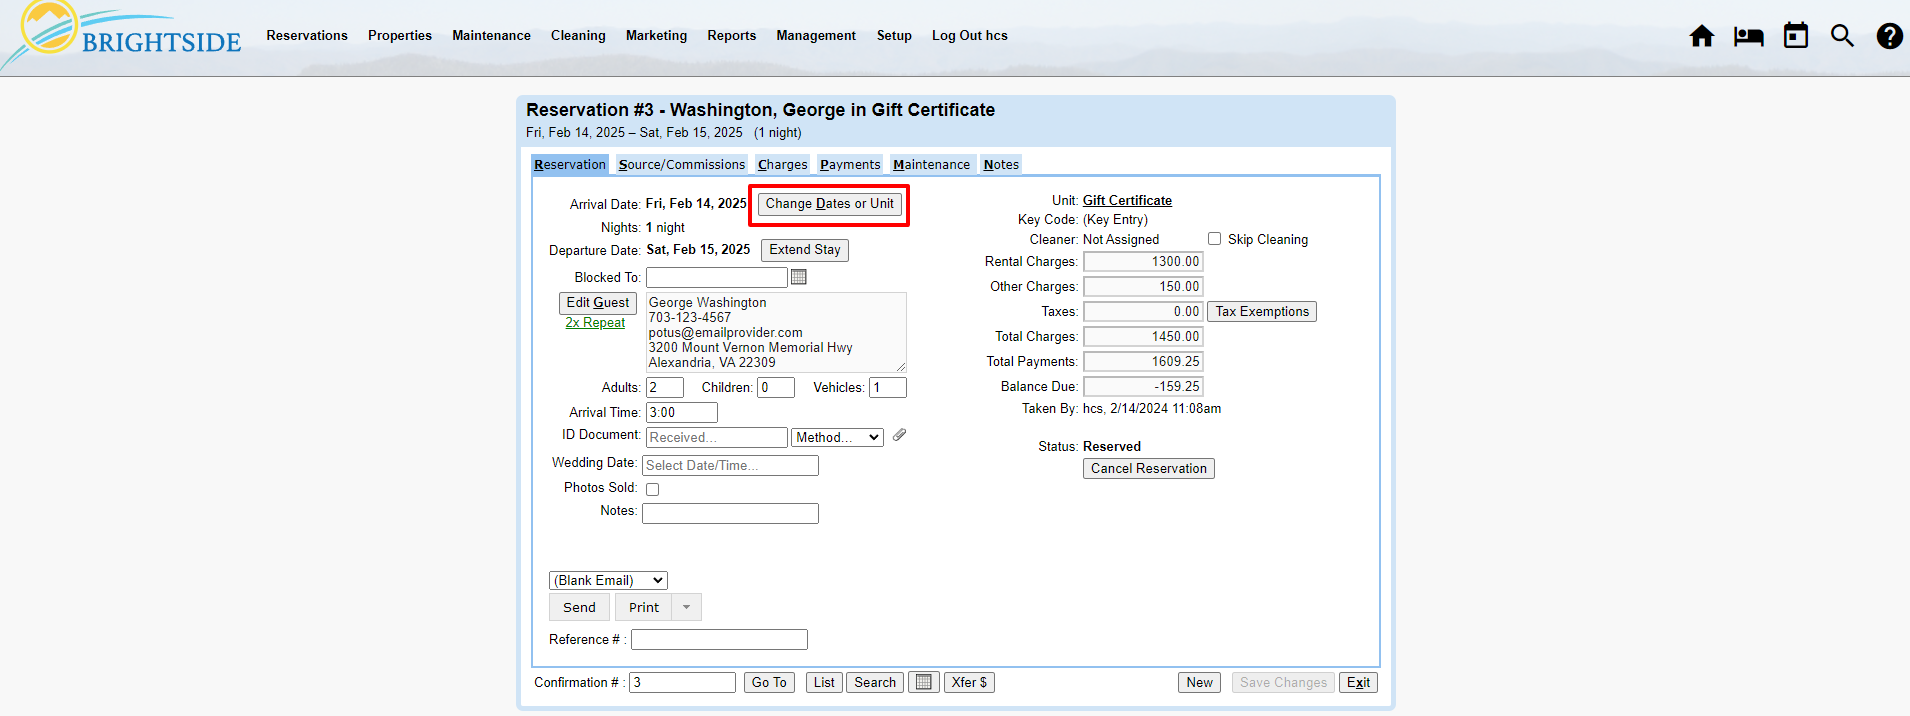
  • Change Dates or Unit: Click the gray “Change Dates or Unit” button located next to the arrival date in the reservation. A new window will pop up where you may select a new unit. The available units for the current stay dates populate the screen. The number of guests is displayed in red to help you choose a unit with the appropriate number of bedrooms (SEE AN EXAMPLE).
  • Select New Stay Dates: To change the stay dates select new “Arrive” and “Depart” dates. Units with availability on those dates, along with their rates, will populate the screen. It is not necessary to click the gray “Check Availability” button. Hint: you can hover your curser over the rates to get a breakdown for each unit.
  • Select a Unit: After you decide on a new unit, select it by clicking the circle to the left of the unit’s name.
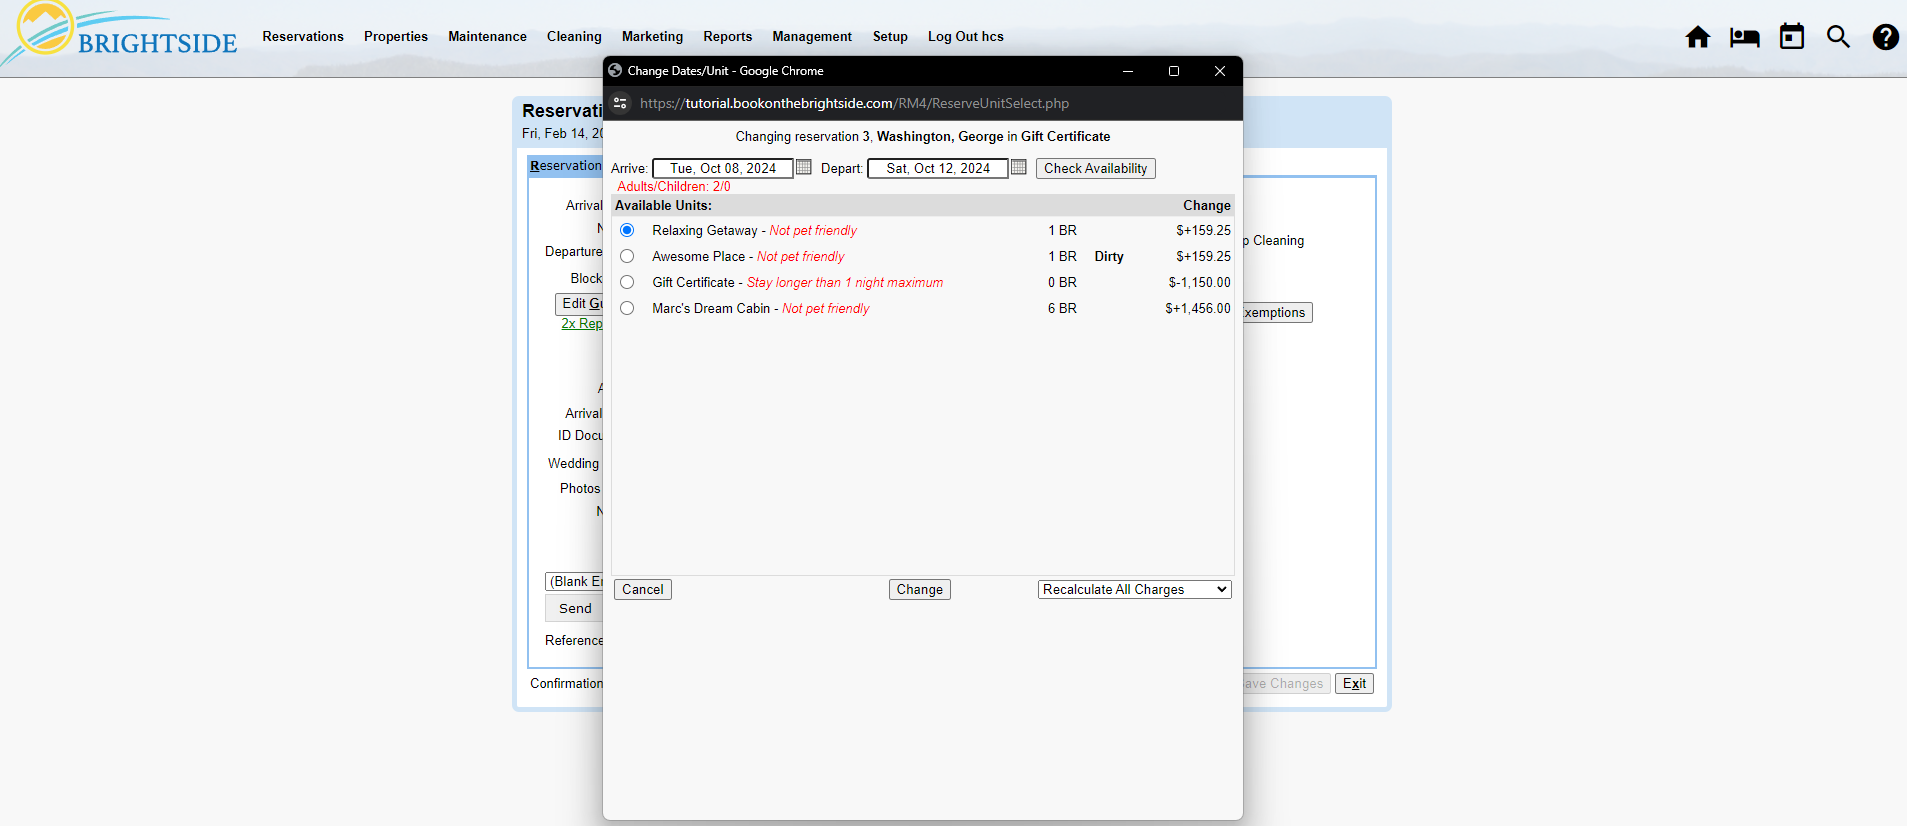
  • Adjust the Charges: Before you click the gray “Change” button located at the bottom/middle of the pop-up window, you need to decide if the charges need to be recalculated. Select which method of rate calculation you want to use from the dropdown list.

NOTE: This is a very important step. Please pay close attention or your charges may not be what you intended.

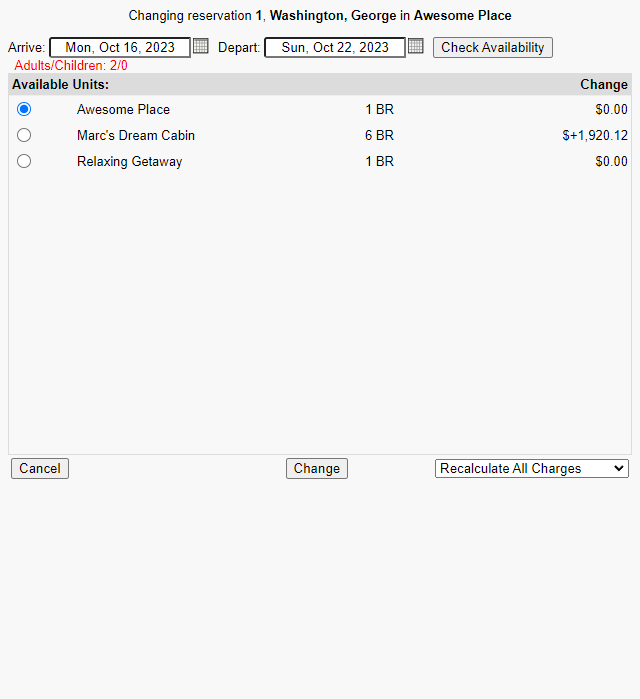
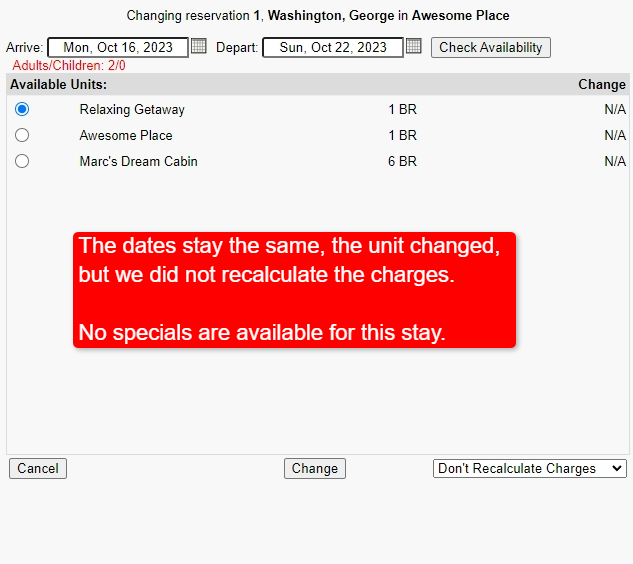
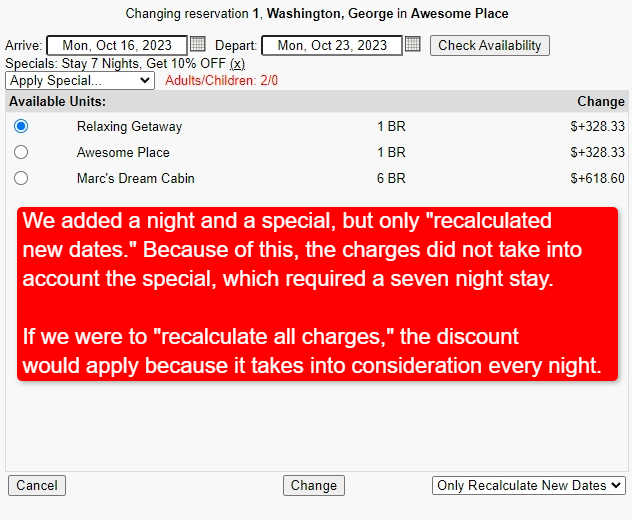
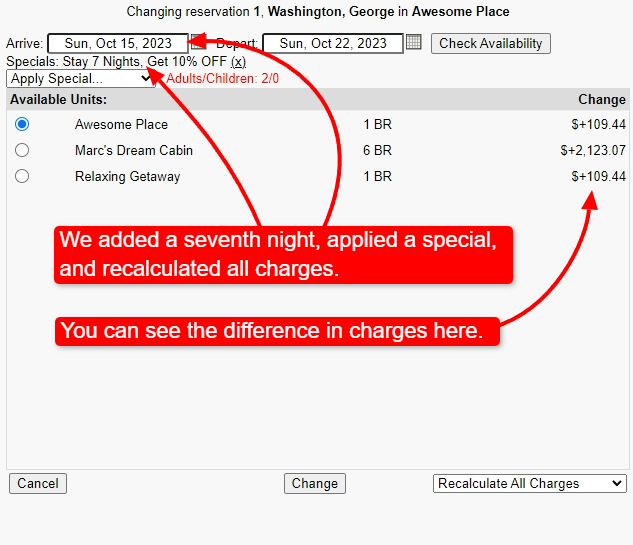
There are three options for handling the charges when you change the unit on a reservation. You can change the recalculation method from the dropdown to see how each method impacts the reservation (SEE EXAMPLES). Changes do not apply until you click the “Change” button.

Don’t Recalculate Charges: When you move a guest and do not want to make any changes to the rent, fees, taxes, etc., select this option. The change column shows $0.00, since you are not recalculating the charges.

Only Recalculate New Dates: If you added new dates to the existing reservation, you probably want to use this option. This calculation retains all the current charges and specials for existing dates, and performs a new calculation for the added date(s). The change column shows the new charge for the added date(s) only.

Recalculate All Charges: When you move a guest to a unit where the rates, fees, and taxes are significantly different, you should select this option. Be aware that using this method removes previously applied discounts or specials, and you may need to reapply it if warranted.

  • Save: Click the gray “Change” button.

Move Guest to a Different Unit2024-05-07T14:41:19-04:00

Gift Certificate Units

2024-04-11T16:30:40-04:00

Summary

A guest cancelling a reservation is not uncommon in the short term rental market. Sometimes their deposit is refunded entirely, while on other occasions, they have passed the deadline for a refund. You may want to offer them a window of time in which they can reschedule, rather than forfeit their funds completely.

So where does the money go in the interim and how do you keep track of it? Since BrightSide does not have a true “Gift Certificate” feature, we recommend using a zero bedroom “Gift Certificate Unit” to keep track of these guests and their funds.

What is a Gift Certificate Unit?

Purpose

A “Gift Certificate Unit” is simply a zero bedroom unit in BrightSide, where you may assign funds tied to a specific guest, for future use. When a guest makes a reservation, makes a payment, and then has to cancel, you may offer them a chance to move the payments to a gift certificate for later use.

NOTE: Making this a zero bedroom unit keeps it from showing up on your website. In addition, BrightSide zero bedroom units are not included in your unit count for your monthly subscription fee.

Setting Up a Gift Certificate Unit

Adding a Unit

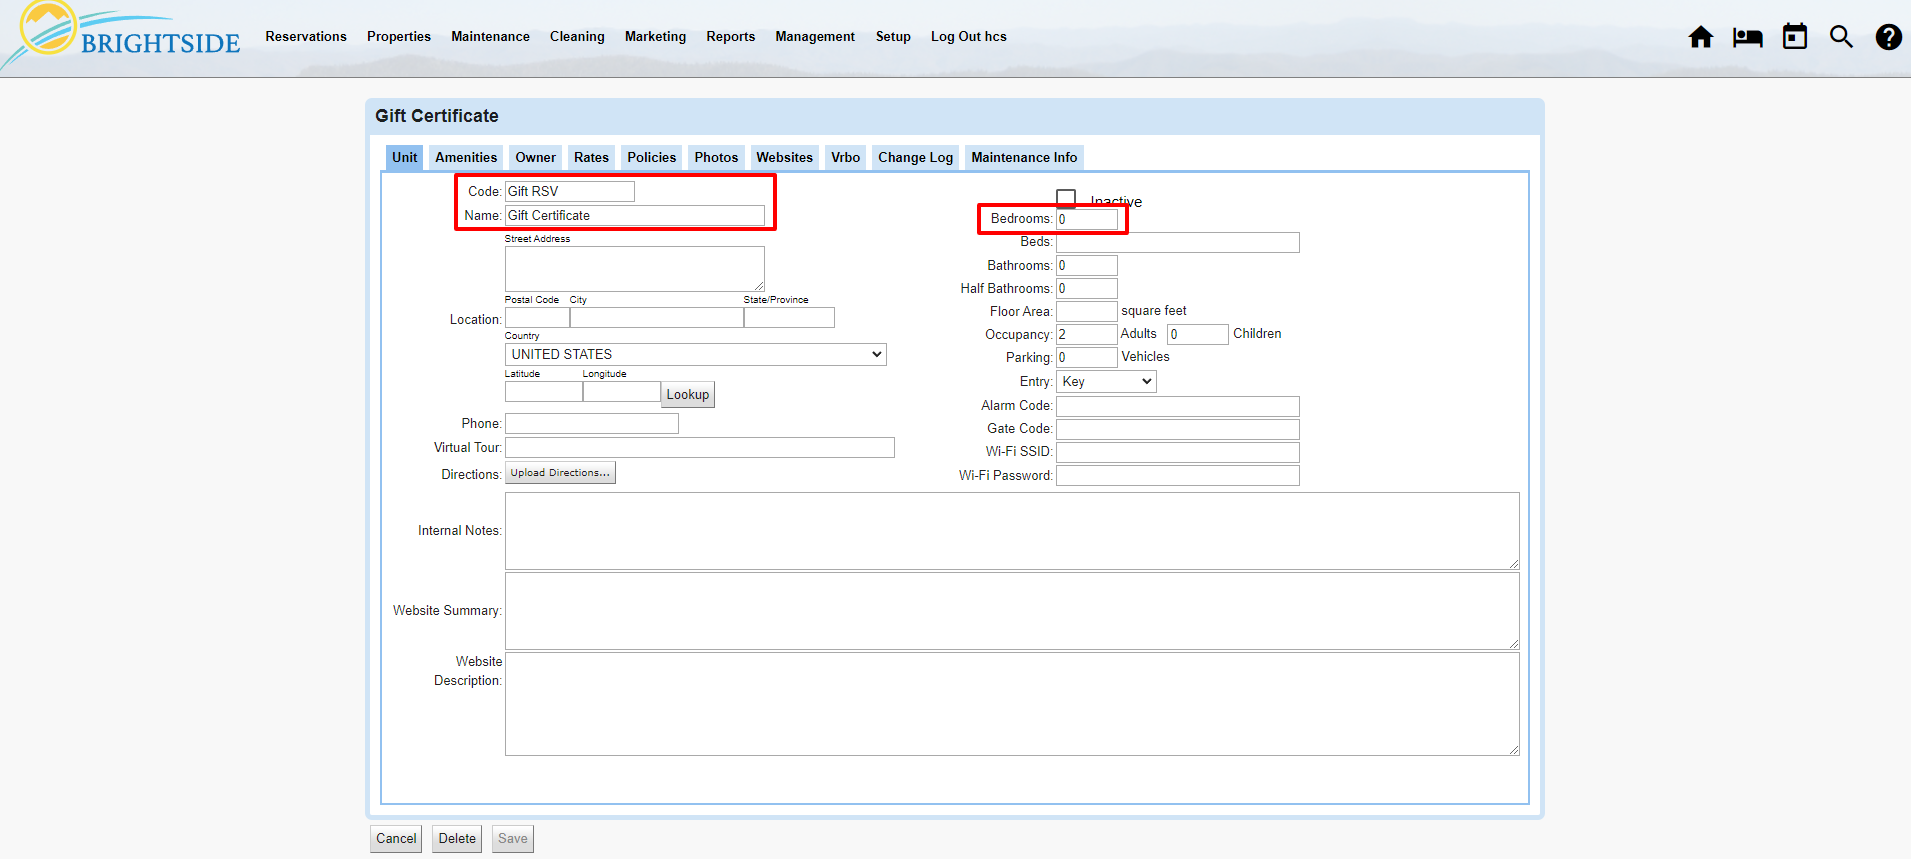
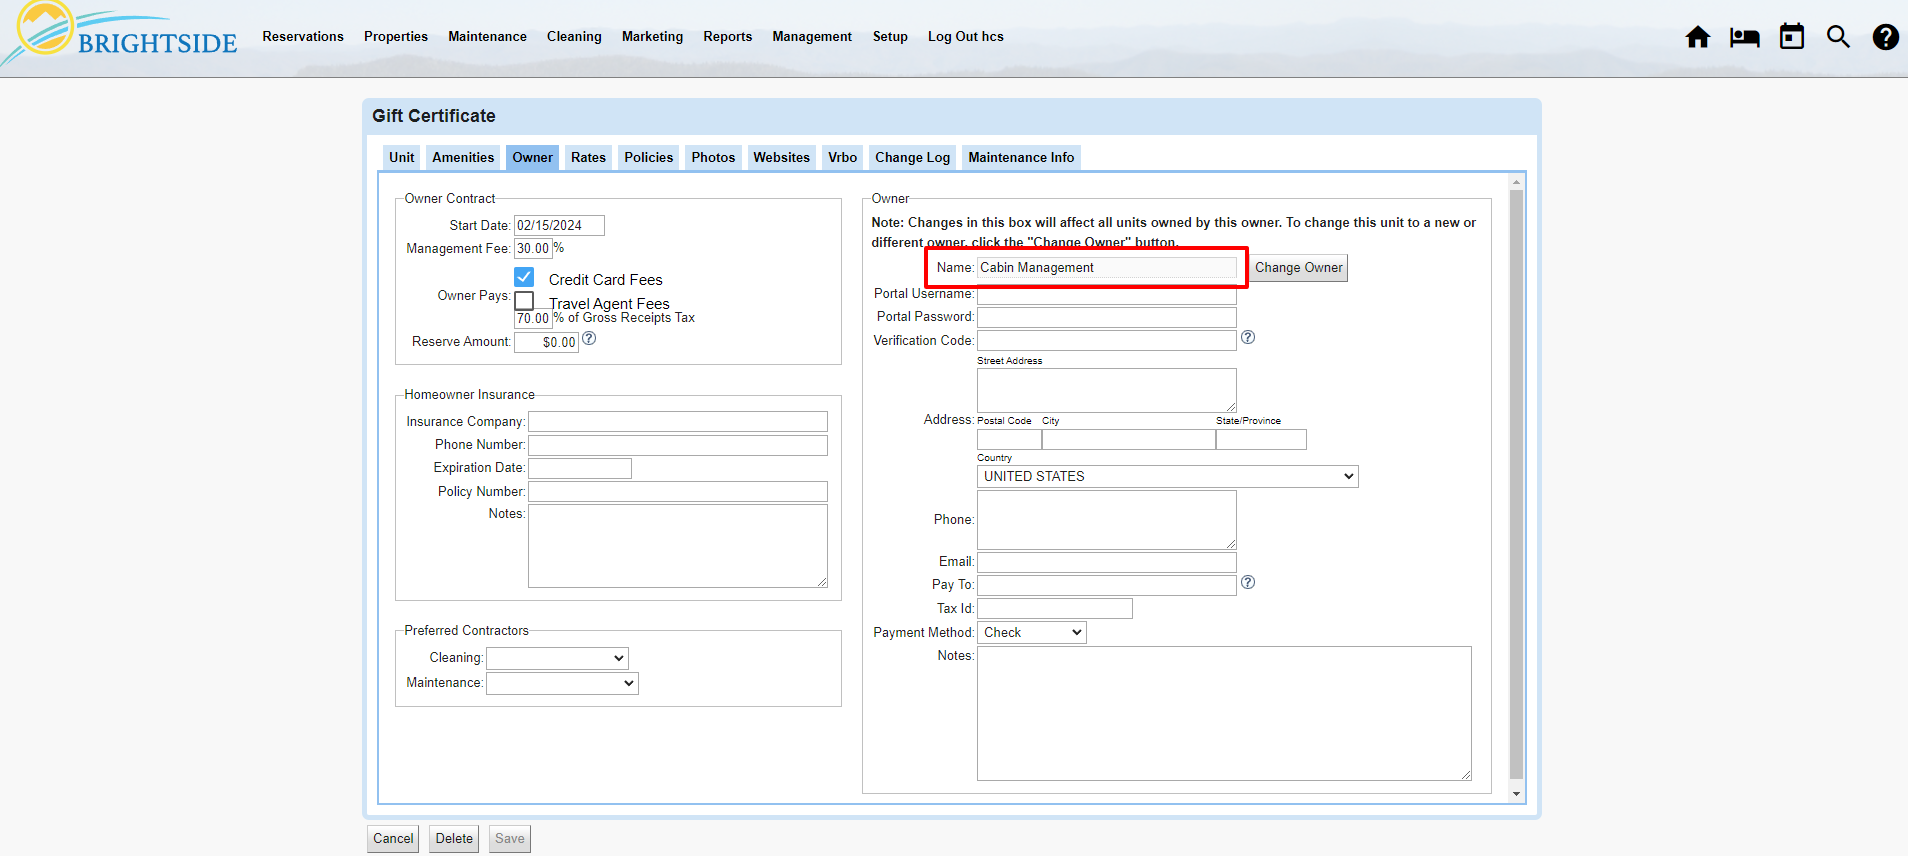
The “Gift Certificate Unit” is set up the same as other units, but with less information and details. The only two things you must have are the name of the unit and an owner. Just set up the following under the Unit and Owner tabs, then save. Now you are ready to use the Gift Certificate unit.

Navigate to:  Properties > Units > Add

Unit Tab

  • Code: Assign a short code you can easily identify in reports and elsewhere in BrightSide where unit codes appear (optional).
  • Name: Gift Certificate
  • Bedrooms: The default is zero, so you do not need to change anything. Just ensure that this is zero.
Gift Certificate Units | Unit Details

Click on Image for Enlarged View

Owner Tab

  • Owner: Enter the name of the owner. In most cases, this is the property management company. This is all you need to input on this tab.
  • Save
Gift Certificate Units | Owner's Name

Click on Image for Enlarged View

Using the Gift Certificate Unit

Move a Reservation to a Gift Certificate

Instead of cancelling the reservation, move it into the Gift Certificate unit. This keeps the history of the reservation intact, including the guest’s information, notes, charges, payments, etc. In these instructions, we provide the guest with a year to use their gift certificate balance.

  • Open the reservation.
  • On the “Reservation” tab click “Change Dates or Unit.”
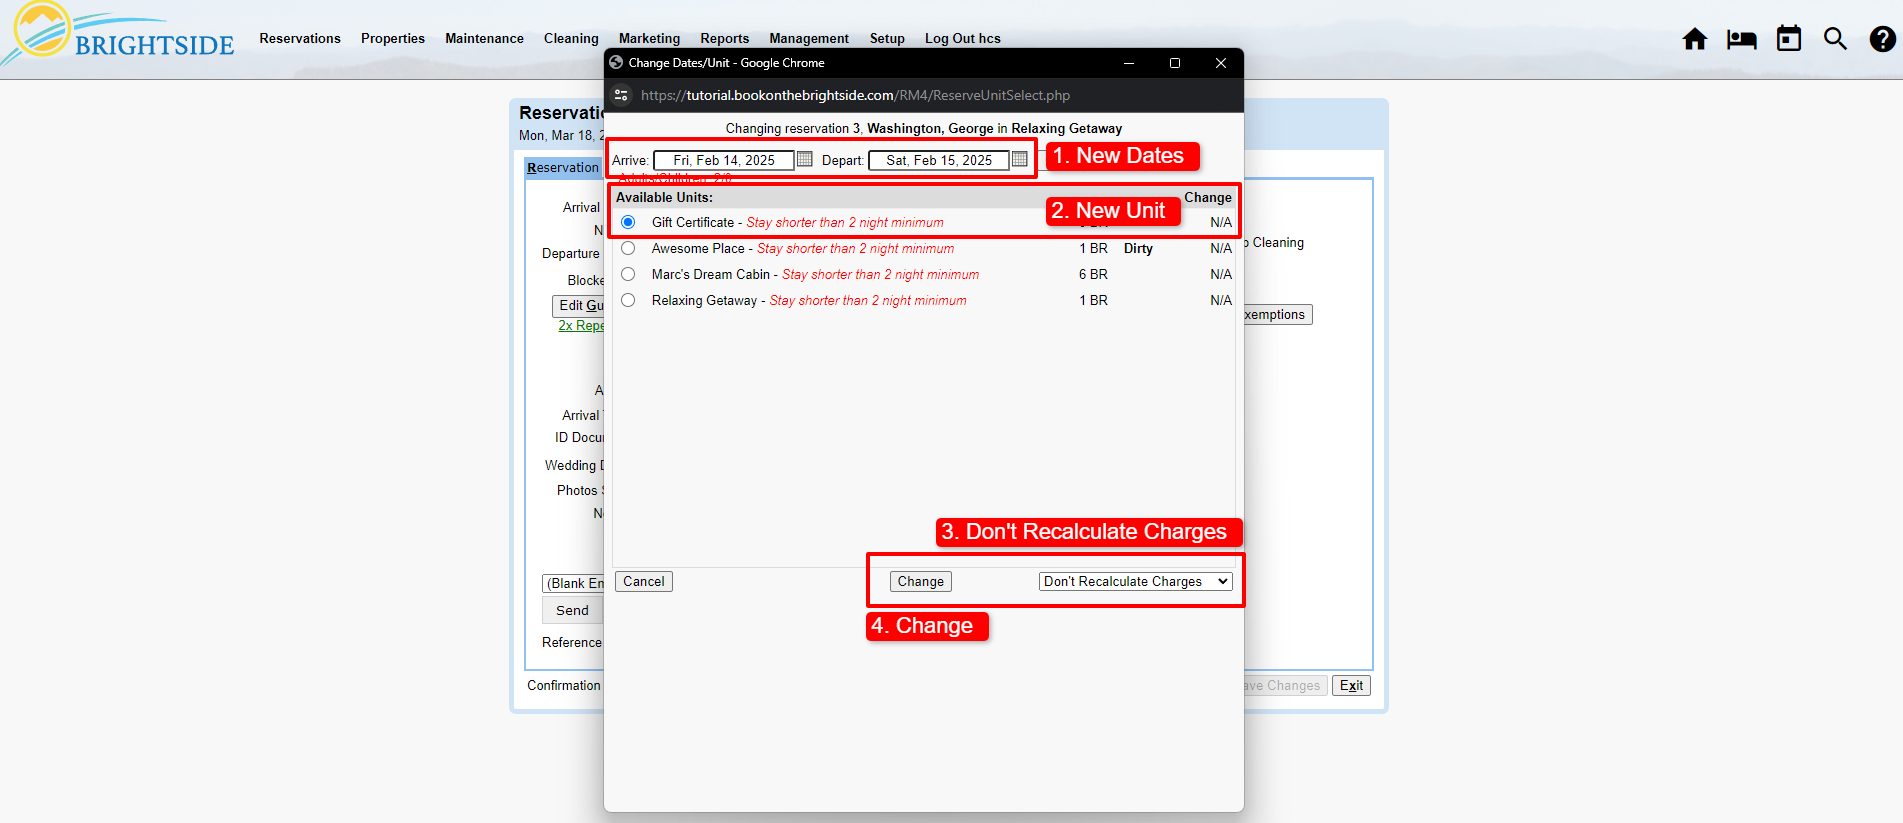
  • Enter a new arrival date one year from the cancellation date with a departure date for the following day. This blocks off the calendar for one night. The new date now becomes the deadline for using the balance. NOTE: Entering the original number of nights unnecessarily blocks off more nights than needed.
  • Select “Gift Certificate” as the new unit.
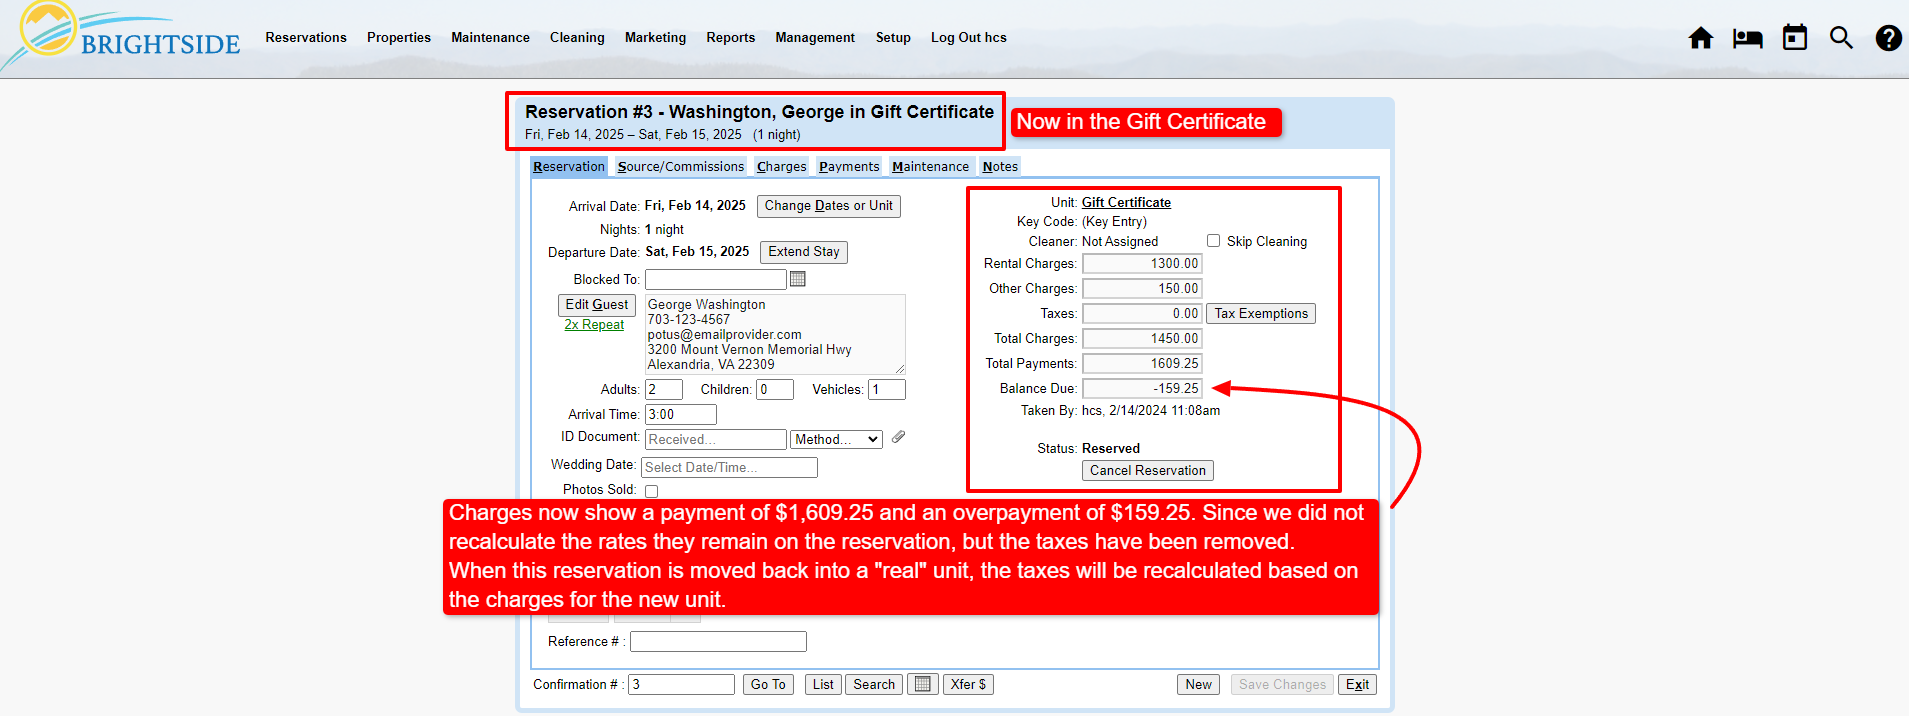
  • Select “Don’t Recalculate Charges” in the bottom right hand corner. By selecting this option, all the original charges remain on the reservation. Also, since you are moving this reservation to the gift certificate unit, the taxes are removed. When you move it back to a “real” unit, you will recalculate the charges and the taxes will be added according to the requirements of the new reservation.
  • Click “Change.”

NOTE: This reservation is now located in the Gift Certificate unit with a date one year in the future. When this date approaches, it will show up on the home screen and in the check in list. If the guest has not used the balance, cancel the reservation and the funds will be moved to earned income.

Gift Certificate Unit | Changing Units

Click on Image for Enlarged View

Gift Certificate Unit | Move to New Unit

Click on Image for Enlarged View

Gift Certificate Unit | New Reservation

Click on Image for Enlarged View

Move a Reservation from a Gift Certificate

When the guest wants to redeem their gift certificate, the process is almost identical to moving the reservation into the Gift Certificate unit. Follow these instructions for moving it to a real unit with new dates and charges.

  • Open the reservation.
  • On the “Reservation” tab click “Change Dates or Unit.”
  • Enter new arrival and departure dates and all the available units appear in the list.
  • Select the desired unit from the list.
  • Select “Recalculate All Charges” in the bottom right hand corner. By selecting this option, all the charges will be recalculated based on current dates, rates, fees, discounts, etc. You can see any fee changes on the right side of the window. Hold your curser over the charges to see the breakdown.
  • Click “Change.”

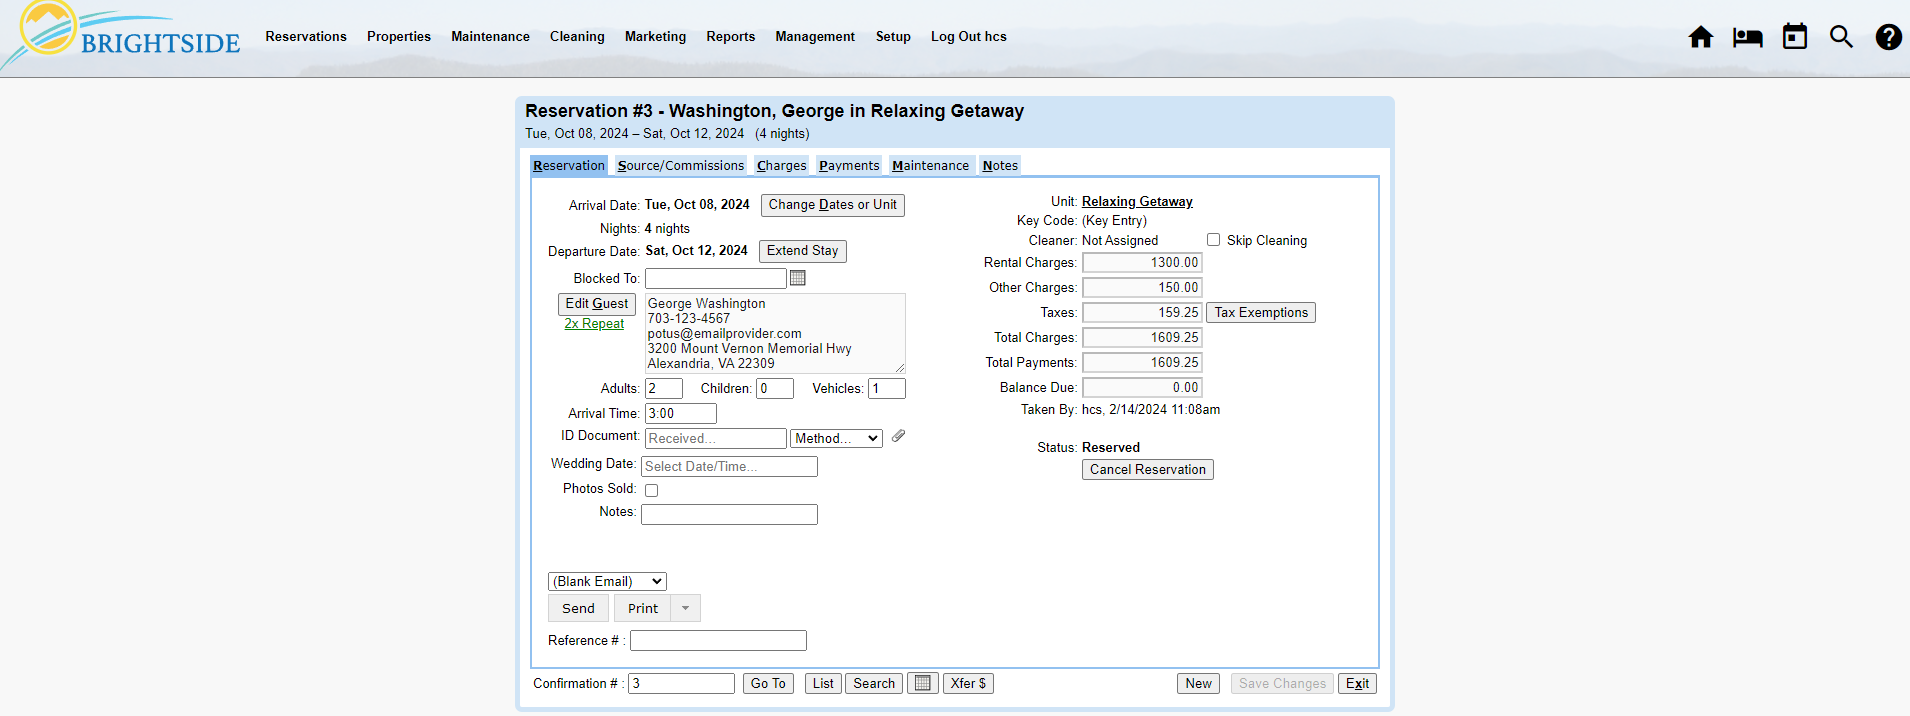
NOTE: The payment follows the reservation, so the new reservation includes the original payment and reduces the amount owed.

Gift Certificate Unit | Redeeming Gift Certificate

Click on Image for Enlarged View

Gift Certificate Unit | Selecting New Unit

Click on Image for Enlarged View

Gift Certificate Unit | New Reservation

Click on Image for Enlarged View

In the example, we moved the reservation back into the same unit with the original rates. This left a zero balance in the new reservation after recalculating all charges. More often than not, the total will be different when you select a different unit or rate season. The guest may owe you additional payments if this is the case.

Gift Certificate Units2024-04-11T16:30:40-04:00

Connect a Unit to Airbnb

2024-05-16T15:35:03-04:00

Summary

After your BrightSide account is integrated with at least one Airbnb account, you can begin connecting and syncing individual units. You may already have a listing on Airbnb and just need to connect to it. If you do not have any listings in your Airbnb account yet, you will add them from BrightSide.

In this tutorial, you will learn how to create a new property in Airbnb right from your BrightSide account. If your property is already listed on Airbnb, we show you how to connect to it and sync them.

First Things First

The Basics

In order for your Airbnb integration to work properly, we highly recommend that you follow the guidelines set forth in this tutorial. Any deviation from the guidelines may cause your unit to have trouble listing.

NOTE: BrightSide is designed to sync with Airbnb utilizing our custom API. Unlike some PMS software, BrightSide does not use a channel manager to communicate with Airbnb. Our custom API “talks to their system directly.” Also, keep in mind that BrightSide overrides Airbnb data, not the other way around.

Everything in Order

To connect a specific unit to Airbnb, follow these steps. Find detailed instructions for steps three and four in the next section, Prepare to List.

  1. Integrate your BrightSide account with your Airbnb account(s). The Airbnb tab becomes visible in the Unit only after your BrightSide account is connected to Airbnb. For detailed instructions, go to Airbnb Integration.
  2. Create the unit in BrightSide, NOT in Airbnb. If you build it out in Airbnb first, you must do it again in BrightSide before you can connect them. If you build it out in BrightSide first, you only have to do it once. Ensure that all of the unit data is ready to go, including rates, photos, policies, fees, amenities, etc. For detailed instructions, go to Adding Units (Properties).
  3. Prepare your property to list.
  4. Activate on Airbnb.

NOTE: Once you activate a unit on Airbnb, all of the unit information in BrightSide overwrites all the unit information on Airbnb. This includes photos, unit name, summary, description, bedrooms, amenities, everything! There is only one exception, when you initially connect to an existing listing (see Connect Existing Listing below).

Prepare to List

Navigate to:  Properties > Units > Select Unit > Airbnb (tab)

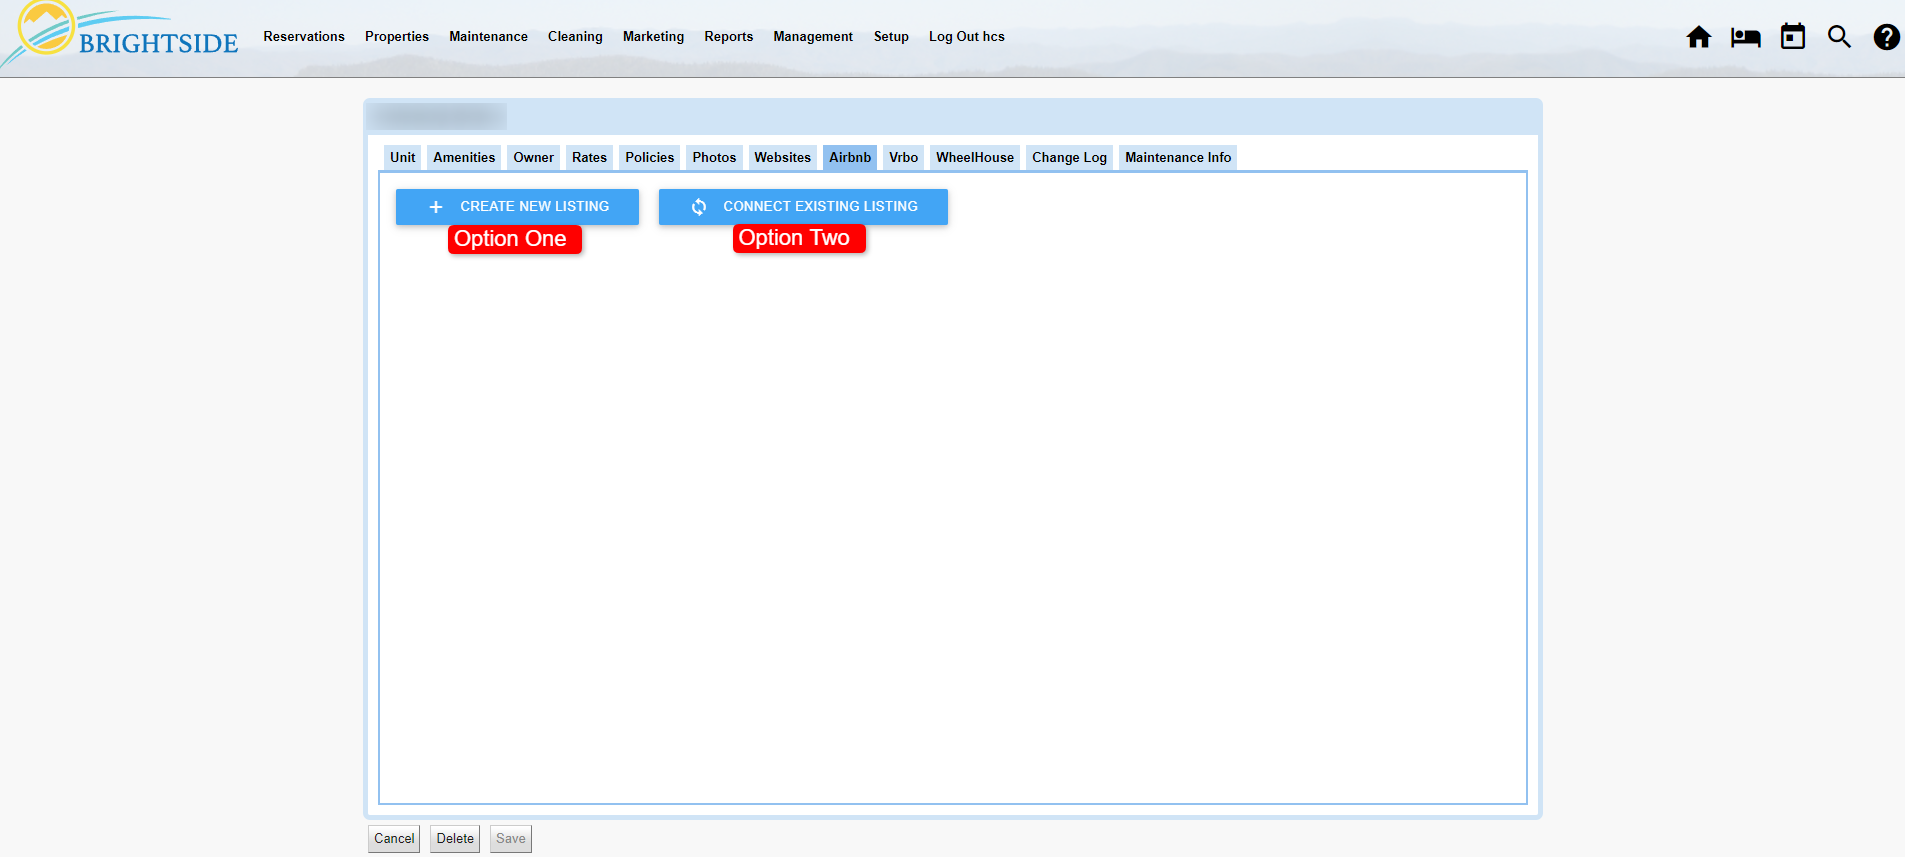
Connect a Unit to Airbnb | Listing Options

Click on Image for Enlarged View

Create New Listing (Option One)

This first option is for units that are not listed in your Airbnb account currently. By choosing Create New Listing, BrightSide will send the property information to Airbnb and create a new listing there. But before it does that, you must fill in the following information.

NOTE: If you are integrated with more than one Airbnb account, you are asked to select which account this listing needs to be associated.

**DO NOT toggle “Activate on Airbnb!” You will do this later.**

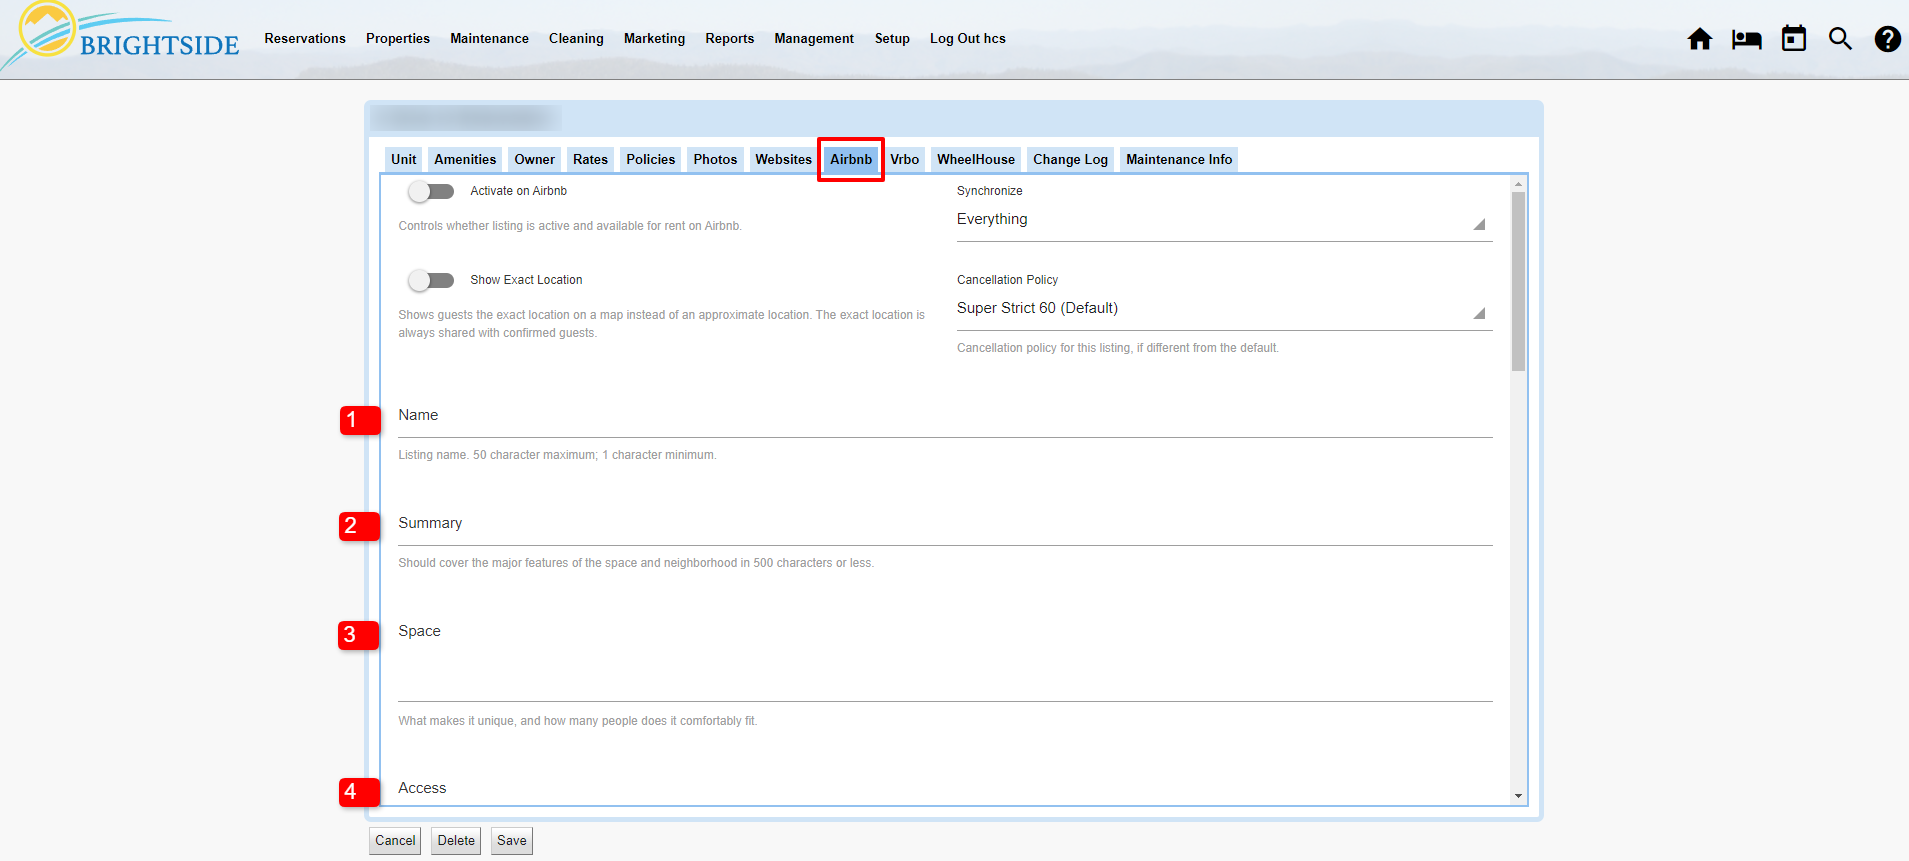
  1. Name: Enter a unique name. You may not use ALL CAPS or repetitive characters like Free!!! The name field has a 50 character limit.
  2. Summary: Use this section to entice the readers to find out more about the property. The summary has a 500 character limit.
  3. Space: In this section, use up to 10,000 characters to describe the unit in detail. Be creative and provide as much information as possible about the bedrooms, bathrooms, living room, kitchen, amenities, or whatever you think guests would want to know. Use short paragraphs so all your copy does not run together.
  4. Access: Provide information about what areas of the space guests are be able to access. For example, if they are not allowed in the basement, tell them here.
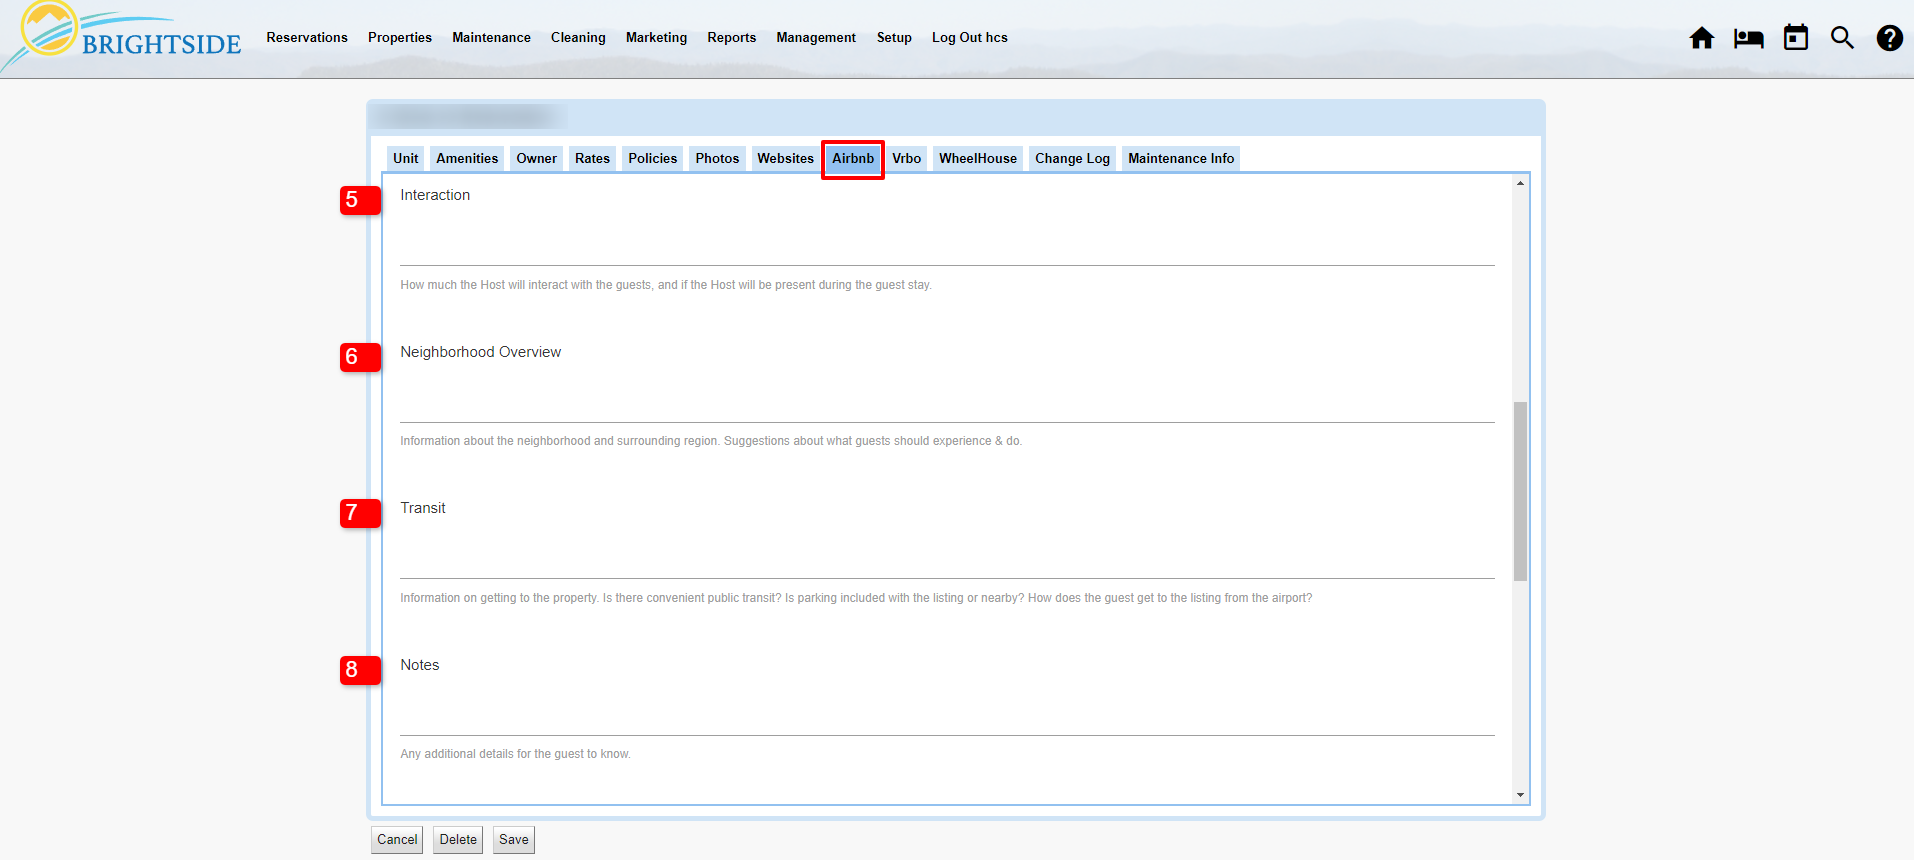
  5. Interaction: Let the guest(s) know if you plan to be there when they arrive or are available for questions. Will they see you during their visit?
  6. Neighborhood Overview: What is the neighborhood and the surrounding region like? Let them know what the area offers for entertainment, eating, or any other unique attractions.
  7. Transit: Do guests need a car to get here? Is public transportation an option? Is parking free and available?
  8. Notes: What else do you want guests to know?
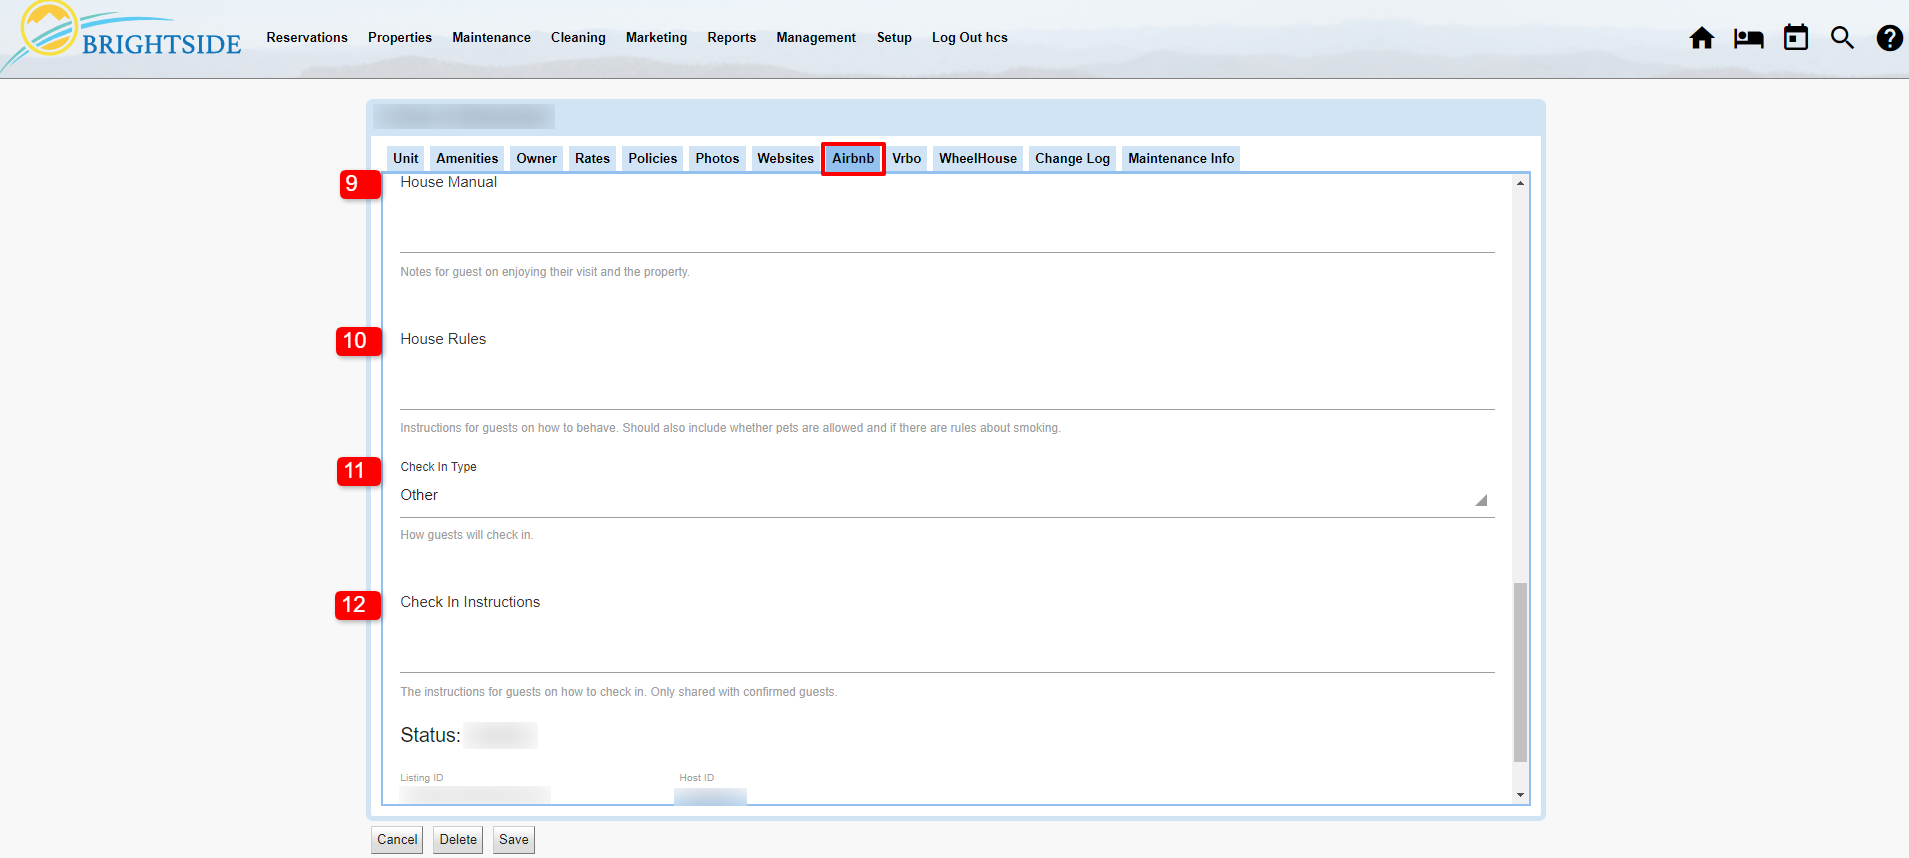
  9. House Manual: Do you need to provide instructions for using and enjoying the property?
  10. House Rules: Communicate what you expect from your guests. Are pets allowed, smoking, or parties? Are there quiet hours?
  11. Check In Type: Select from this dropdown list how the guest will be able to enter the property.
  12. Check In Instructions: These instructions are provided to confirmed guests only. Let them know the check in process.

Save: After entering all of the above, click save, then follow the instructions to activate your listing.

Connect a Unit to Airbnb | Airbnb Tab Information

Click on Image for Enlarged View

Connect a Unit to Airbnb | Airbnb Tab Information

Click on Image for Enlarged View

Connect a Unit to Airbnb | Airbnb Tab Information

Click on Image for Enlarged View

Status: This area provides you with the current status of your listing on Airbnb. After a successful activation, the status reads “Active.” If there is a problem activating your listing, you could see a number of error messages and notices with hints for why it didn’t list.

Listing ID: Airbnb assigns a unique ID for each property and feeds that out to BrightSide. The ID is a link to your Airbnb listing which you may click to go directly to the listing.

Host ID: Assigned by Airbnb. The Host ID is a link that goes directly to your Airbnb host profile.

Connect Existing Listing (Option Two)

Use this option if this unit has a corresponding listing already in your Airbnb account and you want to connect them.

  1. Click “Connect Existing Listing”
  2. A dropdown containing all the units in your connected Airbnb account(s) appears.
  3. Select the matching unit. Be sure to select the correct unit, since they don’t always have the same name.
  4. Since your listing was already active on Airbnb, some of the information is imported.
  5. If needed, you may update the unit information in BrightSide. After saving, BrightSide will push out the updated information to your Airbnb listing.

NOTE: When you connect to an existing listing in Airbnb, the name, summary, description, and any other data that matches the fields in the Airbnb tab, is imported into BrightSide. This is the ONLY time that Airbnb data will download and overwrite data in BrightSide.

Activate New Listing

Options & Final Steps

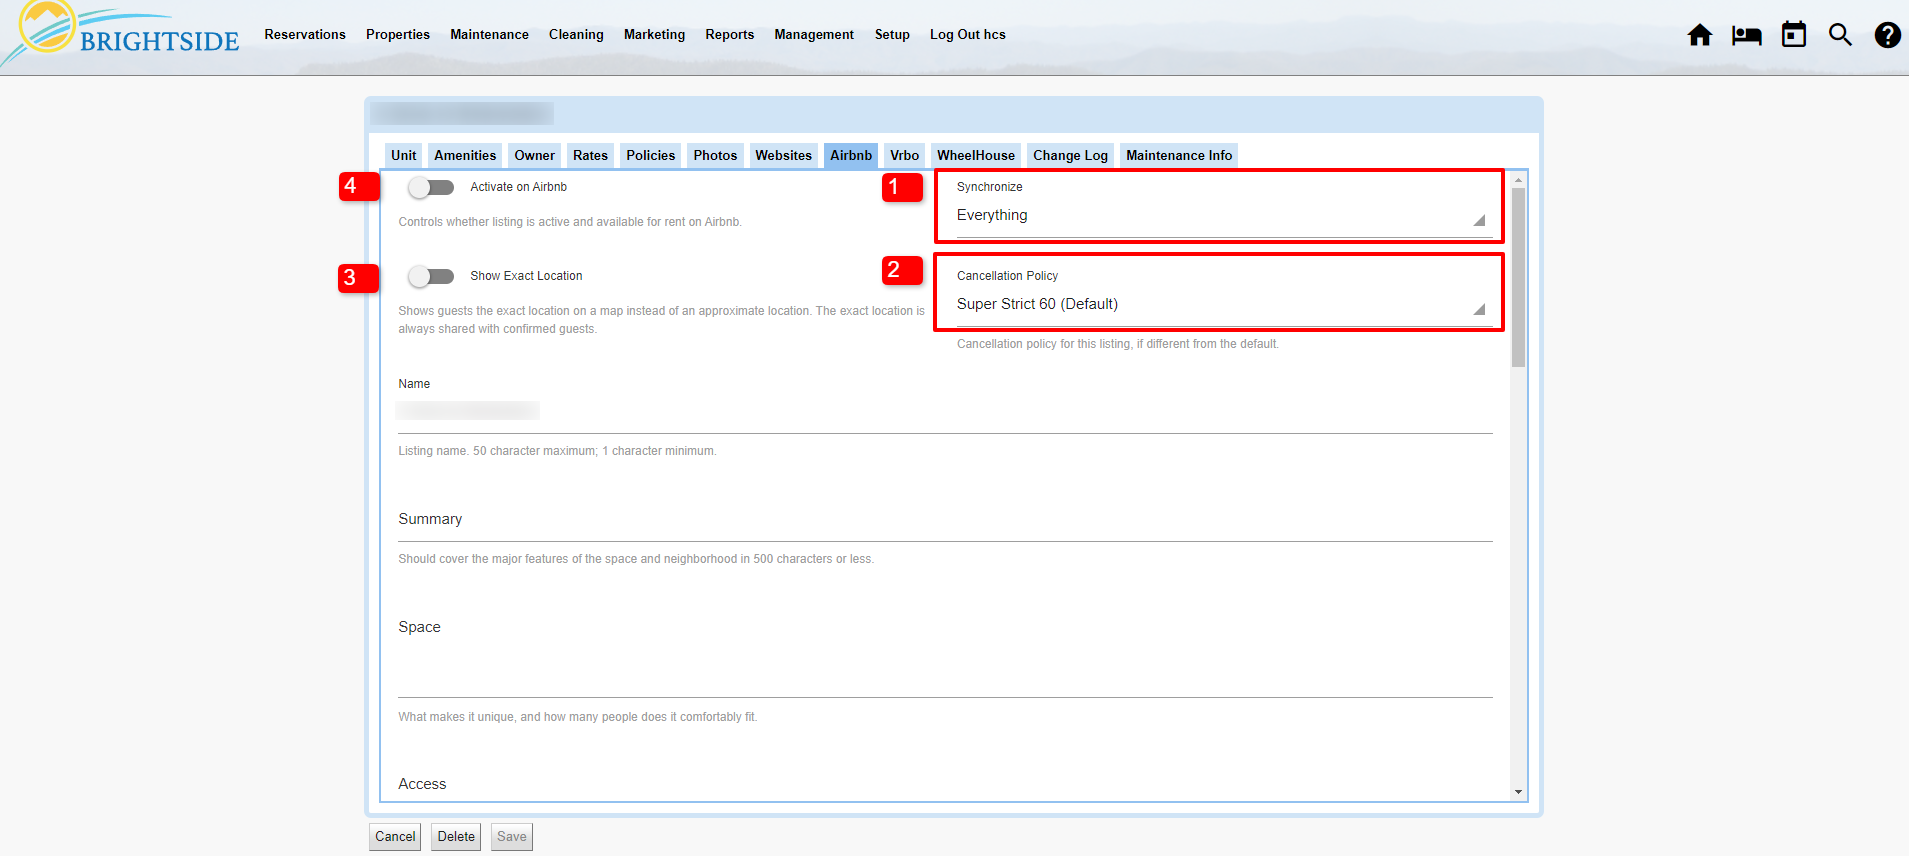
  1. Synchronization: You have two choices for syncing with Airbnb, everything or limited.
    • Everything: To fully utilize the features of BrightSide, we recommend synching everything. This includes, rates, availability, reservations, maintenance blocks, photos, name, summary, literally everything. When you toggle “Activate on Airbnb,” BrightSide creates this unit on Airbnb and sends all of the information.
    • Limited: On rare occasions, you may want to sync only the rates, availability, and reservations with Airbnb. When you choose this option, you must log into Airbnb to maintain photos, descriptions, and other information.
    • Undecided: This is the temporary default until you decide which of the other two you want to use. You must select Everything or Limited in order to activate on Airbnb.
  2. Cancellation Policy: BrightSide allows you to have a default cancellation policy with the flexibility of changing it on a unit by unit basis. To select a different cancellation policy for this unit, click on the dropdown and choose from Airbnb’s various cancellation policies.
  3. Show Exact Location: By default, BrightSide does not show the exact location of your property to guests on the Airbnb map, it is only approximate. To allow Airbnb to show the exact location to unconfirmed guests, click this toggle.
  4. Activate on Airbnb: When you have completed all the above requirements and recommendations, click this toggle to activate your property on Airbnb.
  5. Click Save
Connect a Unit to Airbnb | Options & Final Steps

Click on Image for Enlarged View

Common Issues

  1. I uploaded my unit photos to BrightSide. Why am I getting an error message on the Airbnb tab saying I need to upload photos?
    • Reason: Photos can take a while to upload to Airbnb, especially high definition images. In all likelihood, they are still in the process of uploading.
    • The Fix: Wait a little longer. If after 30 minutes you still have an error, follow these steps exactly to force an update.
      1. Toggle off “Activate on Airbnb”
      2. Toggle on “Activate on Airbnb”
      3. Save.
  2. After updating my unit’s information in Airbnb the changes just disappeared. Why is this happening?
    • Reason: Unit updates made on Airbnb’s website will be overwritten by BrightSide the next time changes are made in BrightSide.
    • The Fix: ALWAYS make updates to your units in BrightSide, not in Airbnb. BrightSide updates Airbnb, not the other way around.

Connect a Unit to Airbnb2024-05-16T15:35:03-04:00

Airbnb Markup

2024-04-11T16:33:52-04:00

Summary

The Airbnb Markup is a fee bundled into the rent. This fee allows the property management company to recoup the Airbnb Service Fee by passing the cost to the guest. This article explains how to set it up and use it properly.

Reason for an Airbnb Markup

Recoup the Service Fee

Airbnb generally charges the host company a 3% service fee on the booking subtotal for every reservation booked through their website. In this article from Airbnb’s website, they explain:

Most Hosts pay a flat service fee of 3% of the booking subtotal. The subtotal is your nightly price plus any optional fees you charge guests, like a cleaning fee, and doesn’t include Airbnb fees and taxes. Guests typically pay a service fee of around 14% of the booking subtotal.

So, if you’re charging $100 USD a night for a 3-night stay, plus $60 USD for a cleaning fee, your booking subtotal is $360 USD. The Host service fee, which is generally 3% of your booking subtotal ($10.80 USD), is deducted from your earnings, and a service fee of 14% ($50.40 USD) is charged to guests and included in the total price they pay.

BrightSide offers a way for hosts to recoup the 3% fee by passing it on to the guests through the Airbnb Markup.

Set Up the Airbnb Markup

Create the Fee

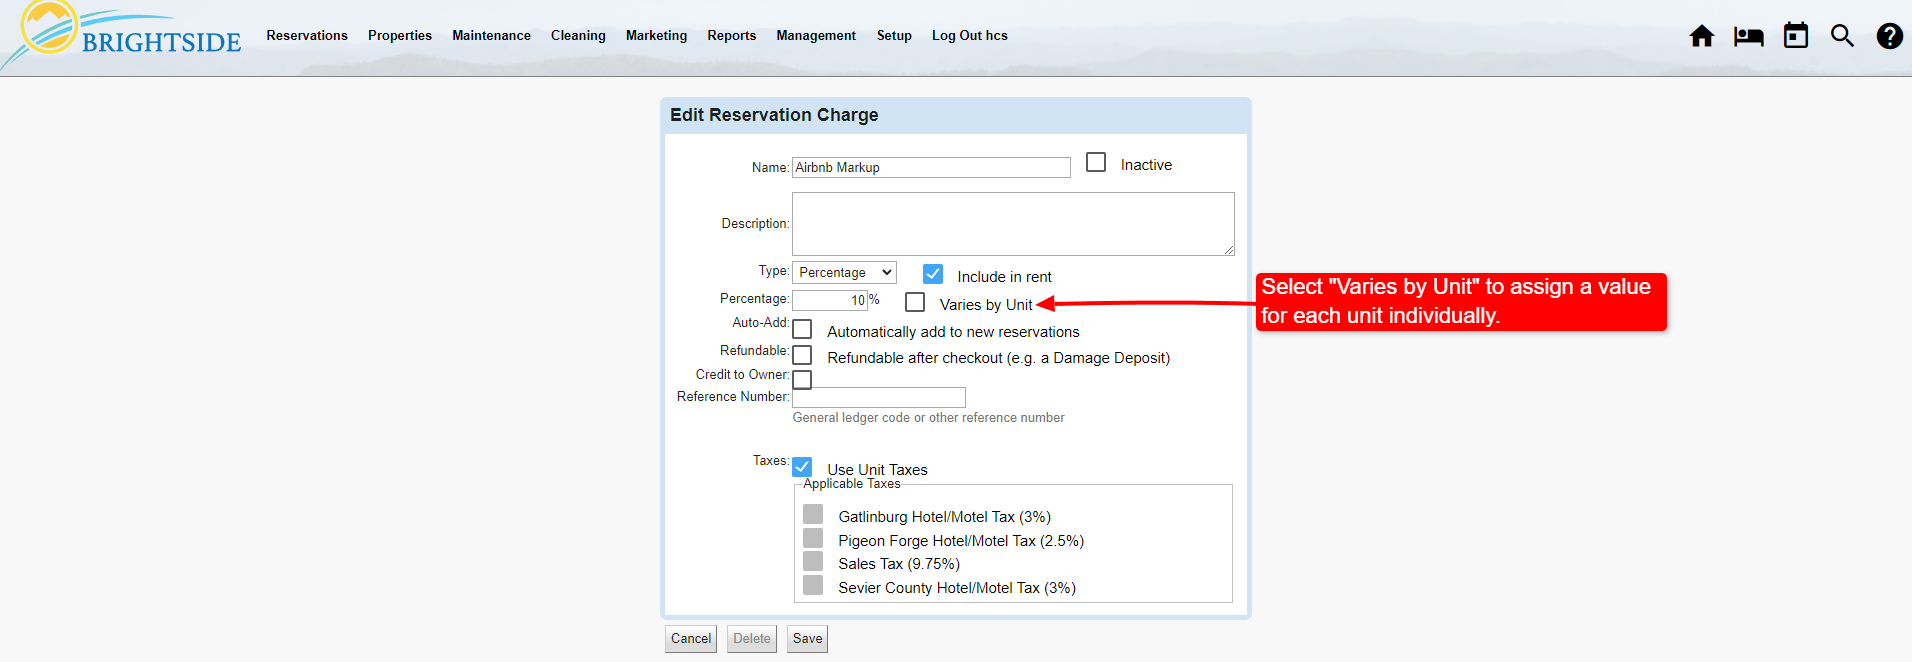
The Airbnb Markup is a regular fee, set up in Reservation Fees and Charges. When you finish adding this fee, it should look just like the screenshot below. The only difference you might possibly have is the percentage.

Navigate to: Reservations > Fees and Charges > +Add

Airbnb Markup | Create the Fee

Click on Image for Enlarged View

  1. Name: Airbnb Markup
  2. Description: Not needed. It will not show up anywhere.
  3. Type: Select “Percentage” from the dropdown menu. The other options do not work properly for the purposes of the Airbnb Markup.
  4. Include in Rent: Tick the box. This bundles the fee in the rent instead of listing it as a separate fee on Airbnb.
  5. Percentage: Enter the amount you want to want to increase the Airbnb rental rate. NOTE: This raises the rental rate ONLY, and does not affect your fees.  However, the 3% service fee Airbnb charges you is based on all of your charges; the rental fee, cleaning fee, admin fee, and any other fees you may charge. In order to have enough of an increase in the rent to cover 3% of “everything,” you need to increase the rent by at least 5-10%. Do what you are comfortable doing. Be forewarned, if you do not increase it enough, your reservation may have a balance due after you receive the Airbnb payout.
  6. Varies by Unit: If you want to charge a different percentage markup for each unit, tick this box. The amount you entered in the percentage field becomes the default markup, but may be changed on a unit by unit basis. This is helpful if you have a property where you don’t want to charge a markup, or if you  just want a higher percentage. After ticking this box, you must go to each unit and enter the desired percentage on the “Rates” tab (for units where you want the percentage to be more or less than the default).
  7. Auto Add: DO NOT select this. It will add this fee to every reservation.
  8. Refundable: DO NOT select this.
  9. Credit to Owner: DO NOT select this unless you want any “leftover” funds from the markup to pass to the owner.
  10. Reference Number: Not needed.
  11. Taxes: Tick “Use Unit Taxes.”
  12. Save

Activate the Markup

After you create the Airbnb Markup fee, you need to activate it in Integration Partners. You must follow these steps so the markup can be added to your Airbnb reservations.

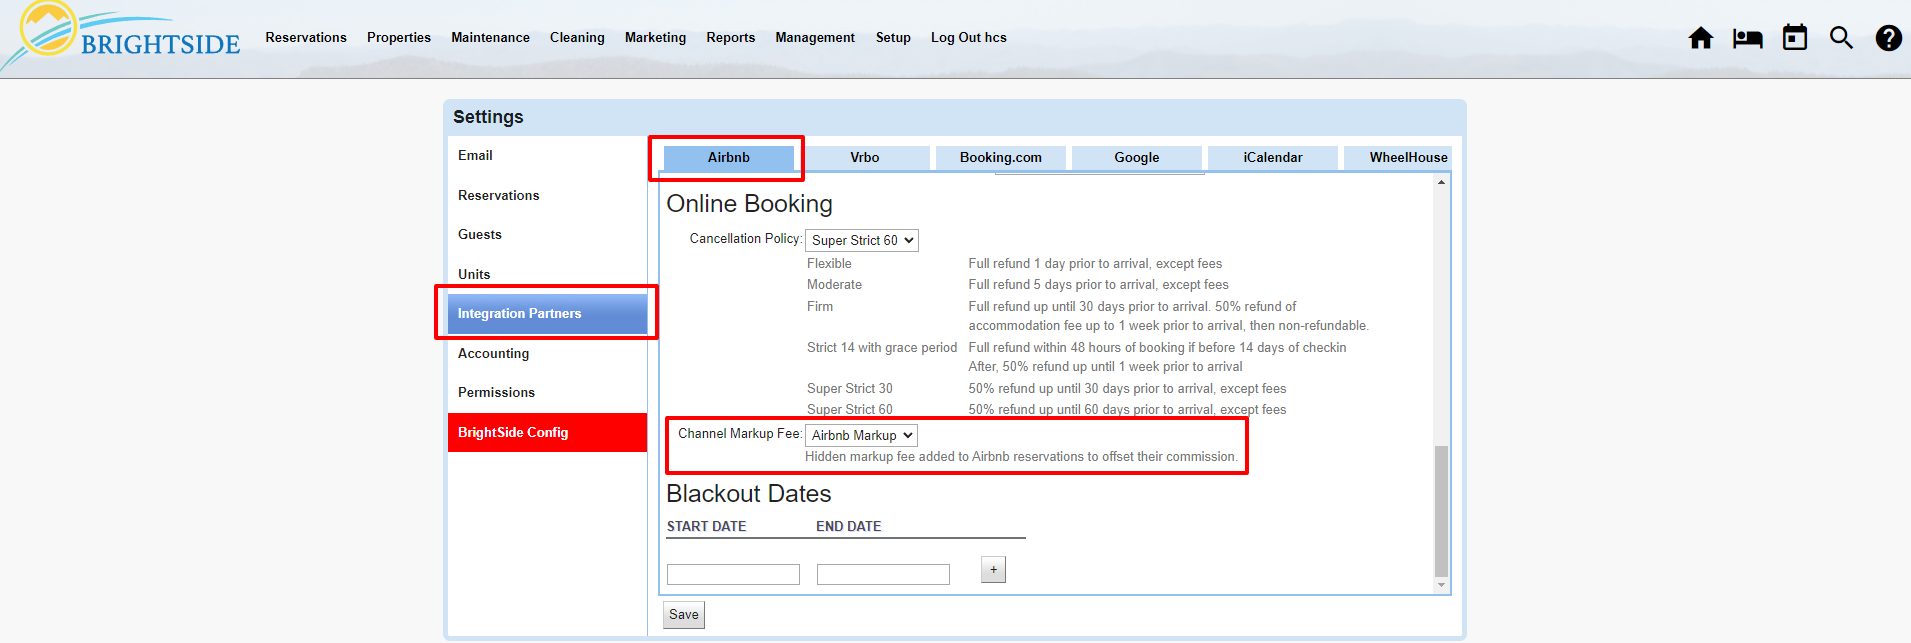
Navigate to: Setup > Settings > Integration Partners > Airbnb (tab)

Airbnb Markup | Activate the Markup

Click on Image for Enlarged View

After you navigate to the Airbnb Integration area of BrightSide, scroll down to Online Booking. Just above Blackout Dates you see the Channel Markup Fee. In the dropdown, select Airbnb Markup.

  1. Channel Markup Fee: Select “Airbnb Markup”
  2. Save

The Airbnb Markup is now active and the specified percentage is added to the rental rates BrightSide sends out to Airbnb.

How the Airbnb Markup Works

The Details

The Airbnb Markup is a way to raise the rental rates on Airbnb to pay for the Airbnb Service Fee, without passing on the increased revenue to the owner. The idea is not to hide rental revenue from the owner, but to recoup the Airbnb Service Fee by including it in a higher rental rate. Here is how it works.

  1. Fees & Charges with the setting “Include in Rent” are bundled into the basic rental rates. The Xplorie fee is a good example of this.
  2. The Airbnb Markup is applied and increases the bundled rate by the percentage set there. If your Airbnb Markup is 10%, the bundled rental rate is increased by that amount.
  3. BrightSide feeds the bundled rental rate to Airbnb, along with any additional separate fees you charge, i.e.: cleaning fee, admin fee, etc.
  4. When Airbnb pays you, they keep 3% of the reservation subtotal, their “Service Fee.” The subtotal includes the rent, cleaning fee, admin fee, and any other fees you charge.
  5. BrightSide breaks down the Airbnb Payout to account for all the “bundled rental fees” and other charges in the reservation.
  6. The 3% Airbnb Service Fee is deducted from the 10% Airbnb Markup. This 10% of the bundled rent recoups the 3% of the subtotal Airbnb keeps and leaves a small amount for the management company to keep.

Example

The following is an example of how the Airbnb Markup is applied, creating a new bundled rate for Airbnb reservations. In this example, the property management company offers Xplorie benefits and the cost is included in the rent rather than listing it as a separate fee. If you do not offer Xplorie, or bundle any fees in the rent, the Airbnb Markup applies only to your rental rate.

$100.00 – Rental Rate
+ $15.00 – Xplorie Fee (only added if “Included in Rent”) This fee varies depending on which tickets you offer your guests.
= $115.00 – Rental Rate ($100.00) + Xplorie Fee ($15.00)
+ $11.50 – Airbnb Markup (10%) The Airbnb Markup is the last fee to be added to a bundled rate.
= $126.50 – Rental Rate ($100.00) + Xplorie Fee ($15.00) + Airbnb Markup ($11.50) = Airbnb Bundled Rental Rate

Breaking Down the Airbnb Payout

The Details

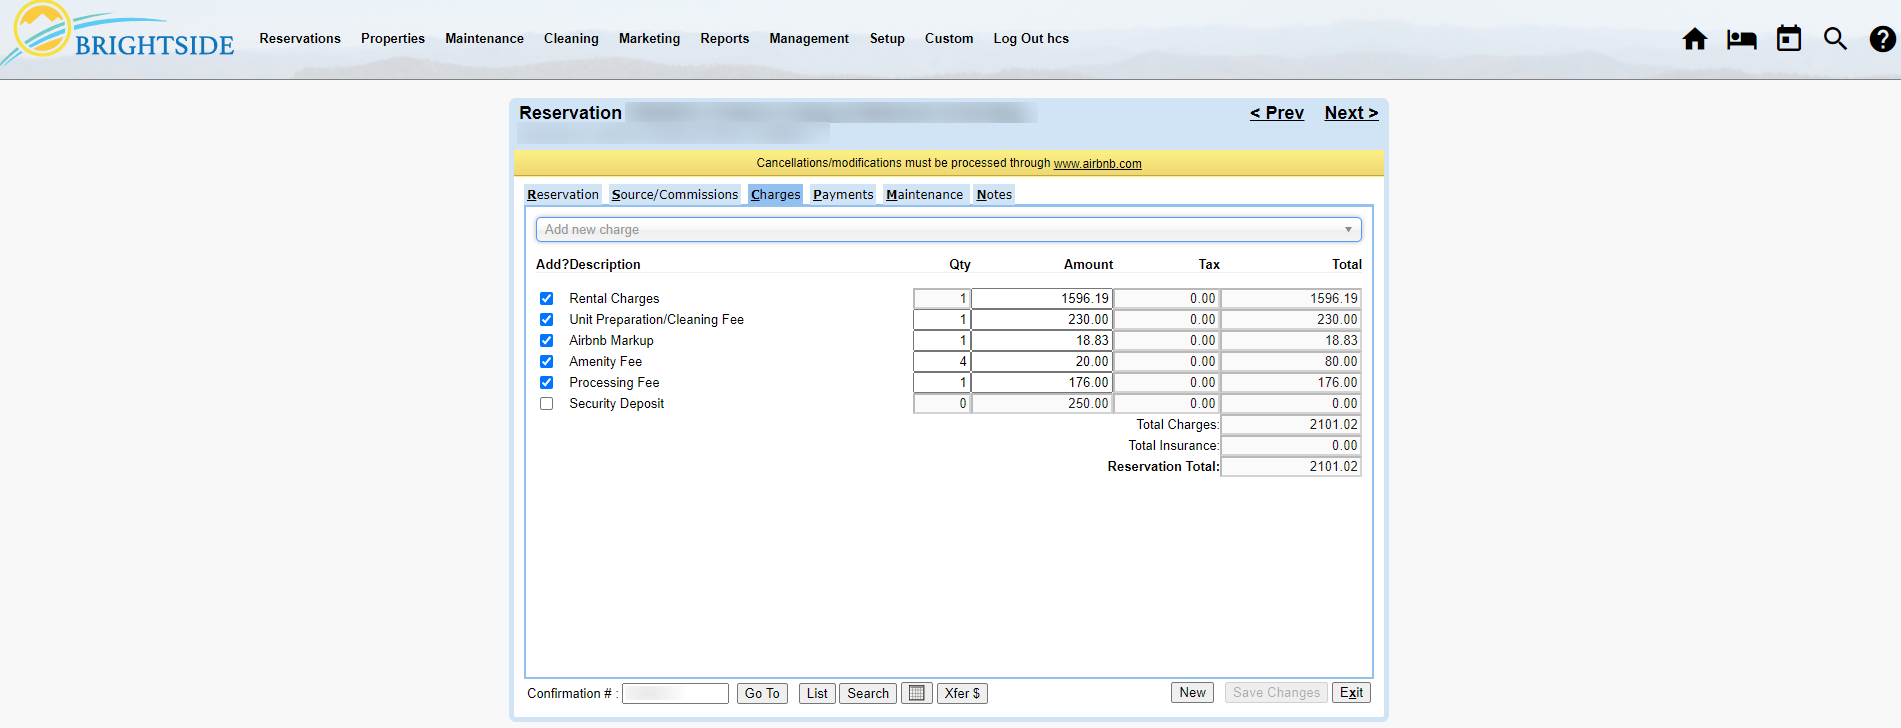
Hosts may expect the Airbnb Payout to arrive in BrightSide within 24-48 hours of the guest checking into your property. Of course, this is totally dependent on when Airbnb sends the payment. After BrightSide receives the payment notification, we break it down into the original fees and charges, as they were before they were bundled. All of it is separated out and listed in the reservation’s “Charges” tab.

In the following reservation, Airbnb deducted their service fees and paid the host a lump sum of $2,101.02. BrightSide then broke it down and divided it into the following categories. The 3% service fee paid to Airbnb was deducted from the Airbnb Markup, and had $18.83 left over. The property management company can keep this or pay it to the owner.

$1,596.19 – Rental Charges
$80.00 – Xplorie Fee (listed as “Amenity Fee”)
$230.00 – Cleaning Fee
$18.83 – Airbnb Markup (leftover amount after paying the 3% service fee to Airbnb)
$176.00 – Processing Fee
$2,101.02 – Airbnb Payout

Airbnb Markup | Breaking Down the Payout

Click on Image for Enlarged View

Airbnb Markup2024-04-11T16:33:52-04:00

Connect a Unit to Vrbo

2024-05-29T10:24:23-04:00

Summary

This tutorial assumes your BrightSide account is already connected to a Vrbo account and you simply want to add a new listing. If your BrightSide account is not integrated with Vrbo yet, follow the instructions in the Vrbo Integration tutorial.

NOTE: BrightSide is designed to sync with Vrbo utilizing our custom API. Unlike some PMS software, BrightSide does not use a channel manager to communicate with Vrbo. Our custom API “talks to their system directly.” Also, keep in mind that BrightSide overrides Vrbo data, not the other way around.

Navigate to: Properties > Units > Select Unit > Vrbo (tab)

Prepare & Activate

Existing or New Unit

You may have a unit in BrightSide that has existed for some time, but it is not listed on Vrbo. Or, you may be adding a brand new unit to your portfolio. Either way, begin in BrightSide with the unit you want to add to Vrbo.

Vrbo Tab

BrightSide allows you to enter unique information for each of the online travel agencies in your units. Instead of having identical descriptions on your website, Airbnb, Vrbo, and Booking.com, you may offer original content for each. This will help your own website’s SEO (search engine optimization).

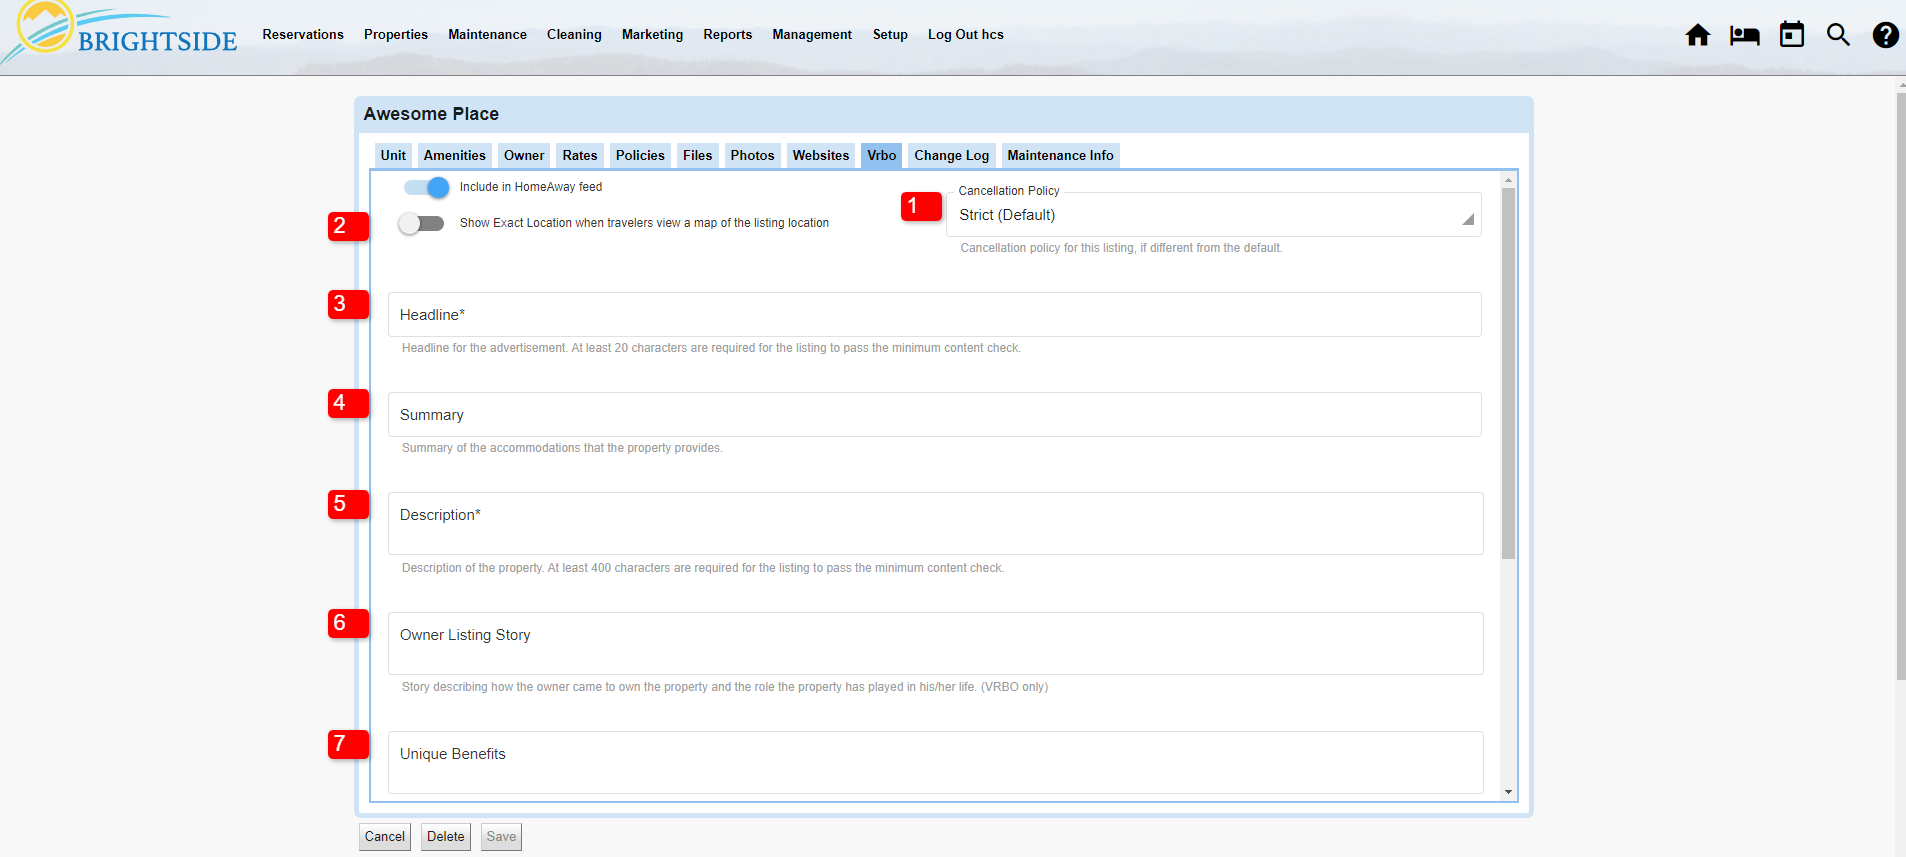
  1. Cancellation Policy: The default cancellation policy set in Vrbo Integration Partners is shown. If this unit needs a different cancellation policy, you may choose it from the dropdown.
  2. Show Exact Location: If left unselected, the map will show guests the general area of the unit, but not the exact location. When activated, guests may see the exact location of the property. After booking, guests will always be able to see the exact location.
  3. Headline: Enter a unique headline using up to 80 characters.
  4. Summary: Enter a summary using up to 80 characters.
  5. Description: Enter a detailed description of the property using a minimum of 400 characters and a maximum of 10,000 characters. If you do not enter any information here, the Website Description from the Unit tab is displayed on Vrbo. If the description is shorter than 400, or more than 10,000 characters, it could prevent your unit from being activated on Vrbo.
  6. Owner Listing Story: Optional, but can be useful of there is a great story behind the rental.
  7. Unique Benefits: Optional, but provides an opportunity to promote the reason you think guests would benefit from staying at this property.
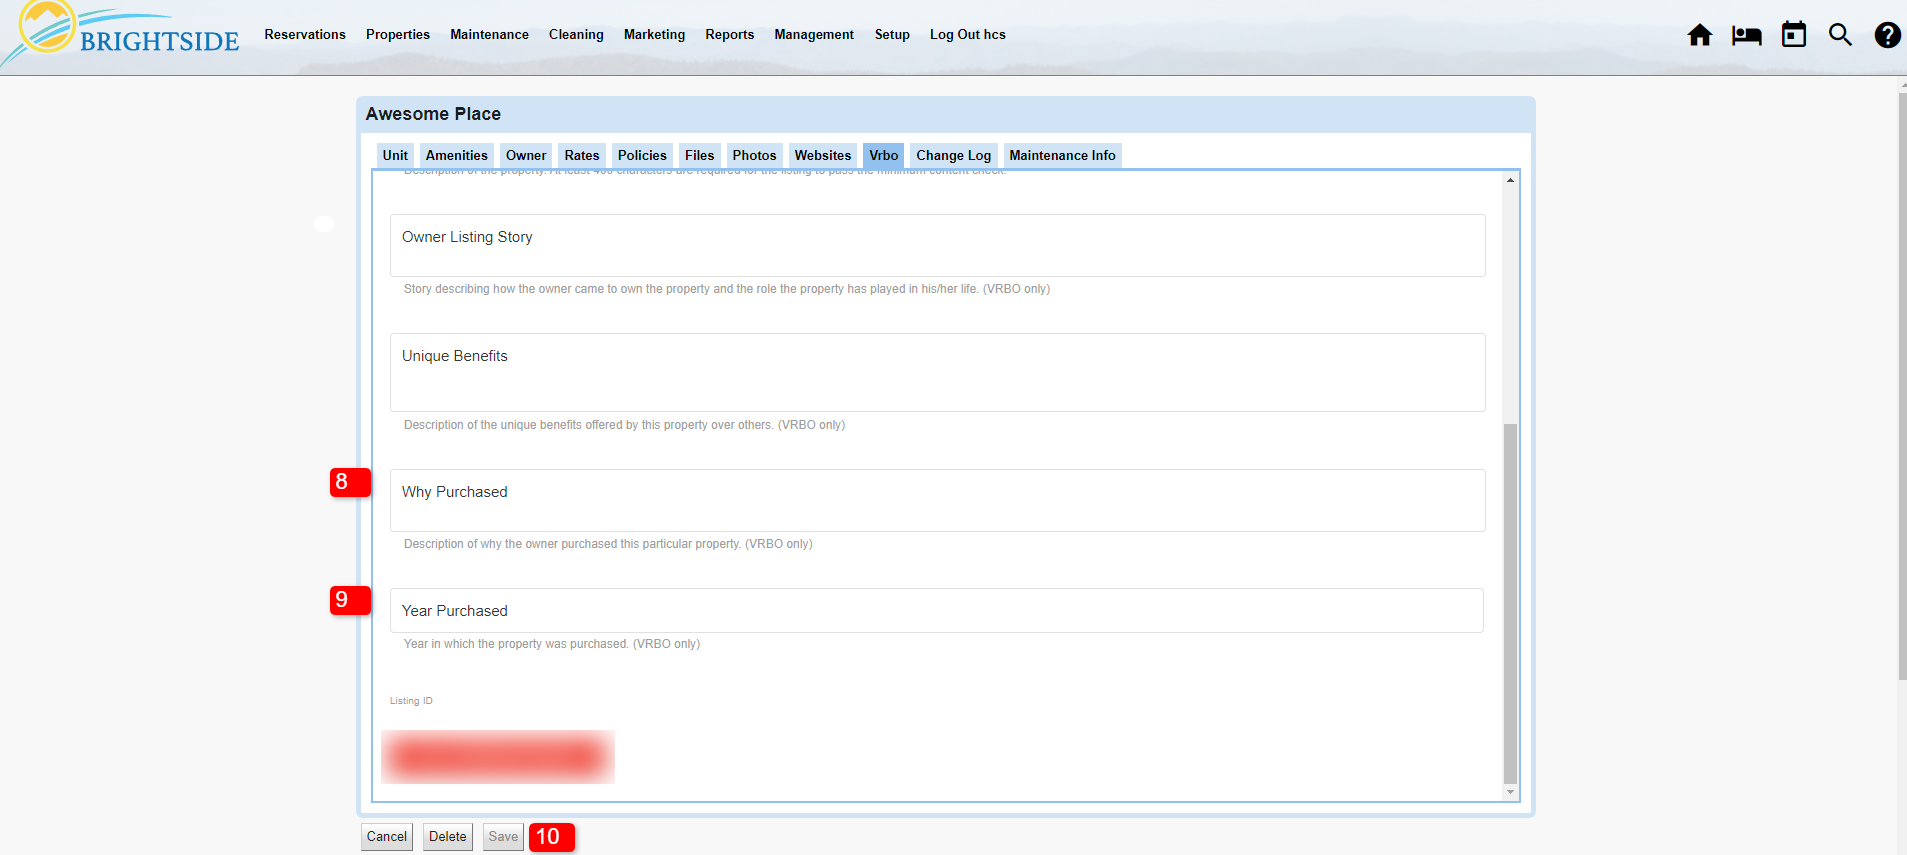
  8. Why Purchased: Optional, tell the story of why you purchased this property.
  9. Year Purchased: Optional, enter the year you purchased the property.
  10. Save: Always save your changes.
Connect to Vrbo | Unit Tab Information
Connect to Vrbo | Unit Information

Click on Image for Enlarged View

Connect to Vrbo | Unit Tab Information
Connect to Vrbo | Unit Information

Click on Image for Enlarged View

Common Questions

Q. How long does it take Vrbo to activate my property so I can see it live on their platform?
A. After you complete all the steps in BrightSide to activate a property, it takes Vrbo at least 48 hours to review the unit details and approve it for publication on their site. This is a manual process and it can take as many as 72 hours.

Q. I went through all the steps to activate my property on Vrbo, but I am getting an error message saying I need to upload photos, enter rates, etc. Why?
A. This is an indication that Vrbo has not completely processed the onboarding of your unit. If you entered all these details, the only thing to do is wait 48 to 72 hours.

Q. My property is active on Vrbo and I made an update in BrightSide, however, the change is not showing up on Vrbo. Why?
A. Vrbo does not update in real time like Airbnb. Vrbo accesses the BrightSide database once a night and pulls the updated information from our servers. They then process that data and update the units on their end. This can take as many as 24 hours to complete.

Connect a Unit to Vrbo2024-05-29T10:24:23-04:00
Go to Top