Summary
In this tutorial, we will go over the basics of creating a new reservation from within your BrightSide dashboard. You will learn how to:
- Create a new reservation beginning with the main menu or the icon menu.
- Search for available properties using stay dates.
- Add search criteria for finding available properties.
- Apply predefined specials.
- Select the best property for the guests.
- Add guest’s information to the reservation.
- Enter referral information.
- Review and/or change reservation charges.
- Take a payment from the guest.
You may choose to create a reservation from the unit calendar if you prefer. The unit calendar provides a visual of availability across a full month for all units. Learn more about using the unit calendar.
Steps to Creating a New Reservation
This section of the tutorial focuses on creating a new reservation from the “main menu” in your BrightSide dashboard.
HINT: Instead of using the menu navigation illustrated below, you may click on the “Bed Icon” shortcut located in the upper righthand corner of your dashboard. It saves a step, and it takes you to the same place as the main menu.
Navigate to: Reservations > New Reservation
1. Search for Availability
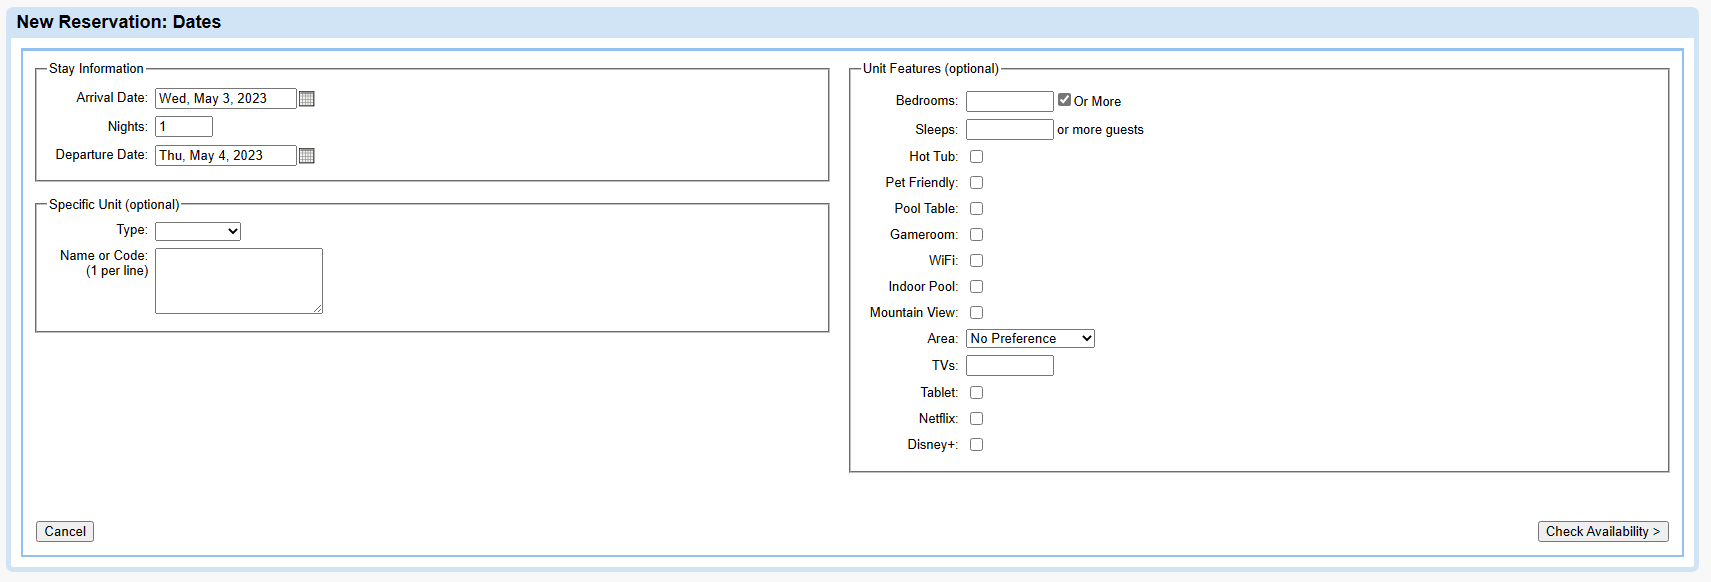
Click on Image for Enlarged View
This page is basically a search form, using preferred dates, amenities, and more, to find an available property.
Stay Information
- Begin by entering the arrival date your guests have chosen.
- Next, you may enter the number of nights they want to stay OR enter the departure date.
HINT: At this point, you may bypass entering any further search parameters and click on “Check Availability.” This will return all available units for those dates without any further filtering. If you want to narrow it down, stay on the page and complete the following.
Specific Unit (optional)
- Type: Choose which type of unit you want.
- Name or Code: If you want a specific unit, enter the unit’s code or at least part of the unit’s name, or the whole name. Sometimes less is better, since you must enter the whole name exactly if you type it in. You may enter more than one unit but be sure to place each one on a separate line.
Unit Features (optional)
- Choose which features the guest is requesting to have in their unit. These features should be a guest’s “must have”, since choosing too many will leave you with few options.
After filling out this form, find which units are available by clicking “Check Availability.” All the properties with the features you requested, and are available during the time selected, will populate the next screen.
2. Select a Qualified Unit
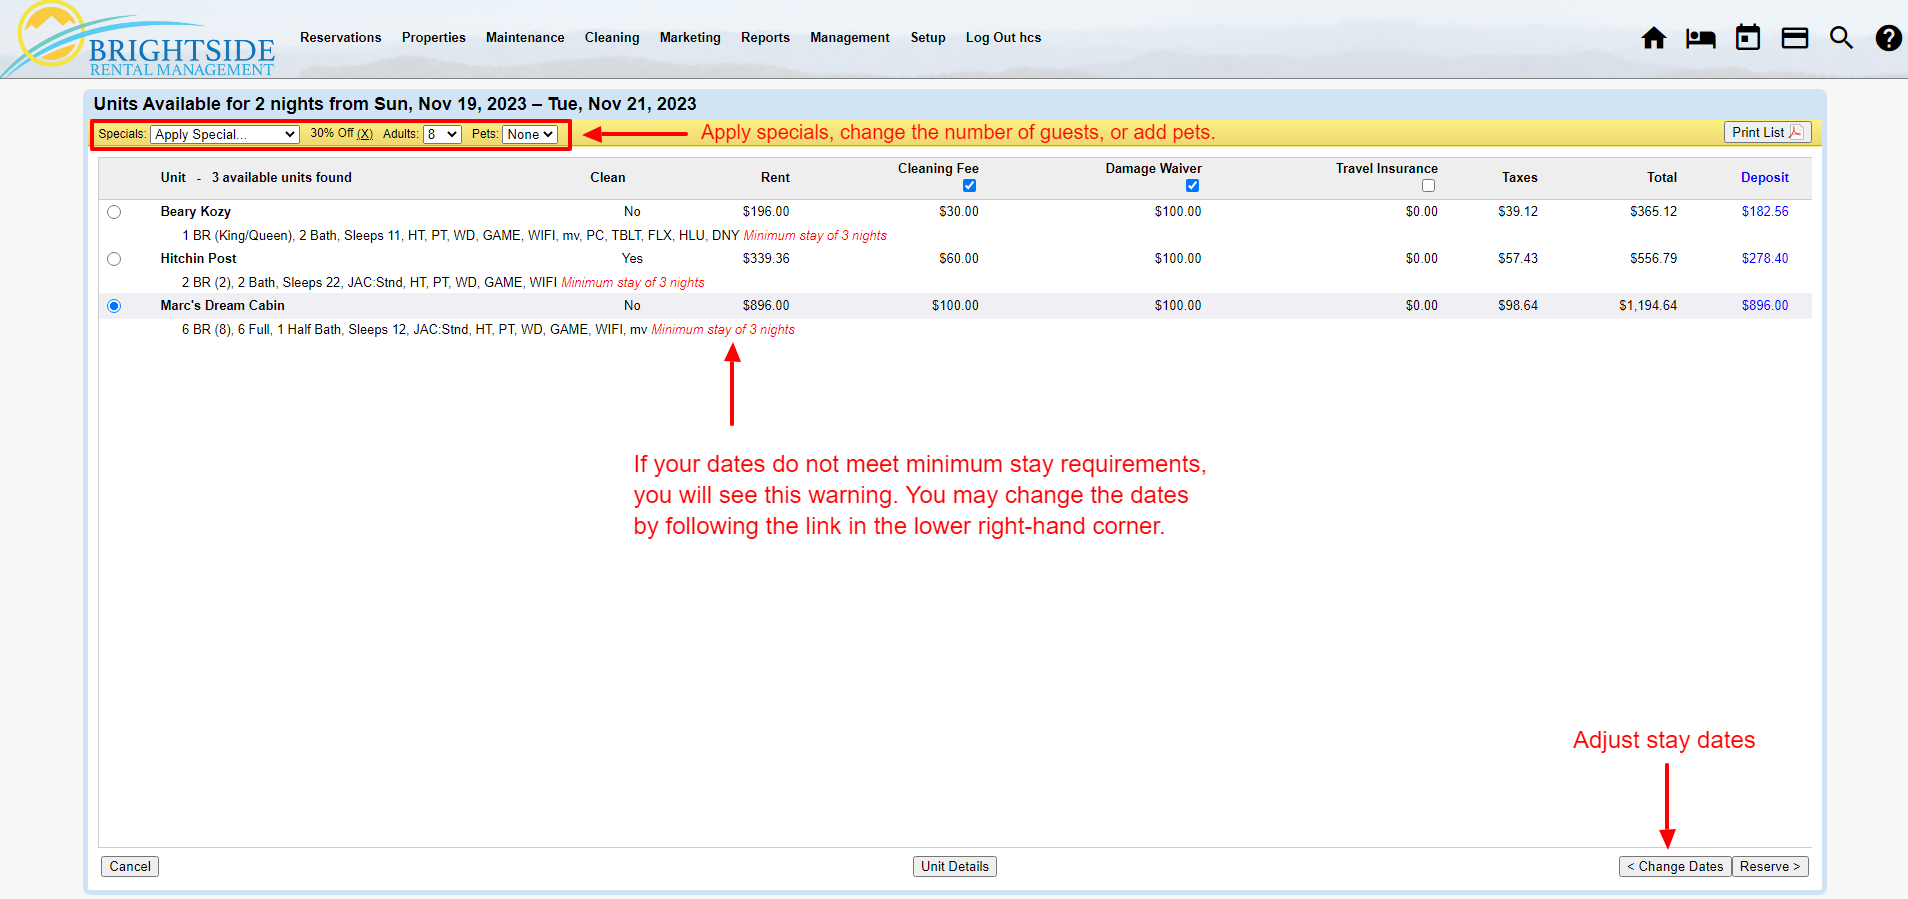
Click on Image for Enlarged View
The second step in making a reservation in BrightSide is selecting the most qualified unit for the guest. This second screen provides search results from step one, although you may continue to narrow down options in this screen.
Review the Dates
- Double check the dates at the top of the screen to make sure they are what you intended.
- All of the available units are listed on this page. In our example, there are only three units fitting the criteria we set in step one.
HINT: If you need to adjust the dates, click on “< Change Dates” in the lower right corner.
Apply Specials (optional)
- If you have created any Specials, you may apply them here. Specials can be based on percentages, free days, or repeat guest discounts. When you apply a special, the price will adjust automatically for each unit below.
Change Number of Guests
- If you need to adjust the number of guests, you may do it on this screen. When you alter it, the available units may change depending on the occupancy levels of each unit.
Pets
- Make sure to select the number of pets the guests will bring from the dropdown menu. Properties not accepting pets will be eliminated from the list of available units.
Review Available Units
- The list of available units provides a summary of amenities for each. If there is a minimum stay requirement, a red notice will appear next to the description, giving you an opportunity to adjust the dates and book more nights. However, as a backend user, you may continue to create the reservation for less than the minimum stay requirement. A guest booking online will not be able to override the minimum stay requirement.
- You may untick fees to remove one or add one if the fee is not mandatory, like taxes.
HINT: Placing your cursor over the dollar amount under the “Rent” column will show you a nightly breakdown of the rent, including any special you have applied.
Selecting a Property
- When you and your guest have chosen a unit, tick the circle next to it and click the “Reserve >” button in the lower right corner and move on to the next step.
3. Guest and Deposit Information
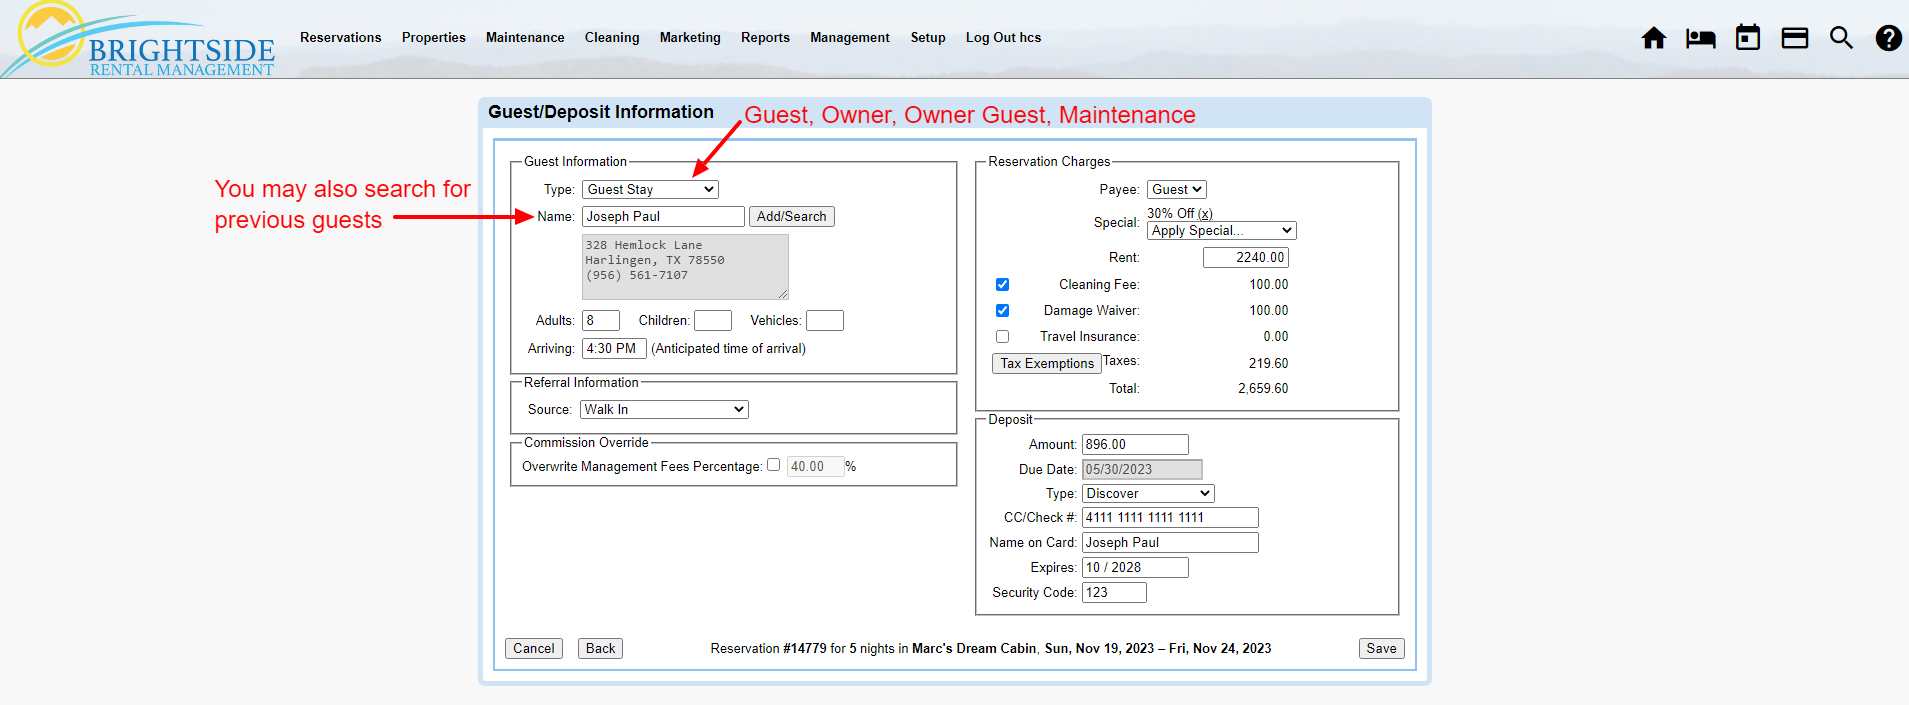
Click on Image for Enlarged View
The third step in making a reservation involved gathering the guest’s information, reviewing the charges, and securing a deposit.
Guest Information
You must select which type of guest is making this reservation. Your choices are Guest Stay, an Owner Stay, an Owner-Guest Stay, or a Maintenance Block.
- Type: Choose which type of guest is staying.
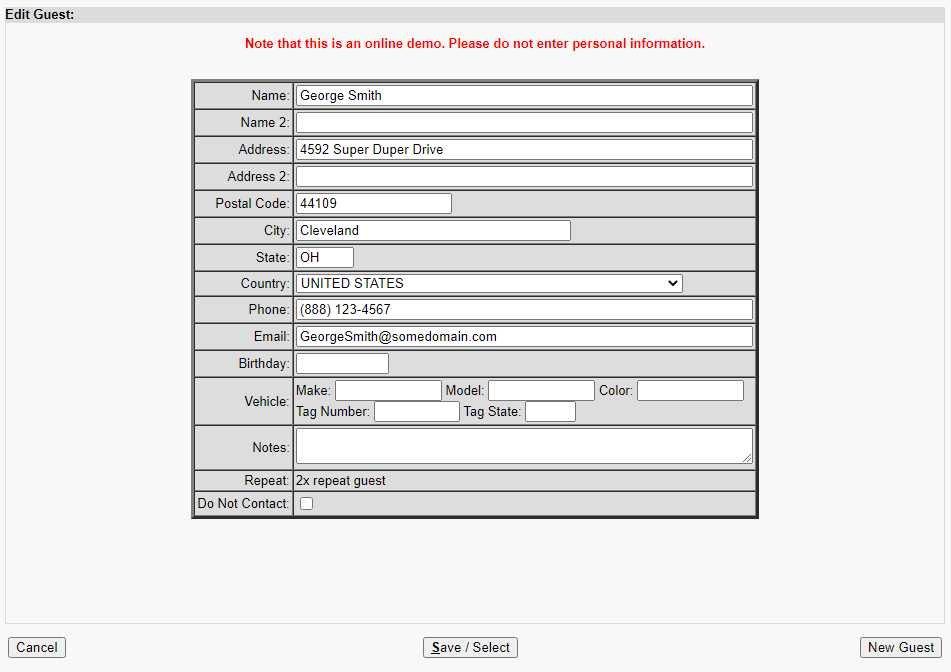
- Name: You may add a new guest or search for a returning guest.
- Miscellaneous: Confirm the number of adults, children, vehicles, and arrival time of the guests.
HINT: When adding a new guest, enter the first and last name into the “Name” field. The “Name 2” field is for the name of a second guest. Tick the “Do Not Contact” box to indicate that they are not to be contacted after they depart. This will prevent any marketing materials going out requesting reviews, etc. Checking this box will not impact any emails the system sends out regarding their reservations and stays.
Click on Image for Enlarged View
Referring Information
- In order to track the source of your booking, select a referral source from the dropdown. This will come in handy when you want to run a report providing details of where your bookings are coming from.
Commission Override
- You may change the management fees for this booking if needed.
Reservation Charges
- Payee: Select who is paying for this reservation. In most cases, it will be the guest.
- Specials: You can change the special on this reservation or remove it altogether.
- Rent: Make a manual adjustment to the rent if needed.
- Other Fees: Miscellaneous fees can be added or removed from the reservation. Some of the fees include cleaning, damage waiver, reservation guarantee, travel insurance, etc. If there is a tax exemption, you may apply it here.
HINT: Placing your cursor over the dollar amount next to “Rent” will activate a popup with the breakdown of the nightly rent, any specials applied, total savings, and average nightly rate.
Deposit
- You may accept a deposit by entering the guest’s credit card information. If you have received a payment in another form (cash, check, money order, etc.), you may add it here as well.
Save
Saving the reservation will make the stay active in the system and block off the dates in all channels.