BrightSide Vacation Rental Software & PMS

BrightSide Short Term Rental Software
Do more. Work less.™

Our cloud-based hospitality software is both powerful and easy to use. But more importantly, our support team is here for you, ready to help make your user experience the best it can possibly be.

  1. BrightSide is powerful and easy to use from anywhere you have Internet access.
  2. BrightSide’s API integrates directly with Airbnb, Vrbo, Booking.com, Google Vacation Rentals and others.
  3. BrightSide support responds to email requests in minutes or hours, not days or weeks. No AI, real people.
  4. BrightSide support answers the phone. If we can’t answer, leave a message and we will call you back. Really.
  5. BrightSide is affordable. We do not add charges for features; it’s all included in the subscription.

Desired Reservation Total

2026-02-13T15:00:48-05:00

Summary

This article explains how to use the “Desired Reservation Total” tool to force a reservation to a zero balance. This is useful when a guest has overpaid or underpaid (Total Payments do not equal Total Charges), and you wish to adjust the rental charges and taxes to match the amount paid.

Note: This tool adjusts Rental Charges and Taxes. It does not change fixed fees such as Cleaning Fees, Damage Waivers, Pool Fees, etc.

Step by Step Instructions

  1. From the main Reservation screen, identify the Total Payments amount. This amount may be lower or higher than the current Total Charges. In our screenshot below, the total payments equal 1,895.00, which is an overpayment of 2.39. In this instance, we want to raise the rent and taxes to equal the amount paid.Totals
  2. Copy the exact amount listed under Total Payments (1895.00).
  3. Click on the “Charges” tab in the top navigation menu of the reservation.
  4. Click the “Change” item next to Rental Charges. A popup will appear where you make the changes. Charges
  5. Locate the Desired Reservation Total field at the bottom of the grid. Paste or enter the Total Payments amount into this field.
  6. Click the Calculate button.
    • Notice that the system automatically adjusts the Rental Charges and applicable Taxes to reach the new total. Fixed items like Cleaning Fees remain unchanged.
  7. Once the calculation is complete, click Submit Changes to finalize the adjustment.Desired Reservation Total
  8. Return to the main Reservation screen. Verify that the Total Charges now match the Total Payments and the Balance is 0.00.Totals Balance

Desired Reservation Total2026-02-13T15:00:48-05:00

Closing the Month

2025-06-19T12:29:27-04:00

Summary

Learn to close the month. Following the correct closing procedure at the end of each month is critical for a smooth transition from month to month. By follow these steps, your accounting will stay balanced. This goes a long way to ensure that your books and owner statements are correct.

Balance Reservations

The first step is to ensure all reservations with a departure date during the month have a zero balance. You cannot close a month with money owed on a reservation or an overpayment on a reservation. Reservations must have a zero balance to close the month.

Calculate Month

Navigate to: Reports > Calculate Month

To determine if there are any reservations with a balance, run Calculate Month. This calculation lets you know which reservations need attention. In the following screenshot, you can see that a “guest paid” reservation still has a balance due. This must be resolved before you can close the month.

NOTE: You may run Calculate Month as many times as you want during the month. So after taking care of the reservations with a balance, run it again.

Closing Out the Month
Calculate Month

Click on Image for Enlarged View

Pay Out Cancellations

When a reservation is cancelled, any money not refunded to the guest remains in escrow. At the end of each month, we recommend moving this to earned income by following the steps below.

Move Funds from Escrow

Navigate to: Management > Pay Out Cancellations

This is a list of reservations cancelled during the month. Previous months are included if you failed to pay them out prior. Any funds not refunded to the guest when the reservation was cancelled, remains in escrow and you can see those figures in the report. The amounts in the Escrow column need to be moved to earned income.

  1. Tick the box next to the reservation(s) you want to pay out.
  2. Select the payout date in the lower right hand corner of the page. The date needs to be the same accounting month you are closing.
  3. Click “Post”

The funds are now in your earned income. Include these paid out amounts when you transfer funds from your escrow account into your operating account at your bank.

NOTE: While it is not required to move funds into earned income every month, it is highly recommended.

If you are cancelling reservations and allowing guests to rebook, we advise you to use the rebooking status or a gift certificate unit to park the reservation instead of cancelling it and leaving it in cancelled status for months.

Finally, the “Company” column is the money automatically moved into earned income at the time of cancellation. This includes travel insurance payments that are not refundable.

Pay Out Cancellations

Click on Image for Enlarged View

Owner Charges & Adjustments

Before closing the month, make sure you enter any charges the owners need to pay. BrightSide provides a way to enter recurring charges, so those charges automatically show up according to how you set them up. However, on occasion, you may need to enter a random charge that is deducted from the owner’s statement.

Enter Owner Charges

Navigate to: Properties > Charges and Adjustments

  1. Enter the date of the charge. Make sure it is in the same accounting month you are closing.
  2. Start typing the name of the unit and it will populate the field.
  3. Select the category of this charge. Categories may be added if needed.
  4. Enter the description of the charge.
  5. Enter the amount of the charge. A positive amount takes money from the owner. A negative amount gives money to the owner.
  6. Click “Add.”

The charges entered here are listed on the owner’s statement and the amount is deducted from what you owe the owner.

Charges and Adjustments

Click on Image for Enlarged View

Closing the Accounting Month

Calculate Month

Navigate to: Reports > Calculate Month

If you entered any new charges into BrightSide since you last ran Calculate Month, you must run it again for it to show up on the owner’s statement. Just before you close the month, run Calculate Month again. This will update the owners’ statements with the most current charges and payments ensuring an accurate statement.

Close the Month

Navigate to: Management > Close Month

When you are ready to close the accounting month, click Close Month. You are required to tick four boxes indicating that you reviewed the following reports, they are correct, and you want to close the month.

  1. Owners Reports are complete and correct.
  2. Rental Report is complete and correct.
  3. Summary Report is complete and correct.
  4. I am certain that I want to close the month.

NOTE: Owner calculations may be different when rolling back the accounting month and re-calculating. For this reason, opening a month back up should be done as soon as possible after closing, and going back multiple months is not recommended. You MUST contact support if you need to reopen a month after closing it.

Closing the Accounting Month
Close the Month

Click on Image for Enlarged View

Closing the Month2025-06-19T12:29:27-04:00

Processing Refunds

2024-12-12T17:09:28-05:00

Summary

On occasion you need to issue a refund to a guest’s credit or debit card. The process is simple, but you must follow specific procedures or you may find yourself frustrated when the refund is declined.

Navigate to: Open Reservation > Payments (tab)

Single Payment Refunds

Simple Refund

When a guest makes a single credit card payment and you want to refund 100% of the payment, or a smaller amount, follow the steps below. In this example, the guest made a single payment of $75.00 using a Discover card ending in 9424 and we refund all of it.

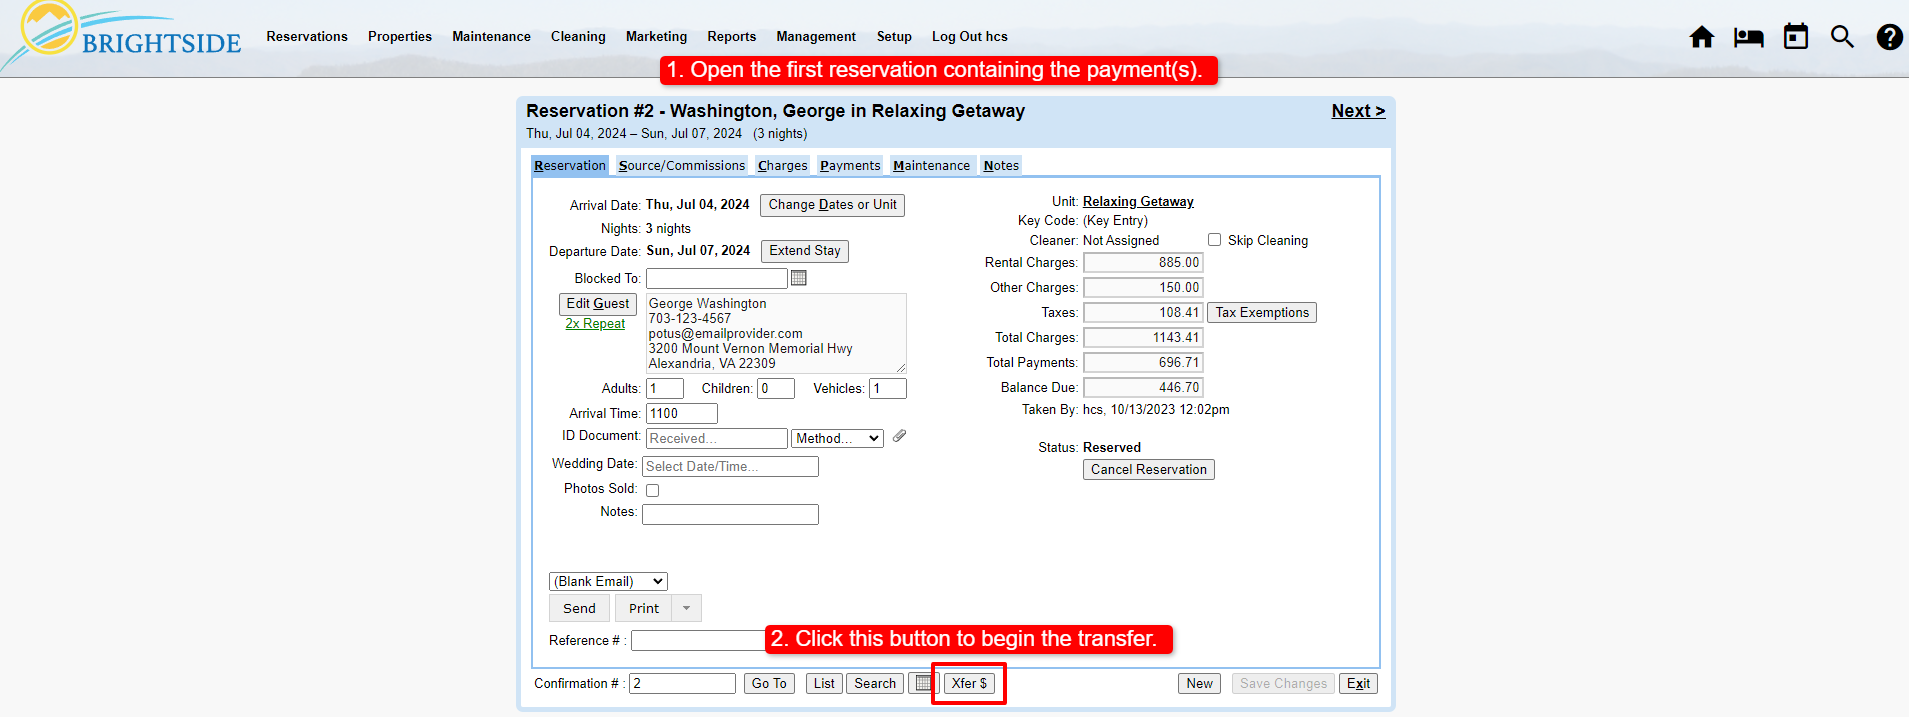
  1. Open the reservation and go to the “Payments” tab.
  2. Under “New Payment” enter -75.00. For a partial refund, enter a smaller amount.
  3. Select “Discover ending in 9424” in the dropdown menu. This is the last option in the list.
  4. Click the “Add Payment” button.
  5. BrightSide will process the refund and record it in the reservation.
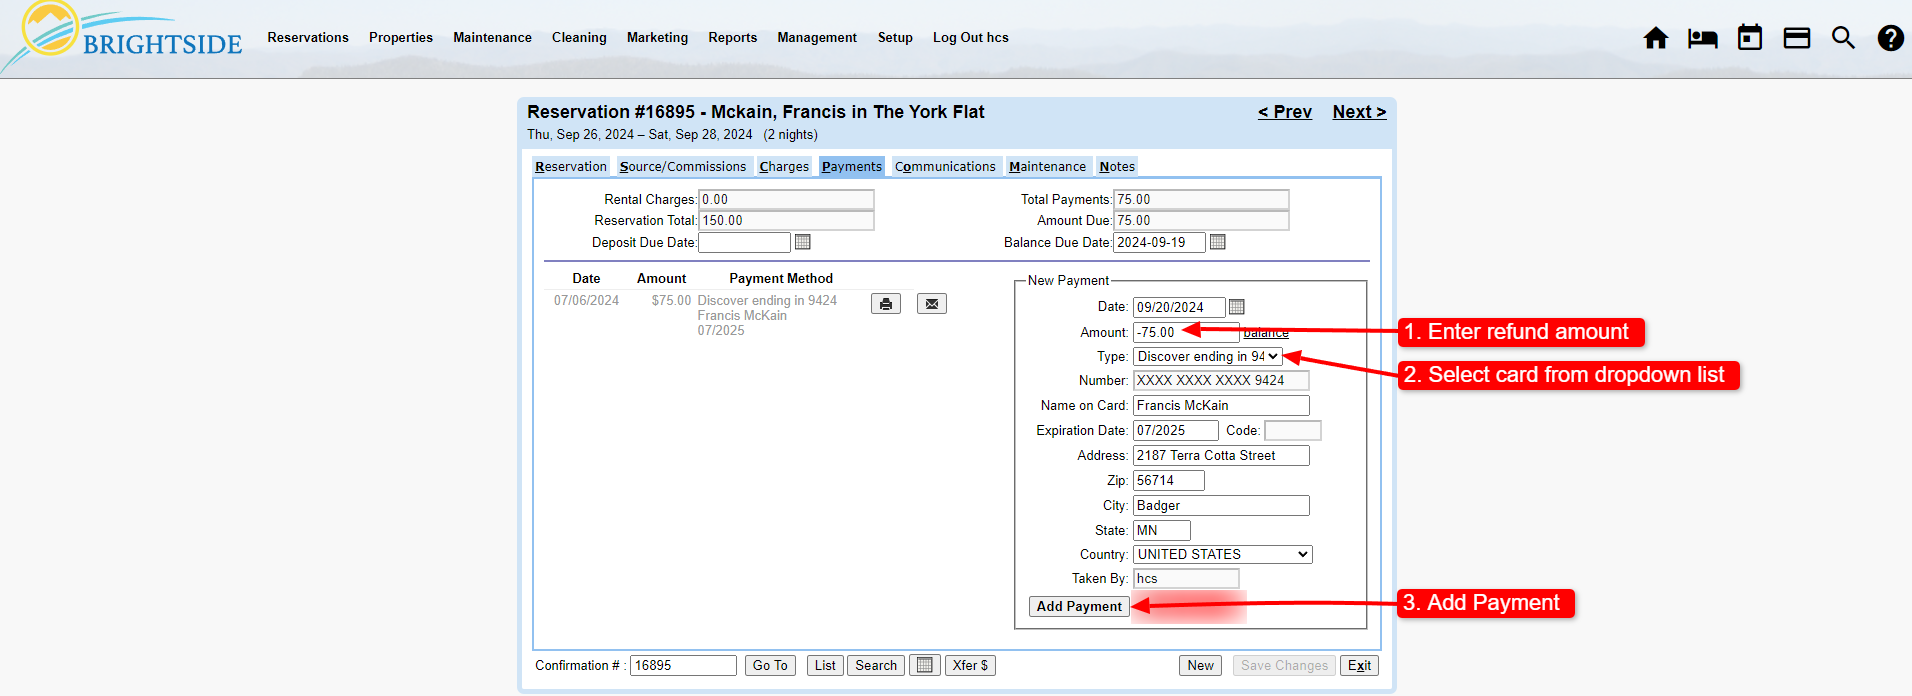
Simple 100% Refund
Simple 100% Refund

Click on Image for Enlarged View

Multiple Payments Refund

Complex Refund

Occasionally you need to refund a guest who has made more than one payment. These refunds are easy to process, when you follow the rules. If you don’t follow the correct procedure, refunds will be declined in most cases.

Rule #1: Refunds must be able to reference an incoming payment in order to process correctly. A token is stored in BrightSide rather than the card number. If there is no valid payment with a token, a refund cannot be given.

Rule #2: You may not refund an amount that is larger than the payment. For example, you cannot refund $600.00 to a card that only paid you $400.00. This regulation is there to provide a safeguard against fraudulently refunding more than the guest paid.

Rule #3: You may not roll two payments into one, single refund. For example, if you received two separate payments of $500.00 each, you may not process a single refund of $1,000.00. You must process two refunds for $500.00 each.

Rule #4: When refunding multiple payments, the first refund is applied to the most recent payment you received. Subsequent refunds will be applied to that payment until it reaches a 0.00 balance.

EXAMPLE: The screenshot below shows us a complex refund situation. Two payments were made with differing amounts totaling $820.00. The guest already  received a refund of $100.00, which was deducted from the $600.00 payment (rule #4). Now you need to refund the remaining $720.00. You CANNOT process a single refund of $720.00, because that goes against both rules two and three. So how do you refund the remaining $720.00? Follow the steps below.

  1. Refund $500.00. Since the first refund of $100.00 was deducted from the guest’s second payment, a balance of $500.00 remains available to refund on that payment (rule #4).
  2. Refund $220.00. The first two refunds were applied to the $600.00 payment, leaving it at 0.00 balance. Subsequent refunds will be applied to the earlier payment of $220.00 (rule #4).
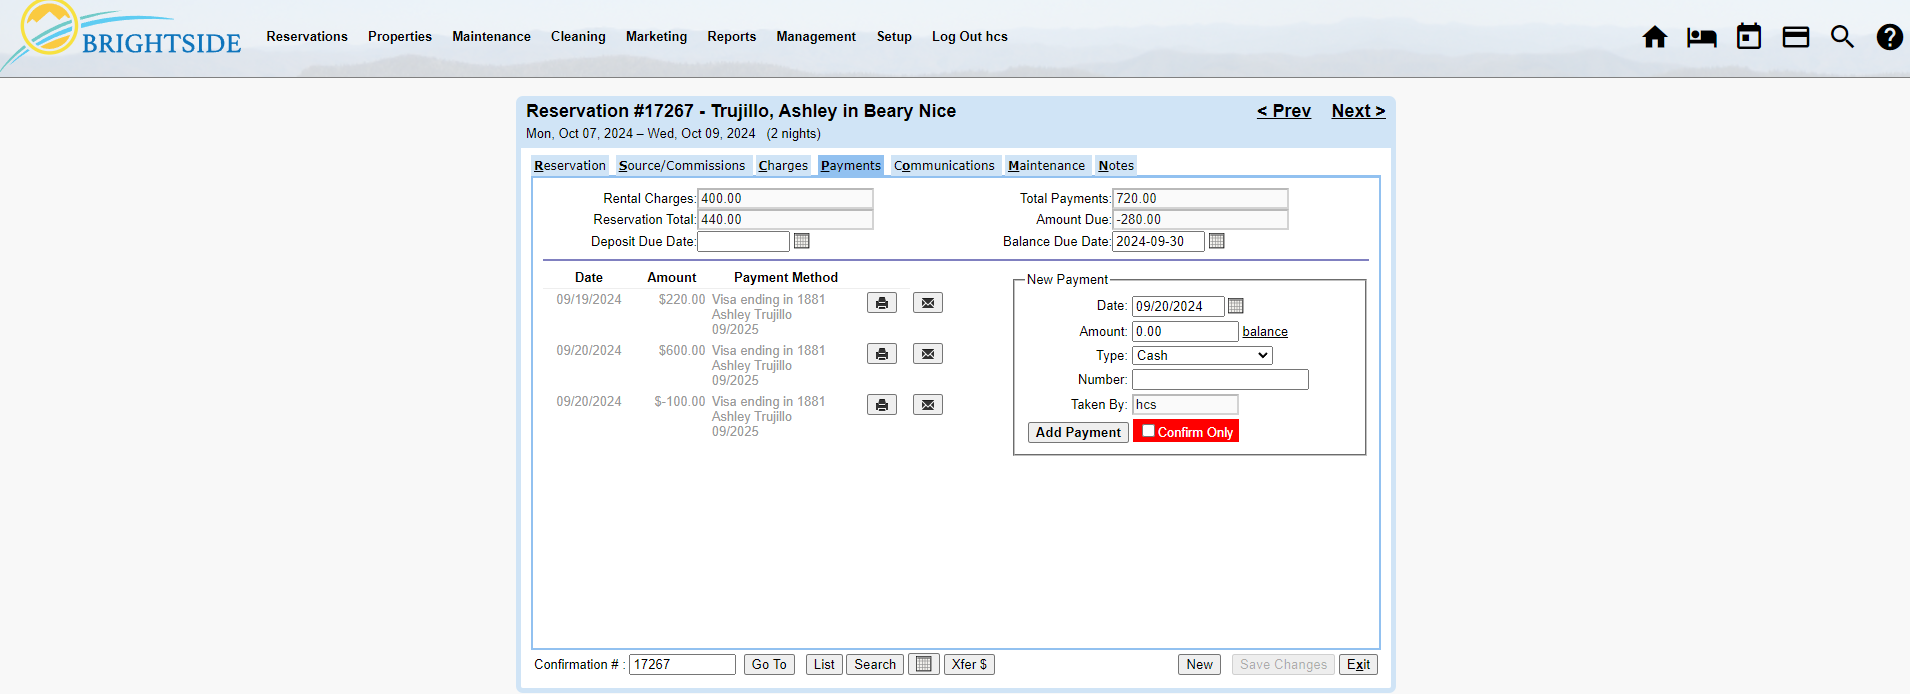
Complex Refund
Complex Refund

Click on Image for Enlarged View

Processing Refunds2024-12-12T17:09:28-05:00

Using Escrow

2024-12-12T17:23:03-05:00

Summary

One of the most basic features in BrightSide is also one of the most misunderstood; escrow. This article is here to help shed light on how to use escrow in our app.

The Basics

What is Escrow?

If you have been managing short term rentals for a while, the odds are good that you know a few things about escrow accounts. However, for the uninitiated, here is a brief introduction. The majority of property management companies keep an escrow account and an operating account at their financial institution. Moneys received as deposits, i.e.: money that could possibly be refunded, and is thus “unearned,” remains in the escrow account until it is either refunded or earned. Once the money is considered earned, it is moved into the operating account.

What Goes Into Escrow?

Reservation Deposits & Payments

As mentioned above, when a guest pays a deposit against a reservation, BrightSide places it in “escrow” status. After all, the guest may cancel their reservation and you must return all, part, or none, of the deposit, depending on your cancellation policy. Deposits are not considered earned income in BrightSide until after a completed stay. This money is held in escrow until BrightSide automatically moves it after check-out.

When a reservation is booked and a deposit is paid, the deposit may include a number of items, including rent, fees, travel insurance, taxes, etc., depending on your settings. All of this money goes into escrow.

NOTE: When a reservation is cancelled, retained funds remain in escrow until you manually move it to your operations account.

Viewing Money in Escrow

Advance Deposits Report

All moneys received from a guest, or on a guest’s behalf, are automatically placed in escrow status within BrightSide. These funds remain in escrow until the stay is completed and the guest is checked out. After check-out, BrightSide automatically moves the funds out of escrow and into earned income status. The Advance Deposits Report lets you see the funds remaining in escrow.

BrightSide offers several options for running this report:

  • Detail – Shows the total advance deposits you should have in escrow. This report is broken down by month to help estimate income for future months. It also includes the departure date, reservation number, unit, guest’s name, and total deposit for each reservation. The detail report shows every active reservation with a deposit or pre-payment.
  • Summary – This report option only shows monthly totals rather than individual reservation details. It includes departure month, stays, nights, and total paid.
  • Monthly – Shows advance deposits or pre-payments received during the current month. This can help balance your cash flow at the end of the month. It includes the date received, reservation number, departure date, unit, guest’s name, and amount paid.

The Advance Deposits Report also allows you to include payments from a selected date, cancellations in escrow, and exclude travel insurance, if needed. This report may be exported to an Excel file for sorting or printed as a PDF.

NOTE: Reservation deposits from all sources go into escrow, including Airbnb, Vrbo, Booking.com, direct bookings, etc.

Using Escrow | Advance Deposits Report

Click on Image for Enlarged View

Cancellations in Escrow

Outstanding Cancellations

Unfortunately, guests cancel reservations. When they cancel, BrightSide places those reservations in cancelled status and the unrefunded part of their payments remain in escrow. To view all of the cancelled reservations, you may run a report that includes the reservation number, the date it was cancelled, the arrival and departure dates, unit, guest’s name, and the amount they paid.

NOTE: When you want to move the funds from a cancelled reservation out of escrow and into your operations account, go to Pay Out Cancellations.

Using Escrow | Advance Deposits Report

Click on Image for Enlarged View

Escrow Cash Flow Report

Summary

The Escrow Cash Flow report is available with two options, summary or details. Option one is a summary report, normally a one page document with total receipts broken into categories. You can see in the sample report below that we have broken the receipts category in a number of subcategories including, Cash, Check, Visa, Mastercard, American Express, Discover, and Refunds.

We also have a section for Advance Deposits that shows a beginning balance, a receipts line, and the amount transferred to revenue (or earned income).

The third section on the summary report provides totals for each source of revenue. For example, in the screenshot below you can see Rental Charges, Cleaning Fee, Damage Waiver, Pool Winter, Security Deposit, Travel Insurance, Tennessee Sales Tax, Sevier County Lodging Tax, and the Pigeon Forge Lodging Tax.

Using Escrow | Summary Escrow Cash Flow Report

Click on Image for Enlarged View

Details

Option two is a report with cash flow details, turning this into a document that can be dozens of pages long. The screenshot below does not include everything in this detailed report. However, it does provide a sample of what you may expect.

Using Escrow | Escrow Cash Flow Report with Details

Click on Image for Enlarged View

Escrow Reconciliation

Worksheet

After closing out the month, you may want to reconcile your escrow bank account with BrightSide. Think of BrightSide as your written record, sort of like a checkbook register. You want to reconcile BrightSide and your escrow bank account to ensure that everything balances. To make this easier, we provide a reconciliation worksheet.

Using Escrow | Escrow Reconciliation Worksheet

Click on Image for Enlarged View

Moving Funds Out of Escrow

Pay Out Cancellations

Keep in mind, when a reservation is taken and a deposit and subsequent payments are received, that money is kept in escrow until the guest checks out. However, if a reservation is cancelled, a rebooking is not possible, and money is retained by the property management company, these funds need to be moved out of escrow and into earned income manually.

To move money out of escrow and into earned income go to: Management > Pay Out Cancellations and follow these instructions.

  • Tick the box next to the reservation from which you want to transfer the funds.
  • Select a Payout Date at the bottom to record when the transfer was made.
  • Click “Post”

That is all there is to it. Now the funds are out of escrow and into the earned income account.

Using Escrow | Escrow Pay Out Cancellations

Click on Image for Enlarged View

Using Escrow | Escrow Pay Out Cancellations

Click on Image for Enlarged View

Using Escrow2024-12-12T17:23:03-05:00

Gift Certificate Units

2024-12-12T17:31:54-05:00

Summary

A guest cancelling a reservation is not uncommon in the short term rental market. Sometimes their deposit is refunded entirely, while on other occasions, they have passed the deadline for a refund. You may want to offer them a window of time in which they can reschedule, rather than forfeit their funds completely.

So where does the money go in the interim and how do you keep track of it? Since BrightSide does not have a true “Gift Certificate” feature, we recommend using a zero bedroom “Gift Certificate Unit” to keep track of these guests and their funds.

What is a Gift Certificate Unit?

Purpose

A “Gift Certificate Unit” is simply a zero bedroom unit in BrightSide, where you may assign funds tied to a specific guest, for future use. When a guest makes a reservation, makes a payment, and then has to cancel, you may offer them a chance to move the payments to a gift certificate for later use.

NOTE: Making this a zero bedroom unit keeps it from showing up on your website. In addition, BrightSide zero bedroom units are not included in your unit count for your monthly subscription fee.

Setting Up a Gift Certificate Unit

Adding a Unit

The “Gift Certificate Unit” is set up the same as other units, but with less information and details. The only two things you must have are the name of the unit and an owner. Just set up the following under the Unit and Owner tabs, then save. Now you are ready to use the Gift Certificate unit.

Navigate to:  Properties > Units > Add

Unit Tab

  • Code: Assign a short code you can easily identify in reports and elsewhere in BrightSide where unit codes appear (optional).
  • Name: Gift Certificate
  • Bedrooms: The default is zero, so you do not need to change anything. Just ensure that this is zero.
Gift Certificate Units | Unit Details

Click on Image for Enlarged View

Owner Tab

  • Owner: Enter the name of the owner. In most cases, this is the property management company. This is all you need to input on this tab.
  • Save
Gift Certificate Units | Owner's Name

Click on Image for Enlarged View

Using the Gift Certificate Unit

Move a Reservation to a Gift Certificate

Instead of cancelling the reservation, move it into the Gift Certificate unit. This keeps the history of the reservation intact, including the guest’s information, notes, charges, payments, etc. In these instructions, we provide the guest with a year to use their gift certificate balance.

  • Open the reservation.
  • On the “Reservation” tab click “Change Dates or Unit.”
  • Enter a new arrival date one year from the cancellation date with a departure date for the following day. This blocks off the calendar for one night. The new date now becomes the deadline for using the balance. NOTE: Entering the original number of nights unnecessarily blocks off more nights than needed.
  • Select “Gift Certificate” as the new unit.
  • Select “Don’t Recalculate Charges” in the bottom right hand corner. By selecting this option, all the original charges remain on the reservation. Also, since you are moving this reservation to the gift certificate unit, the taxes are removed. When you move it back to a “real” unit, you will recalculate the charges and the taxes will be added according to the requirements of the new reservation.
  • Click “Change.”

NOTE: This reservation is now located in the Gift Certificate unit with a date one year in the future. When this date approaches, it will show up on the home screen and in the check in list. If the guest has not used the balance, cancel the reservation and the funds will be moved to earned income.

Gift Certificate Unit | Changing Units

Click on Image for Enlarged View

Gift Certificate Unit | Move to New Unit

Click on Image for Enlarged View

Gift Certificate Unit | New Reservation

Click on Image for Enlarged View

Move a Reservation from a Gift Certificate

When the guest wants to redeem their gift certificate, the process is almost identical to moving the reservation into the Gift Certificate unit. Follow these instructions for moving it to a real unit with new dates and charges.

  • Open the reservation.
  • On the “Reservation” tab click “Change Dates or Unit.”
  • Enter new arrival and departure dates and all the available units appear in the list.
  • Select the desired unit from the list.
  • Select “Recalculate All Charges” in the bottom right hand corner. By selecting this option, all the charges will be recalculated based on current dates, rates, fees, discounts, etc. You can see any fee changes on the right side of the window. Hold your curser over the charges to see the breakdown.
  • Click “Change.”

NOTE: The payment follows the reservation, so the new reservation includes the original payment and reduces the amount owed.

Gift Certificate Unit | Redeeming Gift Certificate

Click on Image for Enlarged View

Gift Certificate Unit | Selecting New Unit

Click on Image for Enlarged View

Gift Certificate Unit | New Reservation

Click on Image for Enlarged View

In the example, we moved the reservation back into the same unit with the original rates. This left a zero balance in the new reservation after recalculating all charges. More often than not, the total will be different when you select a different unit or rate season. The guest may owe you additional payments if this is the case.

Gift Certificate Units2024-12-12T17:31:54-05:00

Vrbo Markup

2025-04-04T15:05:35-04:00

Summary

The Vrbo Markup is a fee bundled into the rent. This fee allows the property management company to recoup the Vrbo Commission by passing the cost to the guest. This article explains how to set it up and use it properly.

Reason for an Vrbo Markup

Recoup the Commission

Vrbo charges the host company a 5% service fee on the booking subtotal for every reservation booked through their platform (when using the pay-per-booking model). Vrbo’s website states, “If you use property management software to manage your listings, you’re charged a 5% booking fee for bookings made through our family of sites.”

So, if you’re charging $100 USD a night for a 3-night stay, plus $60 USD for a cleaning fee, your booking subtotal is $360 USD. The host commission is generally 5% of your booking subtotal ($18.00 USD). Vrbo charges your commissions each month to the credit card you have on file.

BrightSide offers a way for hosts to recoup the 5% fee by passing it on to the guests through the Vrbo Markup.

Set Up the Vrbo Markup

Create the Fee

The Vrbo Markup is a regular fee, set up in Reservation Fees and Charges. When you finish adding this fee, it should look just like the screenshot below. The only difference you might possibly have is the percentage.

Navigate to: Reservations > Fees and Charges > +Add

Vrbo Markup | Create the Fee

Click on Image for Enlarged View

  1. Name: Vrbo Markup
  2. Description: Not needed. It will not show up anywhere.
  3. Type: Select “Percentage” from the dropdown menu. The other options do not work properly for the purposes of the Vrbo Markup.
  4. Include in Rent: Tick the box. This bundles the fee in the rent instead of listing it as a separate fee on Vrbo.
  5. Percentage: Enter the amount you want to want to increase the Vrbo rental rate. NOTE: This raises the rental rate ONLY, and does not affect your fees.  However, the 5% service fee Vrbo charges you is based on the subtotal of your charges, i.e.: the rental fee, cleaning fee, admin fee, and most other fees you may charge. They do not charge the commission on refundable damage deposits or taxes.* In order to have enough of an increase in the rent to cover 5% of “everything,” you need to increase the rent by at least 10%. Do what you are comfortable doing. Be forewarned, if you do not increase it enough, your reservation may show a balance due.
  6. Varies by Unit: If you want to charge a different percentage markup for each unit, tick this box. The amount you entered in the percentage field becomes the default markup, but may be changed on a unit by unit basis. This is helpful if you have a property where you don’t want to charge a markup, or if you  just want a higher percentage. After ticking this box, you must go to each unit and enter the desired percentage on the “Rates” tab (for units where you want the percentage to be more or less than the default).
  7. Auto Add: DO NOT select this. It will add this fee to every reservation.
  8. Refundable: DO NOT select this.
  9. Credit to Owner: DO NOT select this unless you want any “leftover” funds from the markup to pass to the owner.
  10. Reference Number: Not needed.
  11. Taxes: Tick “Use Unit Taxes.”
  12. Save

*See Vrbo’s website for exact details for what they charge, or don’t charge, commissions.

Activate the Markup

After you create the Vrbo Markup fee, you need to activate it in Integration Partners. You must follow these steps so the markup can be added to your Vrbo reservations.

Navigate to: Setup > Settings > Integration Partners > Vrbo (tab)

Vrbo Markup | Activate the Markup

Click on Image for Enlarged View

After you navigate to the Vrbo Integration area of BrightSide, scroll down to Online Booking. Just above Blackout Dates you see the Channel Markup Fee. In the dropdown, select Vrbo Markup.

  1. Channel Markup Fee: Select “Vrbo Markup”
  2. Save

The Vrbo Markup is now active and the specified percentage is added to the rental rates BrightSide sends out to Vrbo.

How the Vrbo Markup Works

The Details

The Vrbo Markup is a way to raise the rental rates on Vrbo to pay for the Vrbo Commission, without passing on the increased revenue to the owner. The idea is not to hide rental revenue from the owner, but to recoup the Vrbo Commission by including it in a higher rental rate. Here is how it works.

  1. Fees & Charges with the setting “Include in Rent” are bundled into the basic rental rates. The Xplorie fee is a good example of this.
  2. The Vrbo Markup is applied and increases the bundled rate by the percentage set there. If your Vrbo Markup is 10%, the bundled rental rate is increased by that amount.
  3. BrightSide feeds the bundled rental rate to Vrbo, along with any additional separate fees you charge, i.e.: cleaning fee, admin fee, etc.
  4. At the end of the month, Vrbo charges your credit card a 5% commission based on the subtotal. The subtotal includes the rent, cleaning fee, admin fee, and nearly any other fees you charge.
  5. BrightSide breaks down the Vrbo Payout to account for all the “bundled rental fees” and other charges in the reservation. These are listed separately in the reservation charges.
  6. The Vrbo Markup is retained by the property management company to cover the cost of the Vrbo commissions.

Example

The following is an example of how the Vrbo Markup is applied, creating a new bundled rate for Vrbo reservations. In this example, the property management company offers Xplorie benefits and the cost is included in the rent rather than listing it as a separate fee. If you do not offer Xplorie, or bundle any fees in the rent, the Vrbo Markup applies only to your rental rate.

$100.00 – Rental Rate
+ $15.00 – Xplorie Fee (only added if “Included in Rent”) This fee varies depending on which tickets you offer your guests.
= $115.00 – Rental Rate ($100.00) + Xplorie Fee ($15.00)
+ $11.50 – Vrbo Markup (10%) The Vrbo Markup is the last fee to be added to a bundled rate.
= $126.50 – Rental Rate ($100.00) + Xplorie Fee ($15.00) + Vrbo Markup ($11.50) = Vrbo Bundled Rental Rate

Breaking Down Vrbo Charges

The Details

Unlike Airbnb, you process the payments for Vrbo guests directly, so there is no Vrbo Payout like there is for Airbnb. Any deposit, and other payments made, are recorded in the reservation as they are paid.

While BrightSide bundles some of the fees when sending them to Vrbo (see above), we break down the charges and fees into the following categories in the reservation. The property management company keeps the Vrbo Markup to pay the commissions.

$1,991.13 – Rental Charges
$130.00 – Cleaning Fee
$159.29 – Vrbo Markup
$274.18 – Taxes
$2,554.60 – Total Charges

In this example, the Vrbo commission is $114.02, or 5% of 2,280.42 (subtotal before taxes). The $159.29 Vrbo Markup is enough to pay the commission and have $45.27 left over. You can choose to keep this or pass it on to the owner.

Vrbo Markup | Breaking Down the Charges

Click on Image for Enlarged View

Vrbo Markup2025-04-04T15:05:35-04:00

Airbnb Markup

2025-05-09T10:17:40-04:00

Summary

The Airbnb Markup is a fee bundled into the rent. This fee allows the property management company to recoup the Airbnb Service Fee by passing the cost to the guest. This article explains how to set it up and use it properly.

Reason for an Airbnb Markup

Recoup the Service Fee

Airbnb generally charges the host company a 3% service fee on the booking subtotal for every reservation booked through their website. In this article from Airbnb’s website, they explain:

Most Hosts pay a flat service fee of 3% of the booking subtotal. The subtotal is your nightly price plus any optional fees you charge guests, like a cleaning fee, and doesn’t include Airbnb fees and taxes. Guests typically pay a service fee of around 14% of the booking subtotal.

So, if you’re charging $100 USD a night for a 3-night stay, plus $60 USD for a cleaning fee, your booking subtotal is $360 USD. The Host service fee, which is generally 3% of your booking subtotal ($10.80 USD), is deducted from your earnings, and a service fee of 14% ($50.40 USD) is charged to guests and included in the total price they pay.

BrightSide offers a way for hosts to recoup the 3% fee by passing it on to the guests through the Airbnb Markup.

Set Up the Airbnb Markup

Create the Fee

The Airbnb Markup is a regular fee, set up in Reservation Fees and Charges. When you finish adding this fee, it should look just like the screenshot below. The only difference you might possibly have is the percentage.

Navigate to: Reservations > Fees and Charges > +Add

Airbnb Markup | Create the Fee

Click on Image for Enlarged View

  1. Name: Airbnb Markup
  2. Description: Not needed. It will not show up anywhere.
  3. Type: Select “Percentage” from the dropdown menu. The other options do not work properly for the purposes of the Airbnb Markup.
  4. Include in Rent: Tick the box. This bundles the fee in the rent instead of listing it as a separate fee on Airbnb.
  5. Percentage: Enter the amount you want to want to increase the Airbnb rental rate. NOTE: This raises the rental rate ONLY, and does not affect your fees.  However, the 3% service fee Airbnb charges you is based on all of your charges; the rental fee, cleaning fee, admin fee, and any other fees you may charge. In order to have enough of an increase in the rent to cover 3% of “everything,” you need to increase the rent by at least 5-10%. Do what you are comfortable doing. Be forewarned, if you do not increase it enough, your reservation may have a balance due after you receive the Airbnb payout.
  6. Varies by Unit: If you want to charge a different percentage markup for each unit, tick this box. The amount you entered in the percentage field becomes the default markup, but may be changed on a unit by unit basis. This is helpful if you have a property where you don’t want to charge a markup, or if you  just want a higher percentage. After ticking this box, you must go to each unit and enter the desired percentage on the “Rates” tab (for units where you want the percentage to be more or less than the default).
  7. Auto Add: DO NOT select this. It will add this fee to every reservation.
  8. Refundable: DO NOT select this.
  9. Credit to Owner: DO NOT select this unless you want any “leftover” funds from the markup to pass to the owner.
  10. Reference Number: Not needed.
  11. Taxes: Tick “Use Unit Taxes.”
  12. Save

Activate the Markup

After you create the Airbnb Markup fee, you need to activate it in Integration Partners. You must follow these steps so the markup can be added to your Airbnb reservations.

Navigate to: Setup > Settings > Integration Partners > Airbnb (tab)

Airbnb Markup | Activate the Markup

Click on Image for Enlarged View

After you navigate to the Airbnb Integration area of BrightSide, scroll down to Online Booking. Just above Blackout Dates you see the Channel Markup Fee. In the dropdown, select Airbnb Markup.

  1. Channel Markup Fee: Select “Airbnb Markup”
  2. Save

The Airbnb Markup is now active and the specified percentage is added to the rental rates BrightSide sends out to Airbnb.

How the Airbnb Markup Works

The Details

The Airbnb Markup is a way to raise the rental rates on Airbnb to pay for the Airbnb Service Fee, without passing on the increased revenue to the owner. The idea is not to hide rental revenue from the owner, but to recoup the Airbnb Service Fee by including it in a higher rental rate. Here is how it works.

  1. Fees & Charges with the setting “Include in Rent” are bundled into the basic rental rates. The Xplorie fee is a good example of this.
  2. The Airbnb Markup is applied and increases the bundled rate by the percentage set there. If your Airbnb Markup is 10%, the bundled rental rate is increased by that amount.
  3. BrightSide feeds the bundled rental rate to Airbnb, along with any additional separate fees you charge, i.e.: cleaning fee, admin fee, etc.
  4. When Airbnb pays you, they keep 3% of the reservation subtotal, their “Service Fee.” The subtotal includes the rent, cleaning fee, admin fee, and any other fees you charge.
  5. BrightSide breaks down the Airbnb Payout to account for all the “bundled rental fees” and other charges in the reservation.
  6. The 3% Airbnb Service Fee is deducted from the 10% Airbnb Markup. This 10% of the bundled rent recoups the 3% of the subtotal Airbnb keeps and leaves a small amount for the management company to keep.

Example

The following is an example of how the Airbnb Markup is applied, creating a new bundled rate for Airbnb reservations. In this example, the property management company offers Xplorie benefits and the cost is included in the rent rather than listing it as a separate fee. If you do not offer Xplorie, or bundle any fees in the rent, the Airbnb Markup applies only to your rental rate.

$100.00 – Rental Rate
+ $15.00 – Xplorie Fee (only added if “Included in Rent”) This fee varies depending on which tickets you offer your guests.
= $115.00 – Rental Rate ($100.00) + Xplorie Fee ($15.00)
+ $11.50 – Airbnb Markup (10%) The Airbnb Markup is the last fee to be added to a bundled rate.
= $126.50 – Rental Rate ($100.00) + Xplorie Fee ($15.00) + Airbnb Markup ($11.50) = Airbnb Bundled Rental Rate

Breaking Down the Airbnb Payout

The Details

Hosts may expect the Airbnb Payout to arrive in BrightSide within 24-48 hours of the guest checking into your property. Of course, this is totally dependent on when Airbnb sends the payment. After BrightSide receives the payment notification, we break it down into the original fees and charges, as they were before they were bundled. All of it is separated out and listed in the reservation’s “Charges” tab.

In the following reservation, Airbnb deducted their service fees and paid the host a lump sum of $2,101.02. BrightSide then broke it down and divided it into the following categories. The 3% service fee paid to Airbnb was deducted from the Airbnb Markup, and had $18.83 left over. The property management company can keep this or pay it to the owner.

$1,596.19 – Rental Charges
$80.00 – Xplorie Fee (listed as “Amenity Fee”)
$230.00 – Cleaning Fee
$18.83 – Airbnb Markup (leftover amount after paying the 3% service fee to Airbnb)
$176.00 – Processing Fee
$2,101.02 – Airbnb Payout

Airbnb Markup | Breaking Down the Payout

Click on Image for Enlarged View

Airbnb Markup2025-05-09T10:17:40-04:00

Utilizing Specials

2025-12-11T16:44:32-05:00

Summary

Specials in BrightSide allow you to offer discounts on rental rates easily across various channels, including internal bookings, your website, and online travel agencies (OTAs) like Vrbo, Airbnb, and Booking.com. You can apply specials to all channels or limit them to specific ones. Note that specials only discount rental rates, they do not affect fixed fees like cleaning or pet fees unless those fees are rent-based.

This feature helps boost occupancy, attract price-sensitive guests, and stay competitive in the market, while giving you flexibility to tailor promotions to your business goals, such as driving direct bookings to reduce OTA commissions.

This guide covers how specials work, how to set them up, OTA-specific considerations, and common pitfalls to avoid.

Getting Started

Understanding Channels

Before creating a special, decide which channels it applies to. Each channel handles specials differently, so consider creating separate specials for each to optimize control and avoid unintended discounts that could erode revenue.

  • Internal: These are for manual use by your staff during reservations. They aren’t visible on your website or OTAs and aren’t auto-applied (except when combined with the Websites channel, see below). Use this for personalized negotiations or one-off deals to build guest loyalty without automating discounts.
  • Websites: Discounts can apply automatically or via promo codes on your site. If you also select “Internal” for the same special, it auto-applies to internal bookings for consistency. Use this for direct bookings to encourage website traffic and increase profit margins by bypassing OTA fees.
  • OTA’s (Vrbo, Airbnb, Booking.com): Specials feed automatically to selected OTAs with limited control. They always apply the best available discount when conditions are met, ignoring promo codes. For details, see the OTA section below. This channel is ideal for broadening reach but requires caution to prevent over-discounting on high-commission platforms.

Setting Up a Special

We recommend separate specials per channel for better management and easier performance tracking over time. However, it is not mandatory, and you may create a single special that is available on more than one channel. To create a new special:

Navigate to: Properties > Specials > +New

Basic Information

  • Name: Choose a guest-friendly description (e.g., “10% Off Summer Stays”).
  • Applicable Pricing: Typically “Nightly,” but options include Weekly or Monthly.
  • Discount Amount: Enter the numerical value.
  • Discount Type: Enter whether you want to offer a percentage or a dollar amount off the reservation.
    • Cheapest Night: Percentage off the final night.
    • Last Night: Percentage off the final night.
    • Entire Stay: Percentage off the total stay.
    • Off Stay: Flat dollar amount off the total.
    • Off Night: Flat dollar per night.
Utilizing Specials | Specials: Basic Information

Click on Image for Enlarged View

Active Channels

Select where the special applies:

Utilizing Specials | Specials: Channels

Click on Image for Enlarged View

  • Internal: Manual application by staff.
Utilizing Specials | Internal Specials

Click on Image for Enlarged View

  • Websites: Offers discounts to qualifying reservations on your website automatically or via discount codes. When you select “Websites” as your active channel, the “Online” menu item will be activated where you enter the discount code (if used) and enter other options.
    • Auto-apply by default (unless a promo code is required).
    • Add a discount code (e.g., “SUMMER10”) and description for guest entry.
    • Include a website description for your Specials page (if supported).
    • Exclude from Specials page if needed.
    • Combining with Internal auto-applies to internal bookings.
Utilizing Specials | Specials: Website Channel

Click on Image for Enlarged View

Utilizing Specials | Specials: Discount Code

Click on Image for Enlarged View

  • OTAs: Select specific ones (Vrbo, Airbnb, Booking.com) if connected. These appear only if your account is integrated.

Allow combination with other specials? Check this to stack with one other qualifying special (the one offering the best additional discount). This can create more attractive deals but use sparingly to protect overall pricing strategy.

Steps to Add a Vrbo Promotion:

  • Step #1
    • Choose “Vrbo” as your active channel, this also activates the Vrbo menu item at the top. Note that it turns a darker color when activated.
Add a Vrbo Special
Add a Vrbo Special

Click on Image for Enlarged View

  • Step #2

Click the Vrbo menu item at the top the choose from the following options.

    • Pick a “Vrbo Promotion Type” from the dropdown menu:
      • Built into Rates (this option hides the discount and does not receive a badge)
      • Early Booking
      • Last Minute
      • Mobile Only
      • Member Only*
      • New Listing Discount

Mobile-Only Promotion: Check the ‘Mobile-Only’ box if available for your selected type. This option offers the promotion only to guests using their mobile devices.

*Member Only: When using this promotion type, you must enter the discount value you provide for each OneKey member tier, Blue, Silver, and Gold. The values will override the main discount amount.

NOTE: When you select a promotion type, you may be required to add conditions for it to work. If so, you will get a warning message like in the second screenshot below. To add conditions click on the “General” menu item and scroll down to “Conditions.”

Select a Vrbo Promotion Type

Click on Image for Enlarged View

Promotion Type Warning

Click on Image for Enlarged View

Vrbo Mobile-Only Promotions

Click on Image for Enlarged View

Vrbo Member Only Promotions

Click on Image for Enlarged View

Conditions

Set rules to control eligibility. Keep them simple for reliability.

  • Required Nights: Minimum stay length.
  • Maximum Nights: Enter the maximum number of nights the guest can stay to receive this discount.
  • Minimum Days Booked in Advance: Encourage early bookings.
  • Maximum Days Booked in Advance: Encourage last-minute bookings.
  • Booking Dates: Specific range for when bookings must be made.
  • Stay Dates: Required stay period (e.g., May 1–July 31, 2026). Optional: Max Occupancy % to avoid high-occupancy periods.
    Note: The entire stay must fit within dates; partial overlaps disqualify.
  • Exclude Rate Seasons: Block specific rate seasons.
  • Exclude Days of the Week: Block specific days of the week.
  • Exclude Arrival Days: Block specific days.
  • Exclude Specific Units: Avoid certain properties.
  • Include Specific Units: Target certain properties.
  • Include Bedroom Sizes: Limit to units with certain bedroom counts.

Click Save. To track performance, deactivate old specials and create new ones instead of editing, this allows reporting on what works best and informs future promotions for better ROI.

Specials: Adding Conditions

Click on Image for Enlarged View

How Specials Work with OTAs

Although we recommend that you create unique specials for OTA channels, it is not a hard and fast rule. You may create a special that feeds to both your website and OTAs, and is used internally as well. Having said that, keep in mind the following when creating specials for Airbnb, Vrbo, and Booking.com.

OTAs apply specials differently, so create OTA-exclusive ones to avoid surprises and maintain control over your direct channels.

  1. They auto-apply the largest discount when conditions match, without promo codes.
  2. If multiple specials qualify, they pick or combine (if allowed) for the best deal. Example: A “10% Off June (3+ nights)” and “15% Off Summer” could combine to 25% on OTAs if conditions overlap.
  3. No filtering by guest type (e.g., can’t limit to military), reserve targeted discounts for direct channels.
  4. Enable per OTA (e.g., Vrbo only) for flexibility.

NOTE: One of the reasons we recommend creating unique specials for OTAs, is that OTAs do not filter who gets the discount. For example, if you want to offer a “10% Military Discount,” OTAs have no way of offering it to military personnel only. They give it to anyone, if it is the best discount available at the time the reservation is made. Since this is the case, reserve the military discount, or one like it, for direct bookings on your website or over the phone, utilizing a promo code.

Common Mistakes & Fixes

Every now and then, someone has a question about how their specials are applying. Here are common mistakes people make when creating specials.

  1. Military discounts applying to all OTA bookings:
    • Cause: OTAs ignore promo codes and apply based on conditions only.
    • Fix: Remove OTA channels from code-required specials; use for direct bookings only. This prevents unintended revenue loss on broad platforms.
  2. Internal specials auto-applying unexpectedly:
    • Cause: Combined with Websites channel, which enables auto-apply.
    • Fix: Use separate specials per channel. This ensures precise control and avoids automation errors in staff workflows.
  3. Special not applying to some units:
    • Cause: Discount drops rate below the unit’s Minimum Nightly Rate (MNR).
    • Fix: Lower the MNR in affected units. This safeguard protects owner pricing preferences while allowing promotions to work as intended.

For more help, contact Support at (865) 233-3778 or request a demo.

Utilizing Specials2025-12-11T16:44:32-05:00

Transfer Payments Between Reservations

2024-12-12T17:29:25-05:00

Summary

This tutorial explains how to move a payment from one reservation to another existing reservation. Once you know what you are doing, moving a payment can take as little as 10 seconds in BrightSide.

Transfer the Payment

Before starting, make sure you have the confirmation number, and/or the name of the guest on the second reservation, the one receiving the payment transfer.

Easy Steps

  1. Open: Begin by opening the reservation containing the payment you need to transfer.
  2. Xfer $: Click on the “Xfer $” button at the bottom/middle of the reservation card; a popup window will open.
  3. To: In the “To” field, begin typing the name of the guest, or the confirmation number of the recipient reservation. BrightSide will provide options according to what you enter. Select the reservation you want to receive the payment transfer.
  4. Charges: DO NOT tick this box.
  5. Payments: Tick the box next to the payment(s) you want to transfer. If the guest made more than one payment, you may move one, or all, of the payments. You may even move a portion of a payment. In the sample reservation below, the guest made a credit card payment of $571.71. However, you may choose to move only a portion of that payment to the second reservation by selecting the payment, then editing the amount in the number field.
  6. Transfer: Click the transfer button to complete the transfer. The payment is now located in the second reservation.
Transferring Payments | Initiate the Transfer

Click on Image for Enlarged View

Transferring Payments | Select the Receiving Reservation

Click on Image for Enlarged View

Transferring Payments | Select the Transfer Amount

Click on Image for Enlarged View

Common Questions

  1. If I move a credit card payment from one reservation to another will I be able to charge the card again?
    • Yes, moving the payment moves the entire credit card transaction intact. When the next payment is due, you may charge the card.
  2. I don’t want to move the entire payment. How do I move just part of a payment?
    • Select the payment from the list. Change the dollar amount in the number field.

Transfer Payments Between Reservations2024-12-12T17:29:25-05:00
Go to Top