BrightSide Software logo

Short Term Vacation Rental Software
Hospitality PMS

Our cloud-based hospitality software is both powerful and easy to use. But more importantly, our support team is here for you, ready to help make your user experience the best it can possibly be.

  1. BrightSide is powerful and easy to use from anywhere you have Internet access.
  2. BrightSide’s API integrates directly with Airbnb, Vrbo, Booking.com, Google Vacation Rentals and others.
  3. BrightSide support responds to email requests in minutes or hours, not days or weeks. No AI, real people.
  4. BrightSide support answers the phone. If we can’t answer, leave a message and we will call you back. Really.
  5. BrightSide is affordable. We do not add charges for features; it’s all included in the subscription.

About BrightSide Support

This author has not yet filled in any details.
So far BrightSide Support has created 36 blog entries.

Connect a Unit to Vrbo

2024-05-29T10:24:23-04:00

Summary

This tutorial assumes your BrightSide account is already connected to a Vrbo account and you simply want to add a new listing. If your BrightSide account is not integrated with Vrbo yet, follow the instructions in the Vrbo Integration tutorial.

NOTE: BrightSide is designed to sync with Vrbo utilizing our custom API. Unlike some PMS software, BrightSide does not use a channel manager to communicate with Vrbo. Our custom API “talks to their system directly.” Also, keep in mind that BrightSide overrides Vrbo data, not the other way around.

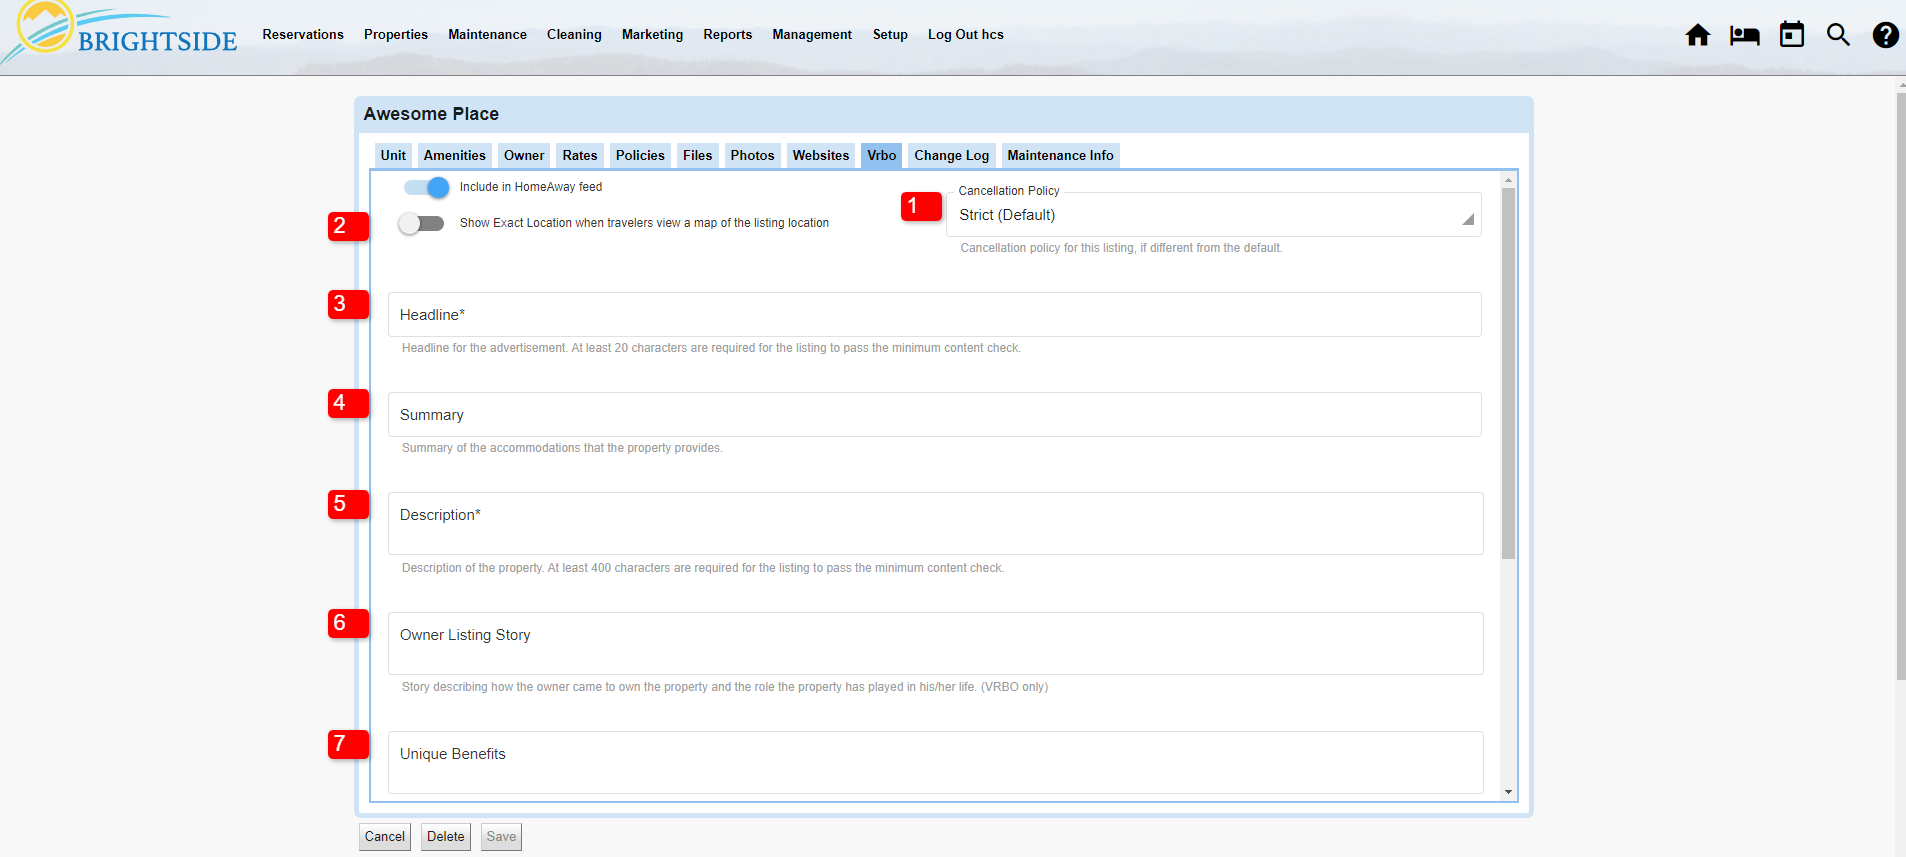
Navigate to: Properties > Units > Select Unit > Vrbo (tab)

Prepare & Activate

Existing or New Unit

You may have a unit in BrightSide that has existed for some time, but it is not listed on Vrbo. Or, you may be adding a brand new unit to your portfolio. Either way, begin in BrightSide with the unit you want to add to Vrbo.

Vrbo Tab

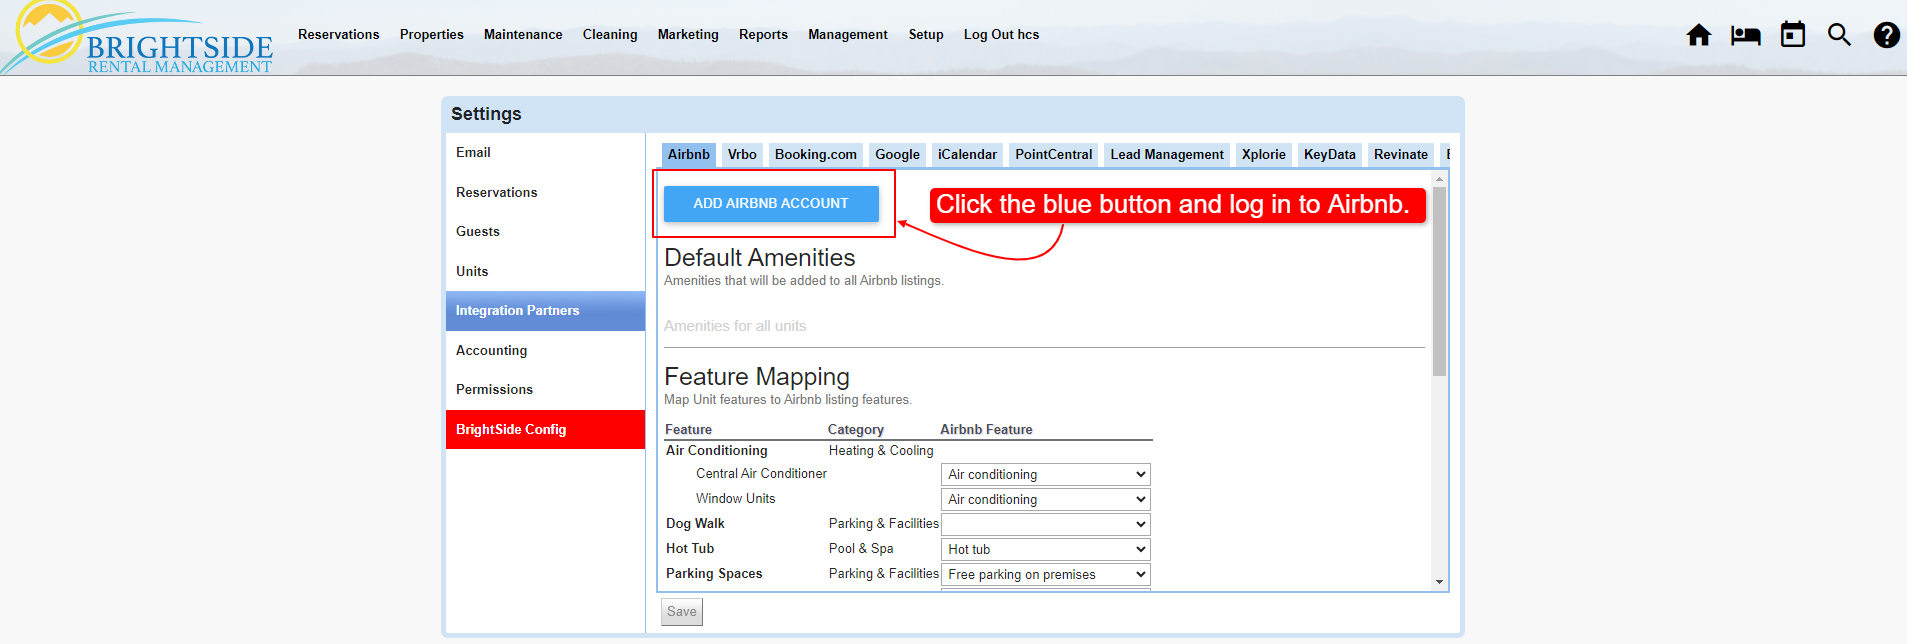
BrightSide allows you to enter unique information for each of the online travel agencies in your units. Instead of having identical descriptions on your website, Airbnb, Vrbo, and Booking.com, you may offer original content for each. This will help your own website’s SEO (search engine optimization).

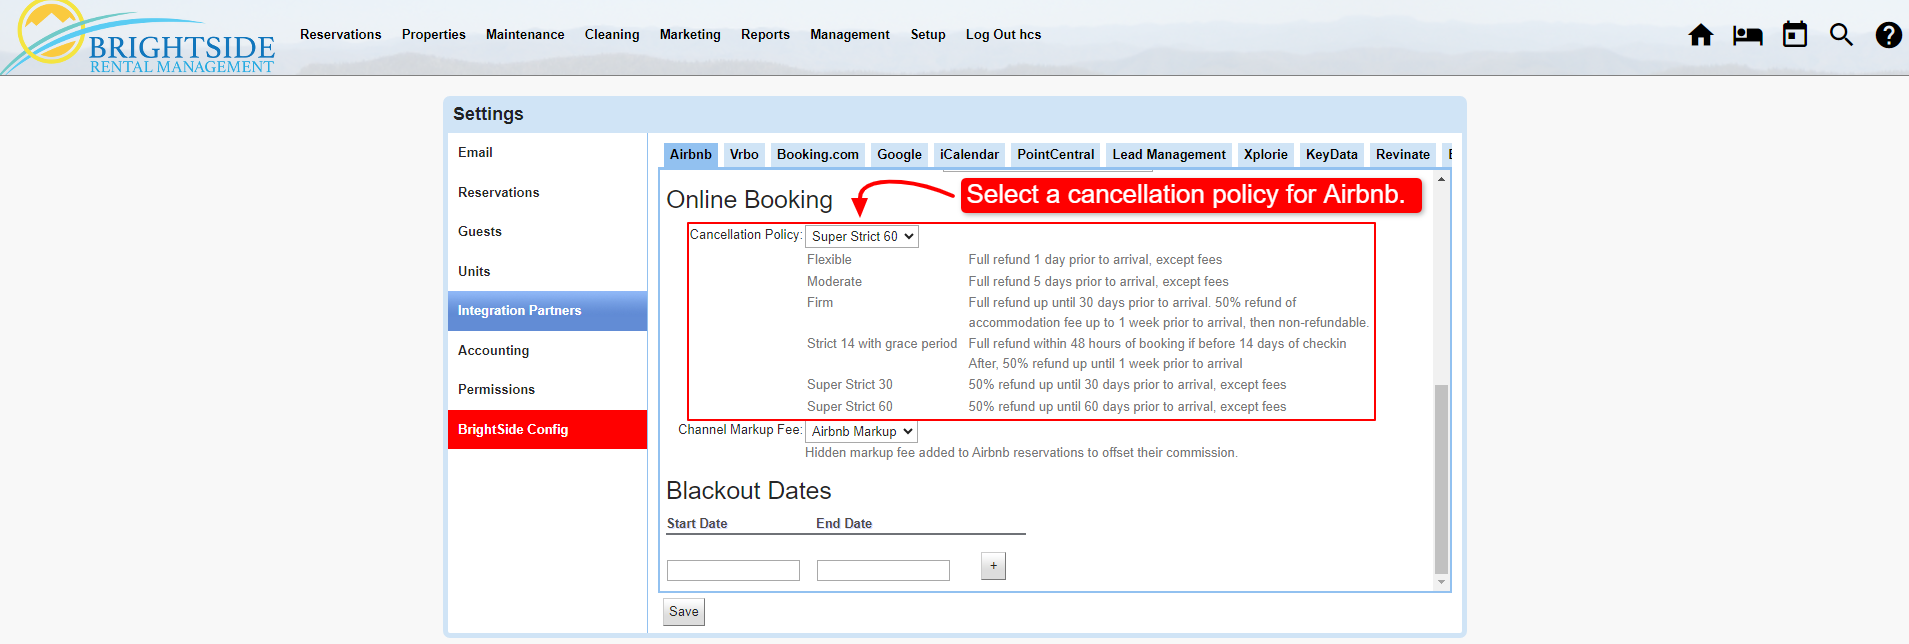
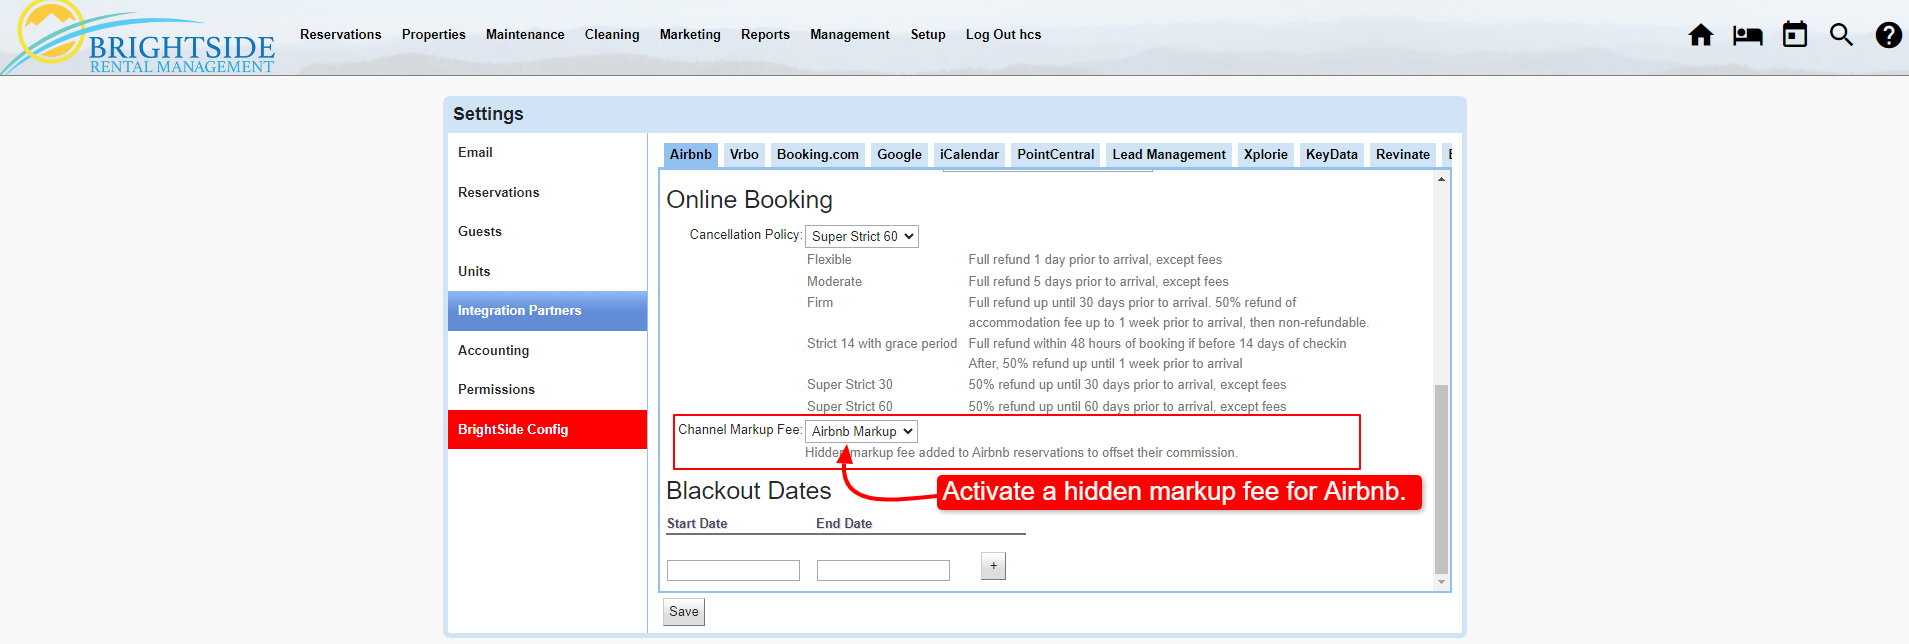
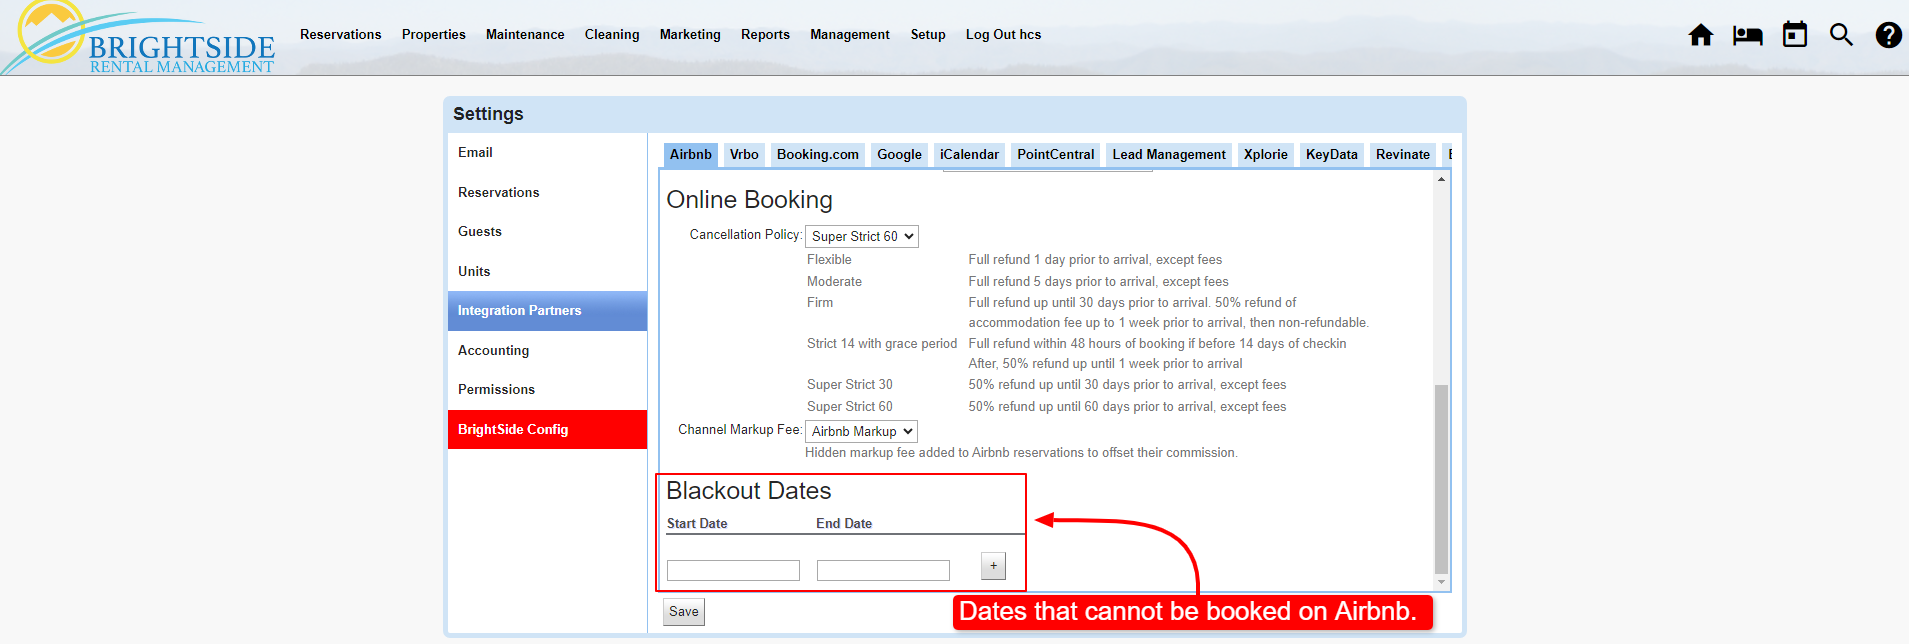
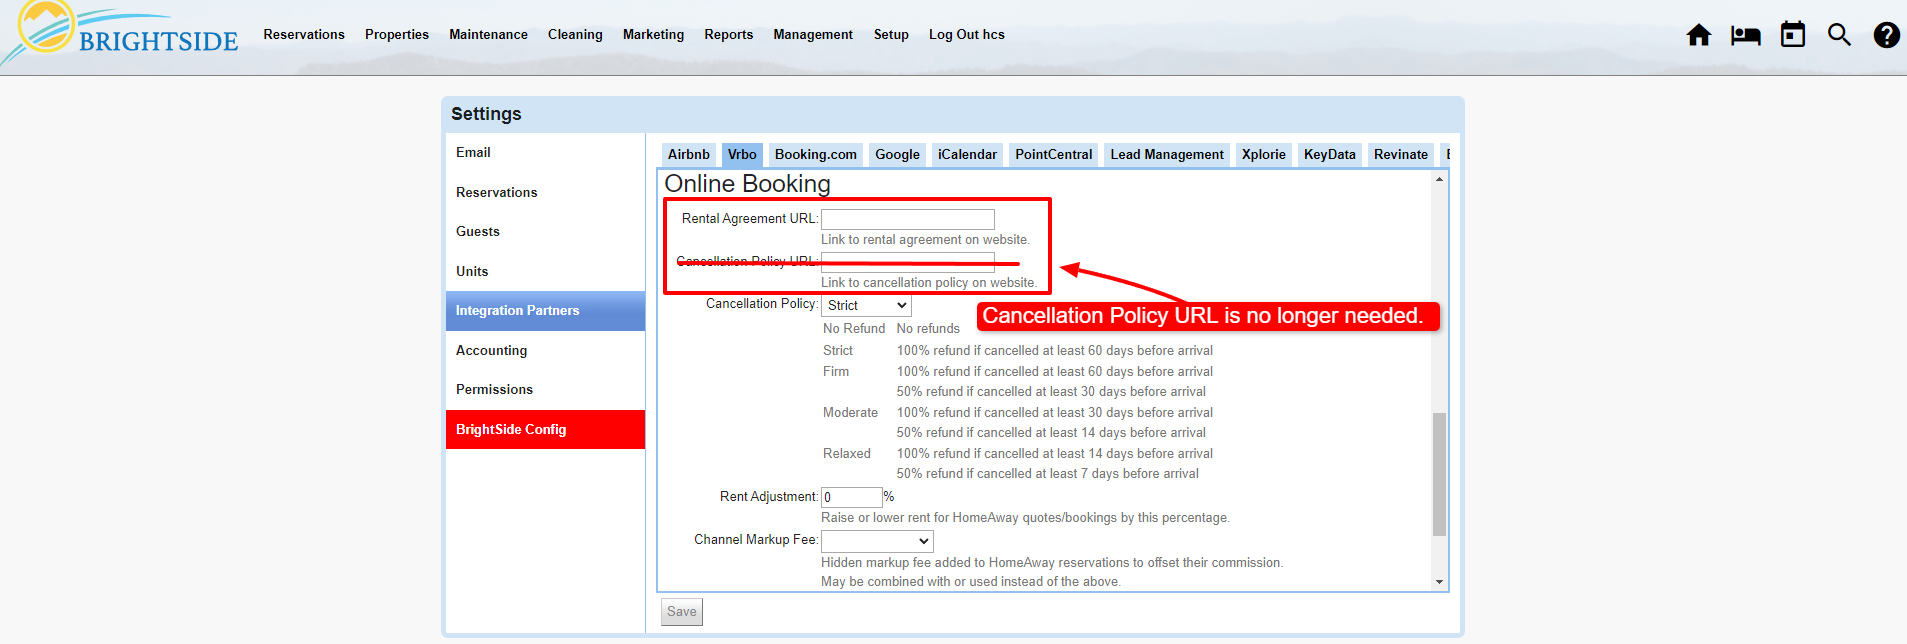
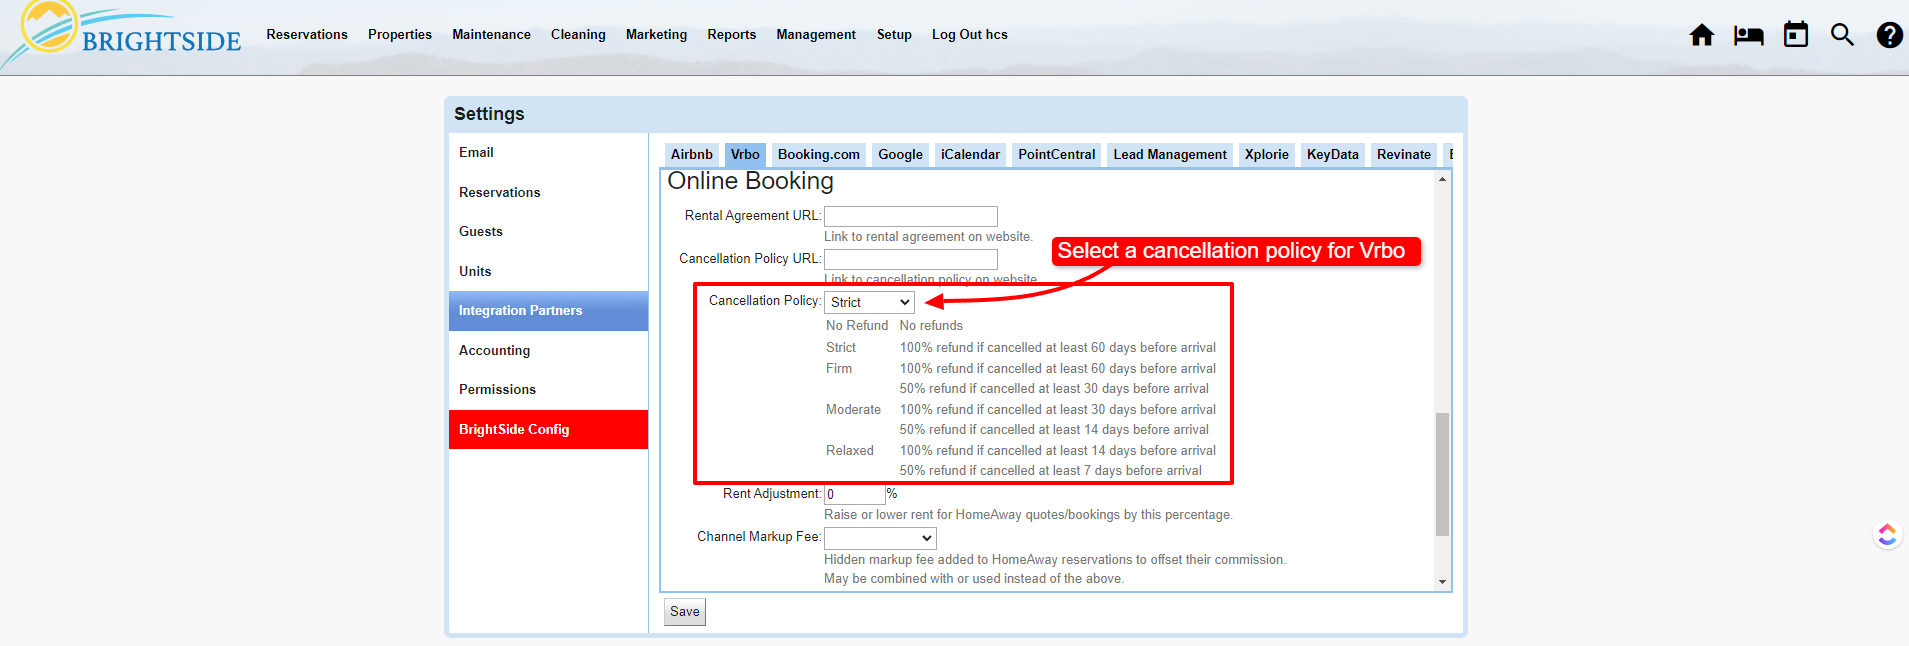
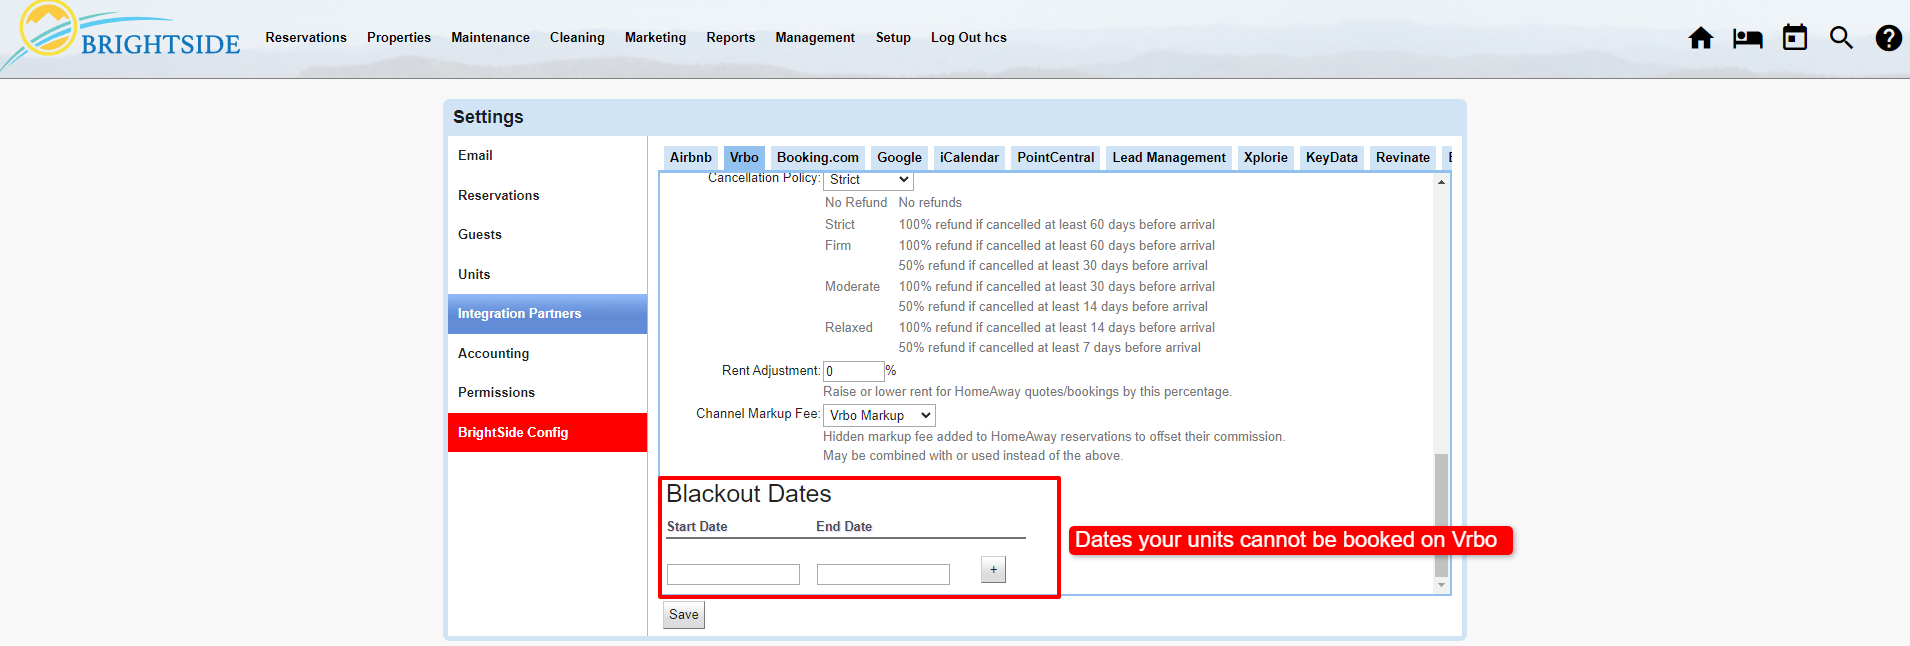
  1. Cancellation Policy: The default cancellation policy set in Vrbo Integration Partners is shown. If this unit needs a different cancellation policy, you may choose it from the dropdown.
  2. Show Exact Location: If left unselected, the map will show guests the general area of the unit, but not the exact location. When activated, guests may see the exact location of the property. After booking, guests will always be able to see the exact location.
  3. Headline: Enter a unique headline using up to 80 characters.
  4. Summary: Enter a summary using up to 80 characters.
  5. Description: Enter a detailed description of the property using a minimum of 400 characters and a maximum of 10,000 characters. If you do not enter any information here, the Website Description from the Unit tab is displayed on Vrbo. If the description is shorter than 400, or more than 10,000 characters, it could prevent your unit from being activated on Vrbo.
  6. Owner Listing Story: Optional, but can be useful of there is a great story behind the rental.
  7. Unique Benefits: Optional, but provides an opportunity to promote the reason you think guests would benefit from staying at this property.
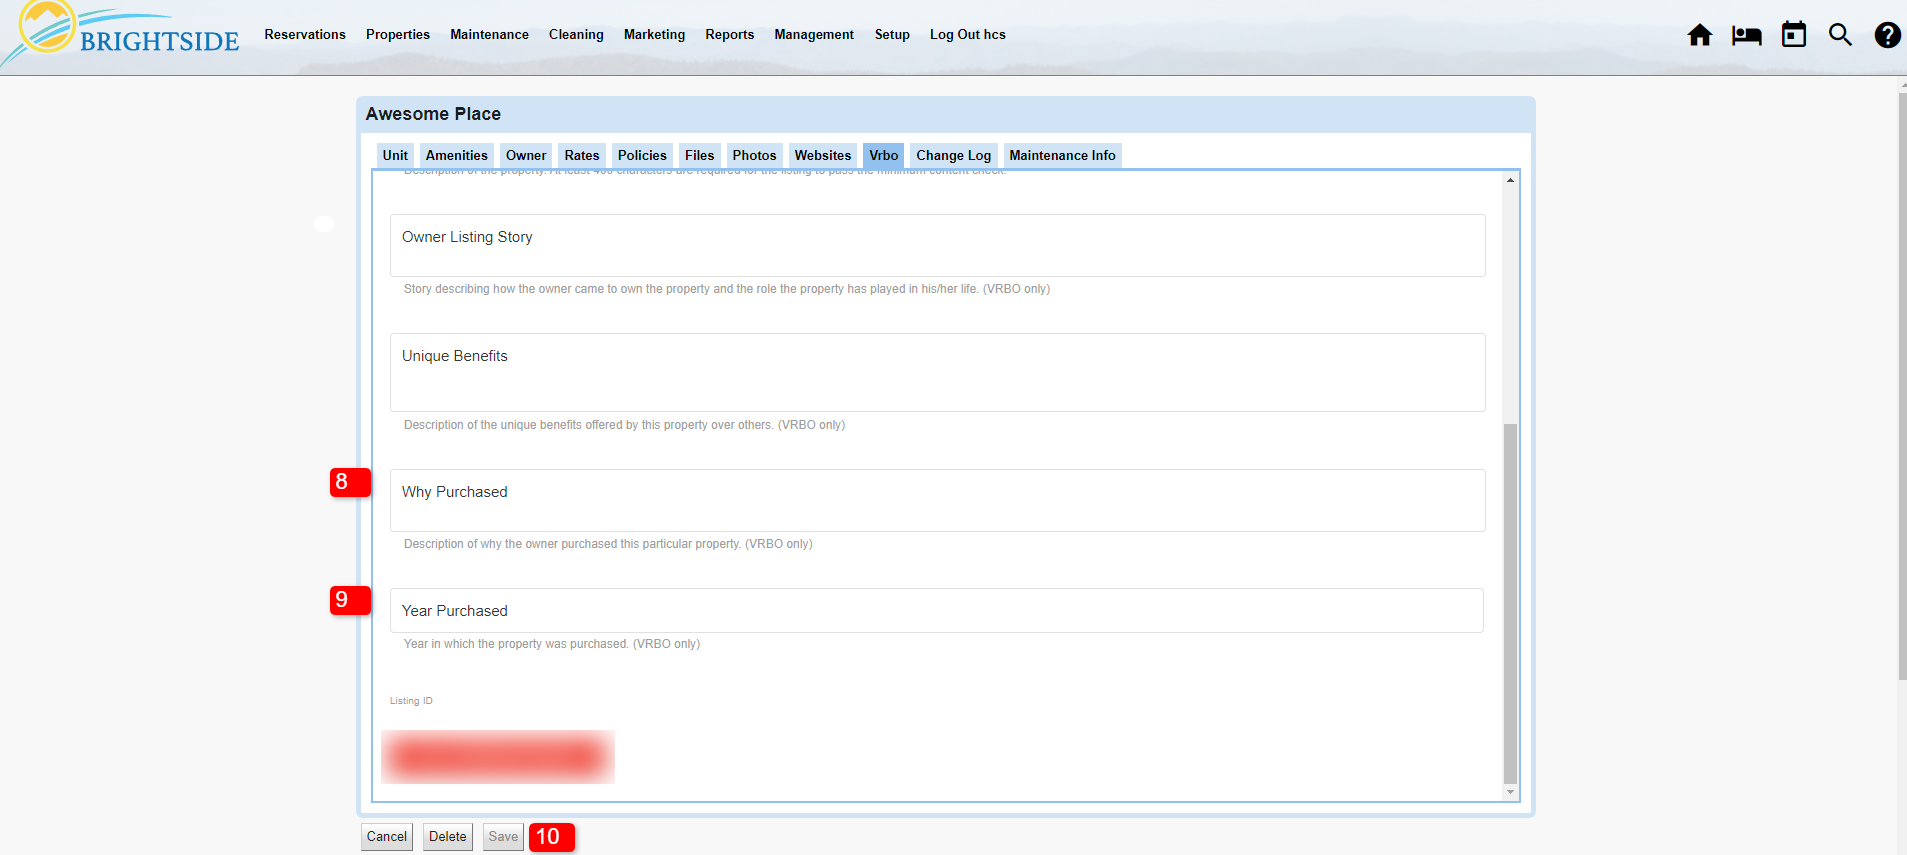
  8. Why Purchased: Optional, tell the story of why you purchased this property.
  9. Year Purchased: Optional, enter the year you purchased the property.
  10. Save: Always save your changes.
Connect to Vrbo | Unit Tab Information
Connect to Vrbo | Unit Information

Click on Image for Enlarged View

Connect to Vrbo | Unit Tab Information
Connect to Vrbo | Unit Information

Click on Image for Enlarged View

Common Questions

Q. How long does it take Vrbo to activate my property so I can see it live on their platform?
A. After you complete all the steps in BrightSide to activate a property, it takes Vrbo at least 48 hours to review the unit details and approve it for publication on their site. This is a manual process and it can take as many as 72 hours.

Q. I went through all the steps to activate my property on Vrbo, but I am getting an error message saying I need to upload photos, enter rates, etc. Why?
A. This is an indication that Vrbo has not completely processed the onboarding of your unit. If you entered all these details, the only thing to do is wait 48 to 72 hours.

Q. My property is active on Vrbo and I made an update in BrightSide, however, the change is not showing up on Vrbo. Why?
A. Vrbo does not update in real time like Airbnb. Vrbo accesses the BrightSide database once a night and pulls the updated information from our servers. They then process that data and update the units on their end. This can take as many as 24 hours to complete.

Connect a Unit to Vrbo2024-05-29T10:24:23-04:00

Airbnb Integration

2024-05-21T10:29:20-04:00

Summary

BrightSide integrates with Airbnb to manage reservations, update photos, block off the calendar, create new properties, and so much more. In order to connect your properties with Airbnb, follow the instructions provided in this tutorial.

Pre-Integration Steps

IMPORTANT!: Before connecting your BrightSide account to Airbnb, you must create your units/properties in BrightSide first. Unit data only goes one way, from BrightSide to Airbnb (reservations go both ways). After your BrightSide account connects to Airbnb, BrightSide will overwrite any unit data you have in Airbnb, not the other way around. If you already have properties on Airbnb, you still need to create them in BrightSide. Once connected, the information from BrightSide will update your listings already on Airbnb.

After you complete the preliminary steps above, follow these next steps to complete the integration with Airbnb.

Navigate to:  Setup > Settings > Integration Partners > Airbnb (tab)

HINT: Skip the “Add Airbnb Account” step for now. We will return to it after we set the default amenities and the feature mapping.

Airbnb Integration | Skip This Step for Now
Airbnb | Skip This Step for Now

Click on Image for Enlarged View

Set Default Amenities

Default amenities are features that are included in ALL of your units. If you provide towels, bed sheets, and toilet paper for all of your properties, this is where you list it. If some of your properties have an air conditioner, but not all, do not include it here.

  • Click the blank area below “Default Amenities”; a dropdown list of common amenities will appear.
  • Scroll down the list and tick the box next to the amenities that apply to ALL of your units.
  • Click Save.

HINT: Having amenities in your BrightSide account is not required to set defaults; but without amenities, you cannot complete the Feature Mapping.

Airbnb Integration | Select Default Amenities
Airbnb Integration | Default Amenities

Click on Image for Enlarged View

Feature Mapping

The purpose of Feature Mapping is to link your amenities to Airbnb’s amenity list. For example, they have a feature named “Hot tub”. Your feature may be named “Hot Tub” or “Jacuzzi”. By mapping the features, you are telling Airbnb that both of these are considered hot tubs.

  • Under the heading Features, and below the heading, Airbnb Feature, click the arrow in the blank field. A list of Airbnb’s amenities will appear.
  • Scroll down the list and select the amenity that most closely matches your amenity. Do this for each amenity in your list.
  • Click Save.

HINT: Not every amenity you have will match to an Airbnb Feature (see Dog Walk in the screenshot). That’s okay, they don’t show every type of amenity on their website. However, the Dog Walk amenity will show up on your website.

Airbnb Integration | Feature Mapping

Click on Image for Enlarged View

Online Booking

Cancellation Policy

Airbnb allows you to select from a number of cancellation policies, from Flexible all the way down to Super Strict 60. Whatever you choose here will sync with Airbnb to let them know how to handle reservation cancellations. Select one of these from the dropdown and then save it.

  • Flexible: full refund 1 day prior to arrival, except fees.
  • Moderate: full refund 5 days prior to arrival, except fees.
  • Firm: full refund up until 30 days prior to arrival. 50% refund of accommodation fee up to 1 week prior to arrival, then non-refundable.
  • Strict 14 with grace period: full refund within 48 hours of booking if before 14 days of check-in. After, 50% refund up until 1 week prior to arrival.
  • Super Strict 30: 50% refund up until 30 days prior to arrival, except fees.
  • Super Strict 60: 50% refund up until 60 days prior to arrival, except fees.
Airbnb Integration | Cancellation Policy

Click on Image for Enlarged View

Channel Markup Fee

Airbnb charges you a commission when someone makes a reservation through their website or app. BrightSide allows you to create a fee to offset their commission, and hide it in the rent. This fee is called a channel markup fee. The amount of the fee is up to you, however, it is normally set to calculate on a percentage basis.

This fee will only be added to reservations booked through Airbnb.

HINT: Create the fee in BrightSide at Reservations > Fees and Charges > Add. After you create the fee, it will show up here where it may be activated.

Airbnb Integration | Markup Fee

Click on Image for Enlarged View

Blackout Dates

During high traffic seasons you may prefer for guests to book directly through your website rather than through Airbnb. Instead of removing the property from Airbnb, block those dates off by creating Blackout Dates.

When you create a blackout date, your units will not be bookable through Airbnb. The calendar will simply show that the dates are not available.

HINT: Keep in mind that blackout dates apply to all of your units. If you create a blackout date from July 1 – July 10, none of your units will be bookable on Airbnb for those dates. Use wisely.

  • Start Date: select the date you want to begin blocking off.
  • End Date: select the date you want to stop blocking off.  If you want to add additional blackout dates, click the + box next to the dates.
  • Save
Airbnb Integration | Blackout Dates

Click on Image for Enlarged View

Add Airbnb Account

It is time to connect your BrightSide account with an Airbnb account.

  • Click on the “Add Airbnb Account” button.
  • Log into your Airbnb account.
  • Once inside your your Airbnb account, navigate to Account > Privacy & Sharing > Services.
  • Choose BrightSide as your integration partner.
  • Select “Sync Everything” and connect.

HINT: Your BrightSide account can connect to more than one Airbnb account. If you are managing properties for more than one Airbnb account, you may connect them and manage them all from within your single BrightSide dashboard. Just repeat the steps above for each Airbnb account you need to connect.

EXTREMELY IMPORTANT!: DO NOT connect individual properties to Airbnb, VRBO, or any other OTA, until you have completely built out your property in BrightSide. This includes photos, rates, amenities, descriptions, basically everything! This is especially important when you already have the property on the OTA. When you connect, BrightSide will overwrite ALL unit data on the OTA. If you have not set rates, they will show up as $0.00 on the OTAs. If you haven’t added photos to BrightSide, the photos on the OTAs will be deleted.

If there is any doubt about what you are doing, contact customer support at support@bookonthebrightside.com or call 865-233-3778.

After you connect your Airbnb account, you need to activate individual units so they will show up on Airbnb. When you get ready to activate units, go to Properties > Units > Airbnb (tab).

Airbnb Integration | Add Airbnb Account

Click on Image for Enlarged View

Airbnb Integration2024-05-21T10:29:20-04:00

Google Reviews

2024-04-11T15:55:02-04:00

Summary

Millions of people rely on Google Reviews every day to determine where they shop, eat, play, or do just about anything and everything. The opinions of those who went before them are important. One of the most visible resources for getting those opinions is Google Reviews. In this article, we explain how you can set up BrightSide to automatically import new Google Reviews where you can respond to the reviews and possibly display them on your website.

First Things First

Google Business Profile

Make sure your company has a Google Business Profile, formerly known as Google My Business. If you don’t yet have a Google Business Profile, you must do that first. BrightSide cannot connect to a nonexistent account, or a business profile you don’t have control over. After Google approves you as the owner of your business profile, we can begin the process of connecting BrightSide to it.

Your Google Business Profile is where you manage your company’s information on Google. You can list your business hours, products, address, phone number, and respond to customer reviews left on their platform. Be sure to keep a record of the email address associated with this account and the password. You will need them.

Google Workspace

Companies utilizing Google Workspace need to provide permission to manage the profile in the Google admin dashboard. Without this permission, we will not be able to connect your BrightSide account.

  1. Log into your Google Workspace account at https:/admin.google.com.
  2. Go to Apps > Additional Google Services
  3. Enable “Google Business Profile Manager”

Connecting to Google Reviews

Contact BrightSide Support

Navigate to: Setup > Settings > Integration Partners > Google Reviews (tab)

After you have access to your Google Business Profile, return to BrightSide and notify us that you want to integrate with Google Reviews. This is the first step. Under the Google Reviews tab, click on the blue button REQUEST GOOGLE ACCESS.

This will send support an email, notifying us that you are ready to connect. We will perform a couple of tasks in the backend and then notify you by email that you may go on to step two below.

Begin the Process
Begin the Process

Click on Image for Enlarged View

Connect Your Google Account

When BrightSide support confirms that we have completed step one, go to the Google Reviews tab in Integration Partners to finish the integration. All you need to do is click on the blue button that reads, CONNECT GOOGLE ACCOUNT. This will take you to Google, where you must log in using the credentials for the account used to manage your Google Business Profile. After you log in, you will be redirected back to BrightSide.

NOTE: If you have more than one Google account, make sure you are not logged into an account that is not associated with your Google Business Profile. This will associate the incorrect Google account with BrightSide and you will not be able to import your reviews.

Connect Google Account

Click on Image for Enlarged View

A successful connection to your Google account is indicated by the message, “Connected to Google Account ###############.” You will also see the name of your business’ Google profile in the dropdown. If you are connected and you don’t see the name of your business in the dropdown, your Google account may not have management permission over the Google Business Profile.

Google Connection Confirmed

Click on Image for Enlarged View

Accessing and Responding to Reviews

Navigate to: Marketing > Guest Comments

Importing Google Reviews

Once connected, BrightSide automatically imports your reviews. When you go to the Guest Comments page in BrightSide, you can see all your reviews, with the sources identified. If the source is BrightSide, it will be blank. If it is from Google, it will be identified as such.

Importing Google Reviews

Click on Image for Enlarged View

Responding to Google Reviews

  1. Header: The header identifies source of the comments. If it is from Google, it will read Google Comment.
  2. Date: This is the date the guest submitted the review to Google.
  3. Guest: The name of the guest.
  4. Unit: The unit where the guest stayed.
  5. Rating: The star rating entered by the guest.
  6. Comment: The full content of the comments submitted to Google.
  7. Private Comment: Enter any comments for your records. These comments do not show up anywhere publicly.
  8. Response: Enter your response to the guest review. This response will be posted on Google, and on your website, if you approve the comments in the next step.
  9. Approved: By ticking this box, you are approving this review for publication on your website, *if it is integrated. It will not have any impact on Google and what they publish.
  10. Archived: Tick this box to archive the comment. This prevents it from showing up in this list and on the website, even if it was an approved comment. Do not archive comments you want to show up on your website.
  11. Reservation: Begin typing the name of the guest and a list of reservations appears in a dropdown. You may select the matching reservation to connect the review.

*NOTE: Depending on how your website is set up, BrightSide Guest Comments may or may not show up there. If BrightSide manages your website, we can easily integrate these comments on the unit pages.

Responding To & Approving Reviews

Click on Image for Enlarged View

Google Reviews2024-04-11T15:55:02-04:00

Vrbo Integration

2024-05-29T10:24:45-04:00

Summary

BrightSide integrates with Vrbo to manage reservations, update photos, block off the calendar, create new properties, and so much more. In order to connect your properties with Vrbo, follow the instructions provided in this tutorial. These steps are different than Airbnb, so please follow closely.

IMPORTANT!: You must create your units/properties in BrightSide even if you have existing units on Vrbo. Unit data only goes one way, from BrightSide to Vrbo (although reservations and availability go both ways). After your BrightSide account connects to Vrbo, and you activate a property, BrightSide will update and overwrite that unit’s data in Vrbo, not the other way around.

* These links take you to our Knowledge Base containing detailed instructions.

NOTE: After you complete these steps, Vrbo may take several days to activate your properties. They may reach out to you through email to confirm that you are asking them to allow BrightSide to manage your properties.

Advertiser ID

Before attempting to connect to Vrbo, ask your BrightSide Onboarding specialist to assign you a unique Advertiser ID. You will use this Advertiser ID when you connect your account. You can find yours at the Vrbo tab in Integration Partners, under Account Settings.

Navigate to:  Setup > Settings > Integration Partners > Vrbo (tab)

VRBO Integration | Advertiser ID
Vrbo Integration | Advertiser ID

Click on Image for Enlarged View

Set Default Amenities

Default amenities are features that are included in ALL of your units. If you provide towels, bed sheets, and toilet paper for all of your properties, this is where you list it. If some of your properties have an air conditioner, but not all, do not include it here.

  • Click the blank area below “Default Amenities”; a dropdown list of common amenities will appear.
  • Scroll down the list and tick the box next to the amenities that apply to ALL of your units.
  • Click Save.

HINT: Having amenities in your BrightSide account is not required to set defaults; but without amenities, you cannot complete the Feature Mapping.

VRBO Integration | Select Default Amenities
Vrbo Integration | Default Amenities

Click on Image for Enlarged View

Feature Mapping

The purpose of Feature Mapping is to link your amenities to Vrbo’s amenity list. For example, they have a feature named “Hot tub”. Your feature may be named “Hot Tub” or “Jacuzzi”. By mapping the features, you are telling Vrbo that both of these are considered hot tubs.

  • Under the heading “Features,” and below the sub-heading, “HomeAway Feature,” click the dropdown arrow in the blank field. A list of Vrbo’s amenities will appear.
  • Scroll down the list and select the amenity that most closely matches your amenity. Do this for each amenity in your list.
  • Click Save.

HINT: Not every amenity you have will match to a HomeAway Feature (see Dog Walk in the screenshot). That’s okay, they don’t show every type of amenity on their website. However, the Dog Walk amenity will show up on your website.

VRBO Integration | Feature Mapping
Vrbo Integration | Feature Mapping

Click on Image for Enlarged View

Online Booking

Rental Agreement URL

BrightSide onboarding can help you upload a PDF of your rental agreement to your website (this may have already been done during the onboarding process). Vrbo imports this document and provides a link to it so guests may read it during the booking process. If you do not know the URL, ask your onboarding specialist to assist you.

NOTE: Since Vrbo provides options for the cancellation policy, it is no longer necessary to provide a URL for your cancellation policy.

Vrbo Integration | Rental Agreement URL

Click on Image for Enlarged View

Cancellation Policy

Vrbo allows you to select from a number of cancellation policies, from “No Refund” all the way down to “Relaxed.” The “default policy” you choose here will sync with Vrbo to let them know how to handle reservation cancellations. Select one of these from the dropdown and then save it.

  • No Refund: No refunds at any time.
  • Strict: 100% refund up until 60 days prior to arrival.
  • Firm: 100% refund if cancelled at least 60 days before arrival and 50% refund if cancelled at least 30 days before arrival.
  • Moderate: 100% refund if cancelled at least 30 days before arrival and 50% refund if cancelled at least 14 days before arrival.
  • Relaxed: 100% refund if cancelled at least 14 days before arrival and 50% refund if cancelled at least 7 days before arrival.

NOTE: When needed, you can override this default cancellation policy within each unit. This is handy if you need to assign a separate cancellation policy for each unit.

Vrbo Integration | Cancellation Policy

Click on Image for Enlarged View

Rent Adjustment

If you want to increase the rates across the board for Vrbo listings, you may do it here. This is useful when you own all of your properties as well as manage them. By using Rent Adjustment, you do not have a separate fee hidden in the rental charges, it just raises the rental rates. Owners are paid a percentage of the entire rental charge.

HINT: When you manage properties but do not own them, you may want to raise the rental rates with a hidden fee to recover the Vrbo commissions you are charged. When this is the case, use the Channel Markup Fee below.

Vrbo Integration | Rent Adjustment

Click on Image for Enlarged View

Channel Markup Fee

Vrbo charges you a commission when a guest makes a reservation through their website or app. BrightSide allows you to create a fee to offset this commission, and hide it in the rent. This fee is called a Channel Markup Fee. The amount of the fee is up to you, however, it is normally set to calculate on a percentage basis.

This fee will only be added to reservations booked through Vrbo.

Create the “Vrbo Markup”

Navigate to: Reservations > Fees and Charges > Add

  • Enter the name of this fee, “Vrbo Markup”
  • Set the type as “Percentage”
  • Tick “Include in Rent”
  • Set the percentage you want to increase the rent in order to cover the commission charged by Vrbo. Remember, this percentage is added to the rent only, not the subtotal, which is how Vrbo calculates their commission.
  • If you need to use different markup percentages per unit, tick the “Varies by Unit” box and set the rate in each unit on the Rates tab.
  • You must tick “Use Unit Taxes” since this is a taxable charge.

NOTE: After you create the fee, it will show up in the Vrbo tab in Integration Partners where it may be activated. If you need assistance choosing the options for this fee, please contact support.

Vrbo Integration | Create a Vrbo Markup

Click on Image for Enlarged View

Apply the “Vrbo Markup”

Navigate to:  Setup > Settings > Integration Partners > Vrbo (tab)

  • Scroll down and select Vrbo Markup from the dropdown next to Channel Markup Fee
  • Save

HINT: When using the Channel Markup Fee, Vrbo shows the guests the increased rental rate that includes the markup. However, BrightSide breaks down this fee into two charges, the rental charge and the markup fee. BrightSide then assigns the markup fee to the management company. The owner’s payment is based on the rental charge that does not include the markup fee.

Vrbo Integration | Apply the Channel Markup Fee

Click on Image for Enlarged View

Blackout Dates

During high traffic seasons you may prefer for guests to book directly through your website rather than through Vrbo. Instead of removing the property from Vrbo, block those dates off by creating Blackout Dates.

When you create a blackout date, your units will not be bookable through Vrbo. The calendar will simply show that the dates are not available.

HINT: Keep in mind that blackout dates apply to all of your units. If you create a blackout date from July 1 – July 10, NONE of your units will be bookable on Vrbo for those dates. Use wisely.

  • Start Date: select the date you want to begin blocking off.
  • End Date: select the date you want to stop blocking off.  If you want to add additional blackout dates, click the + box next to the dates.
  • Save
Vrbo Integration | Blackout Dates

Click on Image for Enlarged View

Activating Units

After you have completed the previous steps, you must activate each unit individually that you want to be available on Vrbo. For detailed instructions on how to activate a unit on Vrbo, visit the Connect a Unit to Vrbo tutorial.

NOTE: The Vrbo tab does not show up in the unit’s screen until after you have an Advertiser ID in BrightSide.

Connect to Vrbo

Final Step

To use BrightSide to manage your properties on Vrbo, you must have an active Vrbo account to which we can connect. If you already have an account, that’s great. We can connect it in just a few short steps. If you do not have an account, you can create one in just a few minutes using the steps below.

I Have a Vrbo Account

Start Here (when you click this link, you will leave BrightSide and go to Vrbo). After arriving on Vrbo’s website, answer the following:

  • Do you have an account with Vrbo or its affiliated partners? If you already have an account with Vrbo, answer “Yes.”
  • Do you currently use property management software? Answer, “Yes.”
  • Sign into your Vrbo account and follow the instructions.
  • When asked, select BrightSide as your choice of property management software.
  • When asked, enter your unique Advertiser ID assigned by BrightSide (find it here: Setup > Settings > Integration Partners > Vrbo).
  • When finished, return to BrightSide.

I Do Not Have a Vrbo Account

Start Here (when you click this link, you will leave BrightSide and go to Vrbo). After arriving on Vrbo’s website, answer the following:

  • Do you have an account with Vrbo or its affiliated partners? Answer, “No”.
  • Do you currently use property management software? Answer, “Yes.”
  • What is the primary language of your listing content in your software? For most, the answer is English.
  • Click “Get started.”
  • Vrbo will take you through a series of screens to set up your account.
  • When asked, select BrightSide as your choice of property management software.
  • When asked, enter your unique Advertiser ID assigned by BrightSide (find it here: Setup > Settings > Integration Partners > Vrbo).
  • When finished, return to BrightSide.

NOTE: After you complete one of the two steps above, Vrbo will contact you via email, and possibly phone, to confirm you want BrightSide to manage your properties and to complete the integration on their end. Expect this process to take at least 48 to 72 hours.

Vrbo Integration2024-05-29T10:24:45-04:00

Minimum Stay Length Rules

2024-05-10T16:43:37-04:00

Summary

Property managers must determine the minimum number of nights required for a guest stay at each unit. BrightSide provides several ways to enter the minimum night stay length requirements, and when needed, minimum stay overrides. This article will help you understand where to set the minimum stay length policies, overrides, and the hierarchy, so you understand which settings take priority.

The following are listed in order of increasing priority, with “Rate Seasons” being the lowest and “Minimum Stay Overrides (Units)” the highest.

Rate Seasons

Applies to: All Units

This is the most basic control, where you set a minimum stay rule for each of your rate seasons. Look at this as the default minimum stay requirement for every unit, based on the rate seasons. For example, if you require a longer minimum night stay during the Peak season than the Holiday season, this is where you enter it.

Navigate to:  Properties > Rate Seasons

NOTE: In the hierarchy of minimum stay length requirements, this is the lowest ranking, or sixth highest ranking (6), and can be overridden by any of the following settings and overrides.

Minimum Stay Length | Rate Seasons

Click on Image for Enlarged View

Unit Rate Seasons Overrides

Applies to: Individual Units

The minimum night requirement number set in “Rate Seasons” above can be overridden on an individual unit basis here. For example, some very large units may not need the same minimum stay requirements as smaller units during the same season. If needed, you may override the “Rate Seasons” default setting within each individual unit. As with the “Rate Seasons,” this setting affects every date during the season, but is specific only to that particular unit.

Navigate to:  Properties > Units > Select a Unit > Rates (tab)

NOTE: In the hierarchy of minimum stay length requirements, this is the fifth highest ranking (5), just above “Rate Seasons.” It overrides the “Rate Seasons” settings, but can be overridden elsewhere.

In the example below, we changed the minimum stay requirement for this unit to “1” night for “Low Season” and “4” nights for “Peak Season.” The “Default Season” and the “Holiday Season” remain unchanged. The light gray color of those numbers indicates the number was set in “Rate Seasons.”

Minimum Stay Length | Unit Rate Season Overrides

Click on Image for Enlarged View

Minimum Stay Overrides (Global)

Applies to: All Units

The first setting, “Rate Seasons” allows you to set the default minimum stay requirements for entire seasons, for all units. The “Unit Rate Seasons Overrides” allows you to override the minimum stay requirements set in “Rate Seasons,” for a single unit. Both tools impact entire seasons, the first on a global level and the latter on a unit level.

On occasion, you may need to override the minimum stay requirement for specific days on ALL units (global). If so, use the “Minimum Stay Overrides” tool. Be sure to select “All” from the dropdown. This allows you to change the minimum stay requirement for specific days and only affects those exact dates, not future years, and applies to all units. Using the global minimum stay override allows you to change the requirements for specific days without impacting the entire season. Keep in mind, this tool allows you to override to a longer minimum stay, but not a shorter stay set in Unit Policies.

For example, a festival is scheduled to run from a Friday to Sunday and you want to change the minimum stay requirement from two nights to three nights for that weekend only. You also want it to apply to all your properties.

Navigate to:  Properties > Minimum Stay Overrides > All (dropdown)

NOTE: In the hierarchy of minimum stay length requirements, this is the fourth highest ranking (4). It overrides both the “Rate Season” and “Unit Rate Seasons Overrides” settings.  However, this setting can be overridden elsewhere.

Minimum Stay Overrides | Global

Click on Image for Enlarged View

Policies

“Minimum Stay Policies” offer the highest level of control, both globally and per unit. The purpose of the policy is to prevent a reservation with a shorter stay length than you or the owner wants.

For example, if a “Rate Season” or a “Global Override” is set to a one night minimum, and the “Policy” for a unit is set at two, the policy prevents a reservation shorter than two nights from being booked. Remember, the Rate Seasons, Unit Rate Season Overrides, and Global Overrides, are global settings and the three lowest settings in the hierarchy. They are trumped by the Unit Policy.

You may set a default policy, that applies to every unit (Global Policy), in the system policies. Alternatively, you may set the policy within each unit (Unit Policy).

NOTE: The only setting that can force a shorter stay mandated by the Policy is the Minimum Stay Overrides (Units). However, the other minimum stay settings and overrides may impose a longer minimum stay requirement.

Global Policy

Applies to: All Units

The global policy allows you to enter the minimum stay requirements without having to enter it for every unit manually. BrightSide offers two ways to enter the Minimum Stay Length Policy, globally, or within each unit. If you have a minimum stay policy that applies to every unit (globally), you may set this in your BrightSide Unit Policies settings.

This policy is only used when it is more restrictive than the one set on the seasons or global overrides. For example, if the global policy is set to “3” and a night is  overridden to “5,” the minimum stay for that night will be “5.” But for nights overridden to “2,” the minimum stay will be “3” due to this policy.

Navigate to: Setup > Settings > Units > Policies (tab)

Near the bottom of the page, enter the number of nights you require for a Minimum Stay Length. This applies the policy to all units. If you prefer, you can set the Minimum Stay Length Policy in each unit (see the next section).

NOTE: In the hierarchy of minimum stay length requirements, this is the third highest ranking (3). This setting can only be overridden by the Unit Policy and Minimum Stay Overrides (Unit level). If you set a Global Policy, remember, the Unit Policy outranks it.

Minimum Stay Rules| Global Policies

Click on Image for Enlarged View

NOTE: Keep in mind, this safeguard setting is primarily for online booking and reservations made through online travel agencies. Your reservationist may book a stay that is shorter than the minimum stay length setting allows.

EXAMPLE: If you set this policy to “2” nights, BrightSide will not allow an online reservation to be booked for one night. If a guest calls and requests to book one night, and you want to do it, your reservationist may book it.

Unit Policy

Applies to: Individual Units

You may want to bypass the global setting altogether and enter the Minimum Stay Length Policy directly in each unit. This provides a bit of flexibility to have different requirements per unit. Entering it in the unit is useful if you have a particular property owner that has a different minimum stay policy than your other units.

In addition, the “Unit Policy” outranks the “Global Policy.” So if you enter a Global Policy in the system settings and a different one in the unit, the “Unit Policy” takes precedence.

Navigate to:  Properties > Units > Select a Unit > Policies (tab)

Near the bottom of the page, enter the number of nights you require for a minimum stay length and save it. In most cases, we recommend using two (2) nights for the minimum.

RECOMMENDATION: Entering one or two nights into the Unit Policies is a good choice, unless you have an owner who refuses to rent for less than a higher number of nights. Enter the number of nights that is the absolute minimum number of nights you are willing to rent this unit. For example, if your owner says they don’t want to EVER rent for less than a week, enter “7.” If you normally rent for “7” nights, but are willing on occasion to rent it for two nights, enter “2.” This will allow you the flexibility to set higher stay requirements elsewhere, but not go below the minimum.

NOTE: In the hierarchy of minimum stay length requirements, this is the second highest ranking (2). The only setting higher than the Unit Policy is the Minimum Stay Overrides (Units).

Minimum Stay Length | Unit Policy

Click on Image for Enlarged View

Minimum Stay Overrides (Units)

Applies to: Individual Units

The “Minimum Stay Overrides,” on the unit level, trumps every other setting and cannot be overridden anywhere. This override even takes priority over the Unit Policy, the second highest ranking setting.

Navigate to:  Properties > Minimum Stay Overrides > (Select Unit)

After navigating to the overrides page, select the unit you wish to modify from the dropdown menu on the left. The light gray numbers on each day of the calendar are the nights designated in the Unit Policies. From there, enter a new number for each day that needs to be changed. This can only be done a day at a time, there is no bulk editing on this screen. Minimums that have been overridden are colored black. To revert back to the default designated in the unit policy, just click in the field and delete the number. These fields will auto-save.

NOTE: In the hierarchy of minimum stay length requirements, there is no higher level than the Minimum Stay Overrides (Units).

Minimum Stay Overrides | Units

Click on Image for Enlarged View

Wheelhouse, Beyond, & PriceLabs

Applies to: Units Connected to Yield Management Companies

All pricing and minimum stay requirements are relegated to Wheelhouse, PriceLabs, or Beyond when you are connected and syncing to any one of them. Policies, overrides, and/or settings entered into BrightSide will be overridden by the external yield management company. You must ensure that you have the proper minimum stay settings in their software before connecting. Any changes made in BrightSide will be overridden by them the next time it syncs.

Calculations

When checking minimum stay rules for a potential reservation, BrightSide checks every night of the stay and uses the largest number found on any of the nights. For example, when getting a quote for a 4 night stay, if 3 nights are set to a 2 night minimum but the last night has a minimum of 5 nights, the stay will not be  allowed, as it treats the whole stay as a 5 night minimum.

However, some OTAs like Vrbo calculate minimum nights only on the arrival date, not the entire stay, so there may be situations where we cannot enforce this logic.

Gap Fill

We also have an optional feature where minimum stay rules can be bypassed completely if the reservation is completely filling a gap between two other stays. If this is enabled on your account, you can configure the absolute minimum stay you’ll accept, even if a gap is being filled, and the maximum lead time (days between the booking date and arrival date) allowed.

Common Questions

Q. If I set the minimum stay length policy in the system setup, can I override it on a unit by unit basis?
A. Yes, the policy setting in the unit takes precedence over the global policy setting.

Q. Do I have to enter a minimum in the global policy settings or can I just enter it in each unit?
A. You are not required to enter a minimum stay length in the global policy settings. You may do it on a unit by unit basis.

Q. How do the OTAs determine the minimum stay requirements when the stay overlaps days with different requirements?
A. Many OTAs only look at the arrival date, not the entire stay, to determine the required minimum nights.

Q. May I override the Unit Policy by using the Minimum Stay Overrides?
A. The answer to this one varies depending on the type of Minimum Stay Override.

  • A Minimum Stay Override using the “Unit,” is the highest level rule and trumps all others. It allows you to lower the number of nights below what is required in the Unit Policy. This is the only setting that allows you to override to a lower number.
  • A Minimum Stay Override using “All” allows you to increase the number of nights required in the Unit Policy, but does not allow you to change it to fewer nights than the policy states.

Minimum Stay Length Rules2024-05-10T16:43:37-04:00

Utilizing Specials

2024-09-19T16:29:58-04:00

Summary

Specials (discounts) are easy to set up in BrightSide, but it is extremely helpful if you know how they work. Specials can be set to apply on every channel: internally, on your website, and on the online travel agencies (OTAs). Or, you may set them to apply to a limited number of these channels. This article explains how specials work and how to set them up.

NOTE: Specials are designed to provide a discount on the nightly rate only. Specials DO NOT apply to fees and charges like the cleaning or pet fees. A special only impacts a fee if the fee is based on the rent.

Getting Started

Channels

BrightSide makes it easy to offer guests discounts utilizing our Specials tool. When you create a special, you must determine on which channel(s) you want to use it. Keep in mind, you may create a special that applies to only one of the following channels, or all three. Make sure you understand how each channel applies specials before assigning a special to it.

  1. Internal: Internal specials do not show up on your website and are not fed out to the OTAs. These specials are available internally for reservationists to offer guests when needed. They are not automatically added to reservations, instead, they require a reservationist to manually apply them (for the exception, see Websites below).
  2. OTAs: This option makes the special available on Airbnb, Vrbo, Booking.com, and other integrated online travel agency channels. OTAs offer very little control over who receives a discount, so make sure you understand how they work before selecting this option. IMPORTANT: How Specials Work with OTAs.
  3. Websites: Offer specials on your company’s website, either automatically or by using discount codes. When you select “Websites” AND “Internal” on the same special, BrightSide automatically adds the special to internal reservations when the conditions are met. The logic is that if you want to automatically provide the special to online guests, you will want to automatically provide it to internal bookings also.

Setting Up a Special

These instructions are for setting up a “Special” that can apply to one or more channels; internally, on your website, or at online travel agencies. We do recommend creating separate specials for each channel since they are applied differently on each channel.

Navigate to: Properties > Specials > Add Special

Utilizing Specials | Setting Up a Special

Click on Image for Enlarged View

  1. Name: Use wording that makes sense to the guest and describes the discount well.
  2. Applicable Pricing: Under normal circumstances this will be nightly.
    • Nightly
    • Weekly
    • Monthly
  3. Discount: Do you want to offer a dollar amount or a percentage off the stay? Enter the numerical amount and then choose from the following options:
    • % Off the Cheapest Night – Provides a percentage off the cheapest night of the stay.
    • % Off the Last Night – Provides a percentage off the last night of the reservation. This may or may not be the cheapest night of the stay.
    • % Off the Entire Stay – Provides a percentage off the entire stay.
    • $ Off the Entire Stay – Provides a flat dollar amount off the entire stay rather than a percentage.
    • $ Off Each Night – Provides a flat dollar amount off every night of the stay rather than a percentage.
  4. Active Channels: Select the channel(s) where you want this Special to be offered.
    • Internal – Allows your staff to offer this discount to guests when making a reservation in BrightSide. Internal specials are not automatically added to reservations, they must be added manually (for the exception, see Websites > Additional Channels below).
    • OTAs – Automatically applies the special to qualifying reservations booked through online travel agencies. PLEASE READ: How Specials Work with OTAs
    • Websites – Offers discounts to qualifying reservations on your website automatically or via promo codes.
      • Automatically Apply: By default, specials active on this channel are automatically added to reservations booked on the website, unless a discount code is required.
      • Discount Codes: When you select “Websites” as an active channel, BrightSide opens additional fields so you may add a discount code, sometimes referred to as a promo code. If you assign a discount code to the special, guests are required to enter the code on the website in order to receive this discount. Keep in mind, if this special is also active on the OTAs channel, the discount code will be ignored there.
      • Website Description: If you have a Specials page on your website, you may enter a description of this special so guests can see the current specials. Please check with support to see if your website is coded to show the description.
      • Exclude from Specials Page: Choose to exclude a particular special from your website’s Specials page.
      • Additional Channels: When you select “Websites” AND “Internal” on the same special, BrightSide automatically adds the special to internal reservations when the conditions are met. The logic is that if you want to automatically provide the special to online guests, you will want to automatically provide it to internal bookings also.
  5. Allow combination with other specials?: If you want to allow guests to combine this offer with another one, tick this box. NOTE: By ticking this box, it will combine with any other special when the conditions are met, even if the other special does not have this ticked. This special combines with only one other special, by choosing the one that provides the best discount to the guests.
  6. Conditions: Provide specific conditions under which a guest may receive this discount. Do not select too many conditions and/or make it too complex; the fewer conditions there are, the better.
    • Required Nights: Enter the minimum number of nights the guest must stay to receive this discount.
    • Maximum Nights: Enter the maximum number of nights the guest can stay to receive this discount.
    • Number of Days Booked in Advance: Enter the number of days before arrival guests must book in order to receive this discount. Use this to encourage guests not to wait to make their reservation.
    • Stay Dates: If guests must stay during certain dates to receive this discount, enter the dates here. For example, June 1, 2024 – June 30, 2024.
      • When electing to use stay dates, an optional condition can be applied, “Maximum Occupancy %.” This prevents the special from applying to units with more than the specified percentage occupancy.
      • If the reservation includes one day outside of the required Stay Dates, the special will not apply. Every day of the reservation must fall within the required Stay Dates to receive the discount.
    • Select Rate Seasons: If any day of the reservation falls outside of the selected rate season, the special will not apply.
    • Exclude Days of the Week: If any excluded day is included in the reservation, the special will not apply to the entire reservation.
    • Exclude Arrival Days of the Week: Select any arrival day(s) of the week that will exclude this discount.
    • Reservation Taken Date: Enter the dates when the reservation must be booked in order to receive this discount.
    • Exclude Specific Units: Tick the box next to any unit(s) where this discount does not apply.
    • Include Specific Units: Tick the box next to any unit(s) where this discount does apply.
    • Include Bedroom Sizes: To limit this discount to units with a particular bedroom count, apply it here.
  7. Save

NOTE: To track the performance of a specific Special over time, do not make changes to it. In other words, don’t just change the name and the conditions when you want to offer something new. Adding a new special is best. Deactivate the current special, then create a new one with a different name, conditions, etc. This makes it possible to compare Specials to see which one performed best.

How Specials Work with OTAs

Specials do not work the same on Airbnb, Vrbo, and Booking.com as they do on your own website or internally. If you list your properties on any of these channels, BrightSide makes it easy to offer discounts. However, since OTAs apply specials differently than your website, or in BrightSide, we recommend creating specials that only apply to OTAs.

Although we recommend that you create unique specials for OTA channels, it is not a hard and fast rule. You may create a special that feeds to both your website and OTAs, and is used internally as well. Having said that, keep in mind the following when creating specials for Airbnb, Vrbo, and Booking.com.

  1. OTAs consider the conditions you set for a special and automatically apply the discount to every reservation when the conditions are met. In other words, if you have a “10% OFF June Stays” special, with the following two conditions, 1) a three night minimum, and, 2) a June stay date, OTAs automatically apply it to the reservation when those conditions are met.
  2. If you have a separate special of “15% OFF Summer Stays,” with the condition of a June or July stay date, OTAs will apply this discount instead of the “10% OFF June Stays,” because it provides a larger discount. They always offer the largest discount available and automatically apply it.
  3. BrightSide also allows you to combine offers. When you set two separate specials to “Allow combination with other specials,” OTAs will apply BOTH discounts, if the reservation meets both sets of conditions. In the examples given above, the guest would receive a 25% discount if they stay at least three nights in June.
  4. OTAs do not require a promo or discount code, even if you set it up with one. If the conditions are met for a special, they will always offer the largest discount available, automatically. They disregard your promo code and give the guest the discount.

NOTE: One of the reasons we recommend creating unique specials for OTAs, is that OTAs do not filter who gets the discount. For example, if you want to offer a “10% Military Discount,” OTAs have no way of offering it to military personnel only. They give it to anyone, if it is the best discount available at the time the reservation is made. Since this is the case, reserve the military discount, or one like it, for direct bookings on your website or over the phone, utilizing a promo code.

Common Mistakes

Every now and then, someone has a question about how their specials are applying. Here are common mistakes people make when creating specials.

  1. Every reservation from Airbnb has the military discount applied. Why?
    • Likely Reason: Promo Codes. Many property management companies want to say “thank you for your service” to military personnel. Generally, they create an open ended “Military Discount,” utilizing a promo code with no set conditions. The problem with this scenario is that Airbnb does not require promo codes. They only look at the conditions you set. Lacking conditions, they apply this discount to every reservation where a greater discount has not been applied.
    • The Fix: Remove the “OTA” channel from any special that requires a promo code. Instead, reserve those type discounts for guests booking directly through your website or on the phone.
  2. Why is my “Internal” special applying automatically to reservations made by my reservationists?
    • Likely Reason: In addition to the “Internal” channel, you have the “Websites” channel selected for this special. While “Internal” specials do not automatically apply, the “Websites” channel does, when there is no promo code and the conditions are met. When both of these channels are selected, “Internal” specials will be automatically applied.
    • The Fix: Remove the “Websites” channel from any specials you do not want to be automatically applied to reservations. Create a separate special for each channel, even when they offer the same discount.
  3. A special is set up to automatically apply to all reservations, but it is not applying to every unit. Why?
    • Likely Reason: The special is attempting to take the nightly rate below the Minimum Nightly Rate (MNR) set in a particular unit’s policies. If the MNR is $200.00 and the special would lower the nightly rate to $199.99 or less, the special will not be applied. The MNR is a safeguard to keep the rate from going lower than an owner thinks is acceptable.
    • The Fix: In the unit where the special is not applying, lower the MNR enough so the special will apply.

Utilizing Specials2024-09-19T16:29:58-04:00
Go to Top