Summary
BrightSide integrates with Vrbo to manage reservations, update photos, block off the calendar, create new properties, and so much more. In order to connect your properties with Vrbo, follow the instructions provided in this tutorial. These steps are different than Airbnb, so please follow closely.
IMPORTANT!: You must create your units/properties in BrightSide even if you have existing units on Vrbo. Unit data only goes one way, from BrightSide to Vrbo (although reservations and availability go both ways). After your BrightSide account connects to Vrbo, and you activate a property, BrightSide will update and overwrite that unit’s data in Vrbo, not the other way around.
- Get Advertiser ID
- Add Amenities to BrightSide* (you must have amenities in BrightSide so you can assign them to units and map them to Vrbo)
- Add Units to BrightSide* (even if you have units already in Vrbo, you MUST create them in BrightSide)
- Set Default Amenities
- Feature Mapping
- Online Booking
- Blackout Dates
- Activating Units
- Connect to Vrbo
* These links take you to our Knowledge Base containing detailed instructions.
NOTE: After you complete these steps, Vrbo may take several days to activate your properties. They may reach out to you through email to confirm that you are asking them to allow BrightSide to manage your properties.
Advertiser ID
Before attempting to connect to Vrbo, ask your BrightSide Onboarding specialist to assign you a unique Advertiser ID. You will use this Advertiser ID when you connect your account. You can find yours at the Vrbo tab in Integration Partners, under Account Settings.
Navigate to: Setup > Settings > Integration Partners > Vrbo (tab)
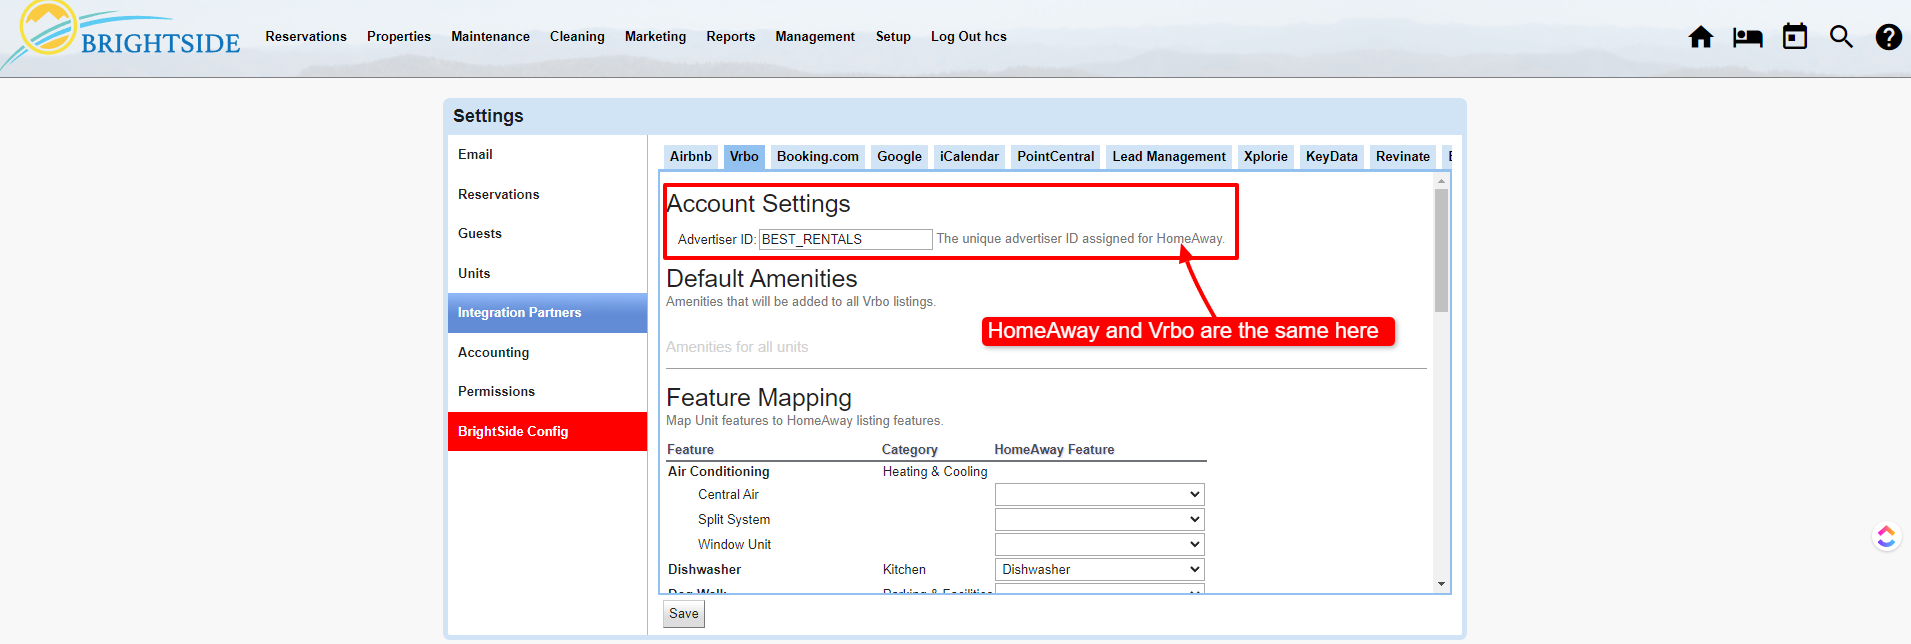
Vrbo Integration | Advertiser ID
Click on Image for Enlarged View
Set Default Amenities
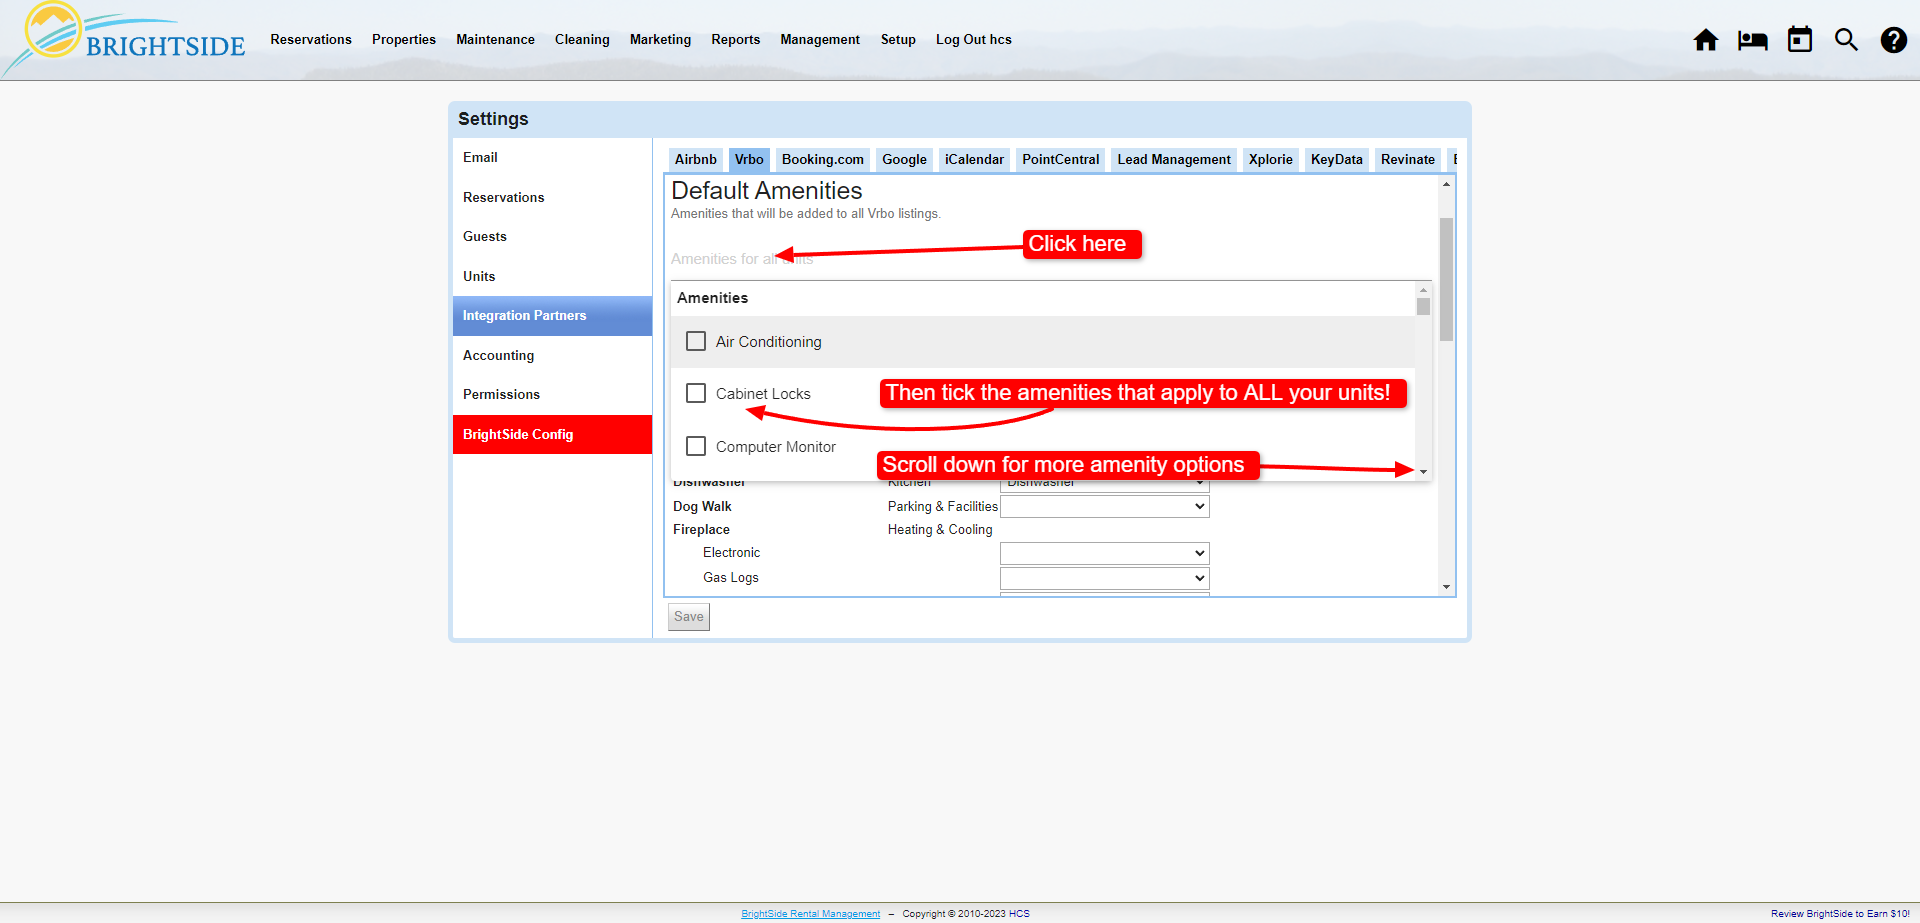
Default amenities are features that are included in ALL of your units. If you provide towels, bed sheets, and toilet paper for all of your properties, this is where you list it. If some of your properties have an air conditioner, but not all, do not include it here.
- Click the blank area below “Default Amenities”; a dropdown list of common amenities will appear.
- Scroll down the list and tick the box next to the amenities that apply to ALL of your units.
- Click Save.
HINT: Having amenities in your BrightSide account is not required to set defaults; but without amenities, you cannot complete the Feature Mapping.
Vrbo Integration | Default Amenities
Click on Image for Enlarged View
Feature Mapping
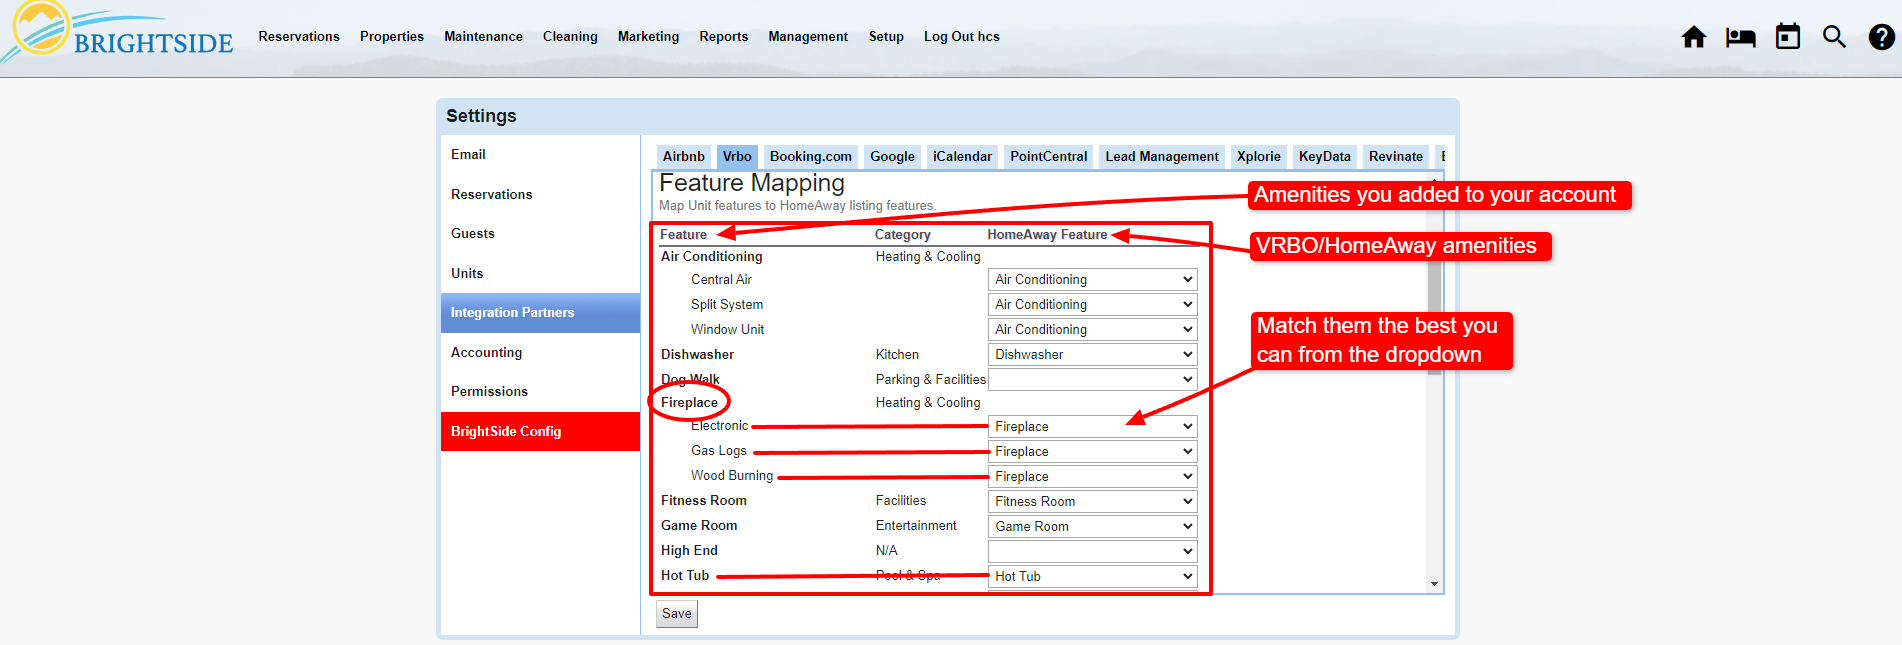
The purpose of Feature Mapping is to link your amenities to Vrbo’s amenity list. For example, they have a feature named “Hot tub”. Your feature may be named “Hot Tub” or “Jacuzzi”. By mapping the features, you are telling Vrbo that both of these are considered hot tubs.
- Under the heading “Features,” and below the sub-heading, “HomeAway Feature,” click the dropdown arrow in the blank field. A list of Vrbo’s amenities will appear.
- Scroll down the list and select the amenity that most closely matches your amenity. Do this for each amenity in your list.
- Click Save.
HINT: Not every amenity you have will match to a HomeAway Feature (see Dog Walk in the screenshot). That’s okay, they don’t show every type of amenity on their website. However, the Dog Walk amenity will show up on your website.
Vrbo Integration | Feature Mapping
Click on Image for Enlarged View
Online Booking
Rental Agreement URL
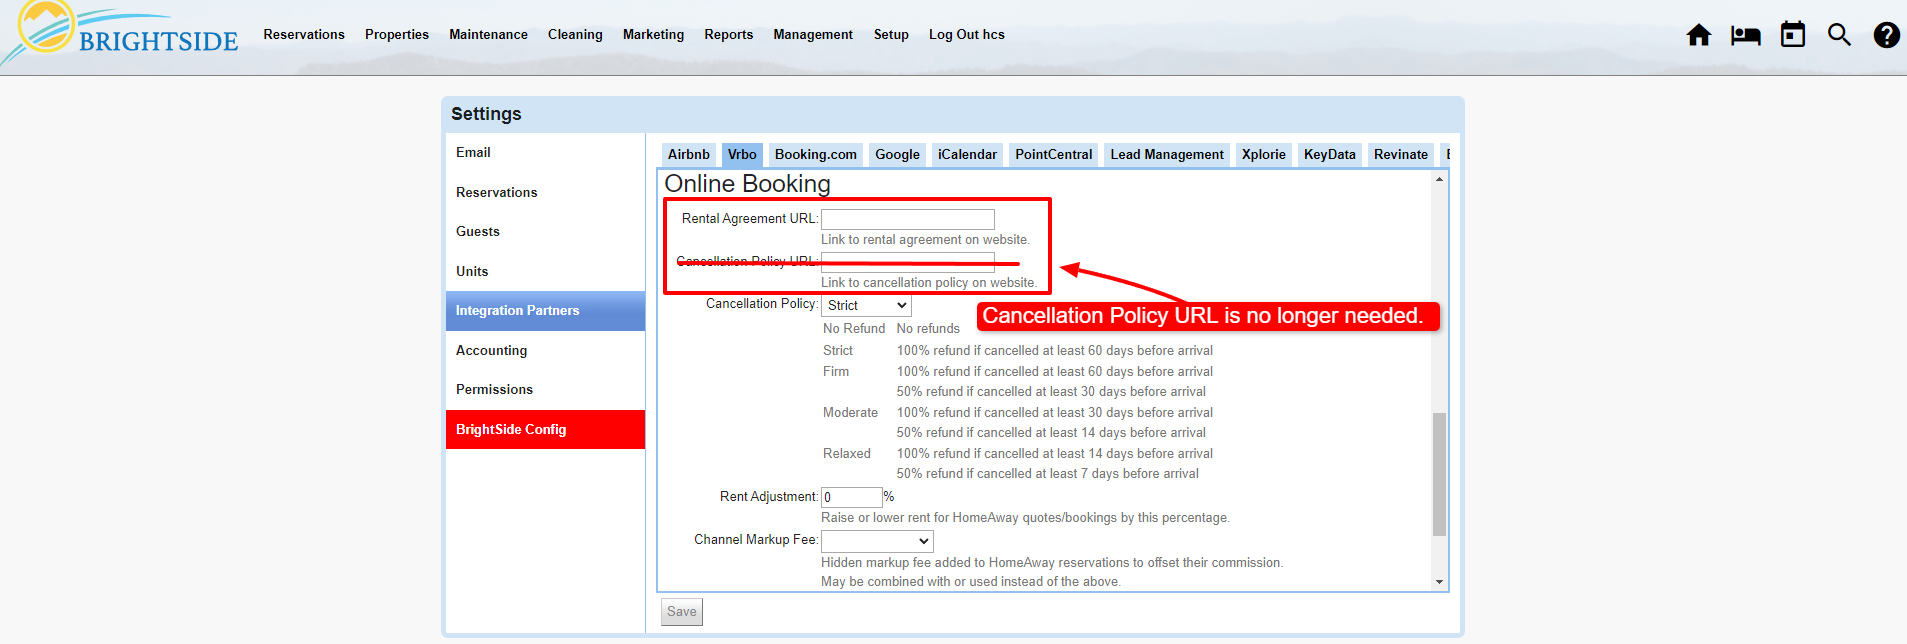
BrightSide onboarding can help you upload a PDF of your rental agreement to your website (this may have already been done during the onboarding process). Vrbo imports this document and provides a link to it so guests may read it during the booking process. If you do not know the URL, ask your onboarding specialist to assist you.
NOTE: Since Vrbo provides options for the cancellation policy, it is no longer necessary to provide a URL for your cancellation policy.
Vrbo Integration | Rental Agreement URL
Click on Image for Enlarged View
Cancellation Policy
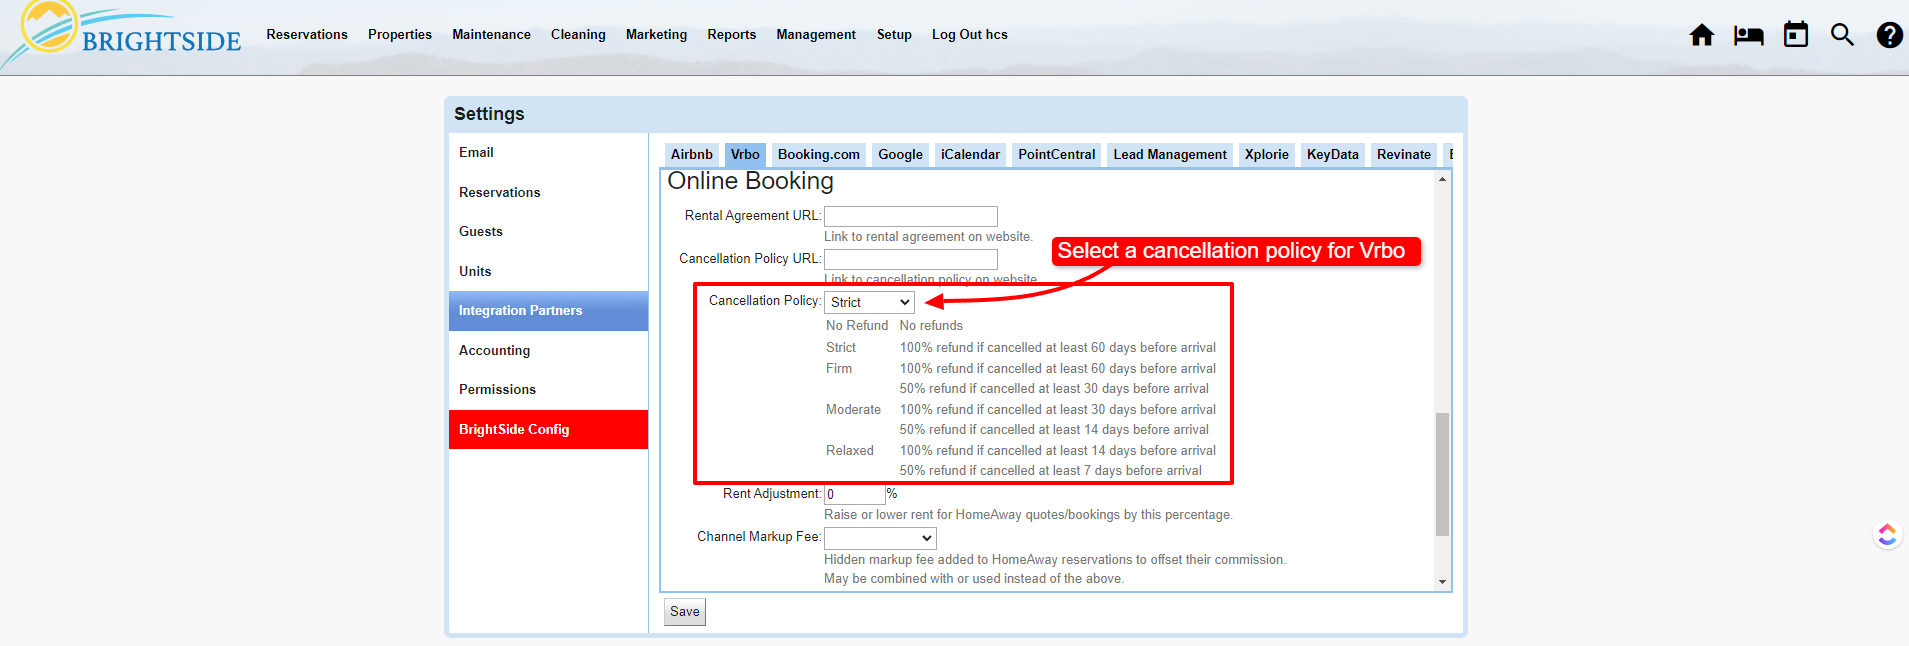
Vrbo allows you to select from a number of cancellation policies, from “No Refund” all the way down to “Relaxed.” The “default policy” you choose here will sync with Vrbo to let them know how to handle reservation cancellations. Select one of these from the dropdown and then save it.
- No Refund: No refunds at any time.
- Strict: 100% refund up until 60 days prior to arrival.
- Firm: 100% refund if cancelled at least 60 days before arrival and 50% refund if cancelled at least 30 days before arrival.
- Moderate: 100% refund if cancelled at least 30 days before arrival and 50% refund if cancelled at least 14 days before arrival.
- Relaxed: 100% refund if cancelled at least 14 days before arrival and 50% refund if cancelled at least 7 days before arrival.
NOTE: When needed, you can override this default cancellation policy within each unit. This is handy if you need to assign a separate cancellation policy for each unit.
Vrbo Integration | Cancellation Policy
Click on Image for Enlarged View
Rent Adjustment
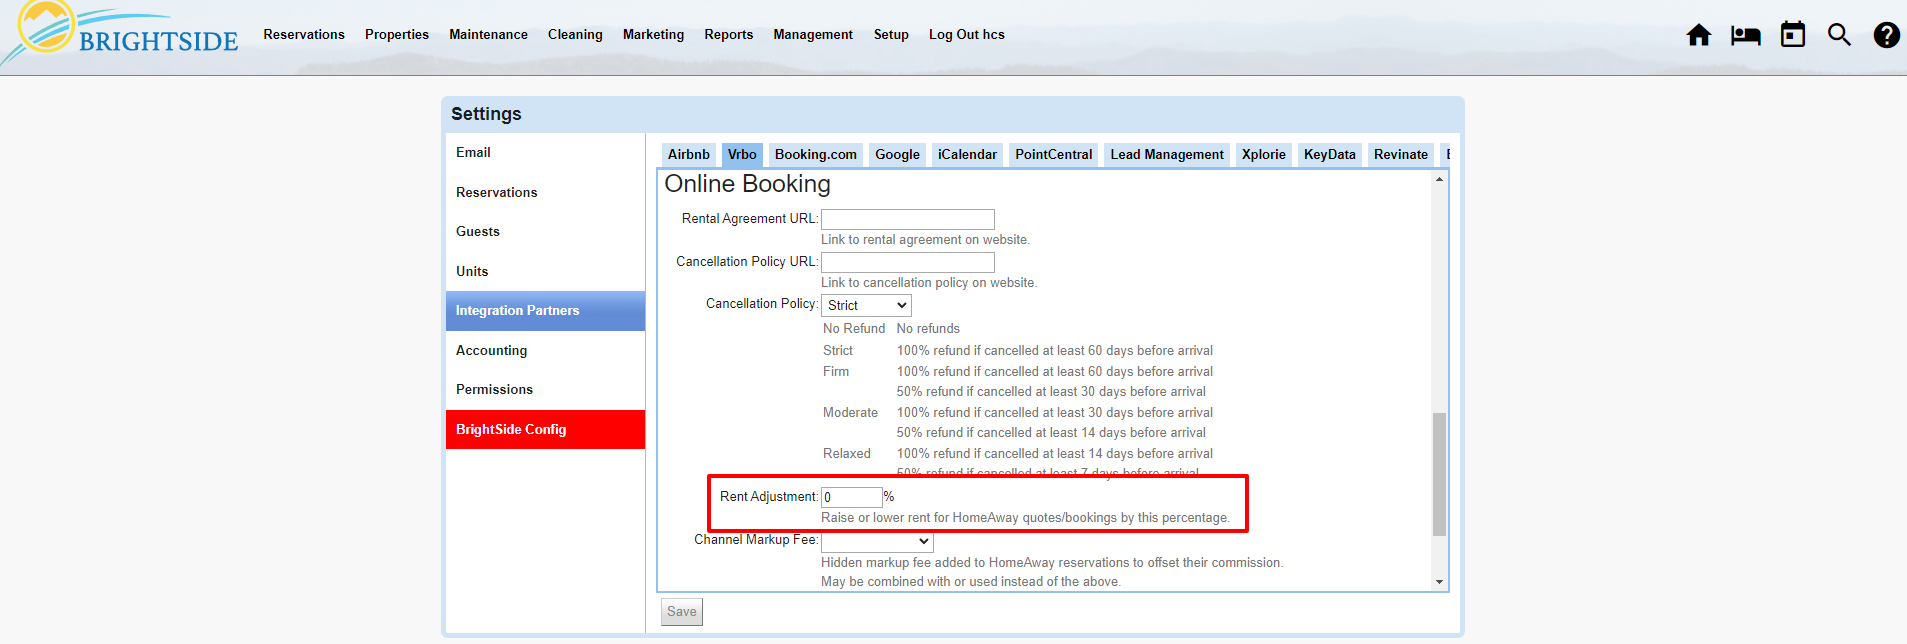
If you want to increase the rates across the board for Vrbo listings, you may do it here. This is useful when you own all of your properties as well as manage them. By using Rent Adjustment, you do not have a separate fee hidden in the rental charges, it just raises the rental rates. Owners are paid a percentage of the entire rental charge.
HINT: When you manage properties but do not own them, you may want to raise the rental rates with a hidden fee to recover the Vrbo commissions you are charged. When this is the case, use the Channel Markup Fee below.
Vrbo Integration | Rent Adjustment
Click on Image for Enlarged View
Channel Markup Fee
Vrbo charges you a commission when a guest makes a reservation through their website or app. BrightSide allows you to create a fee to offset this commission, and hide it in the rent. This fee is called a Channel Markup Fee. The amount of the fee is up to you, however, it is normally set to calculate on a percentage basis.
This fee will only be added to reservations booked through Vrbo.
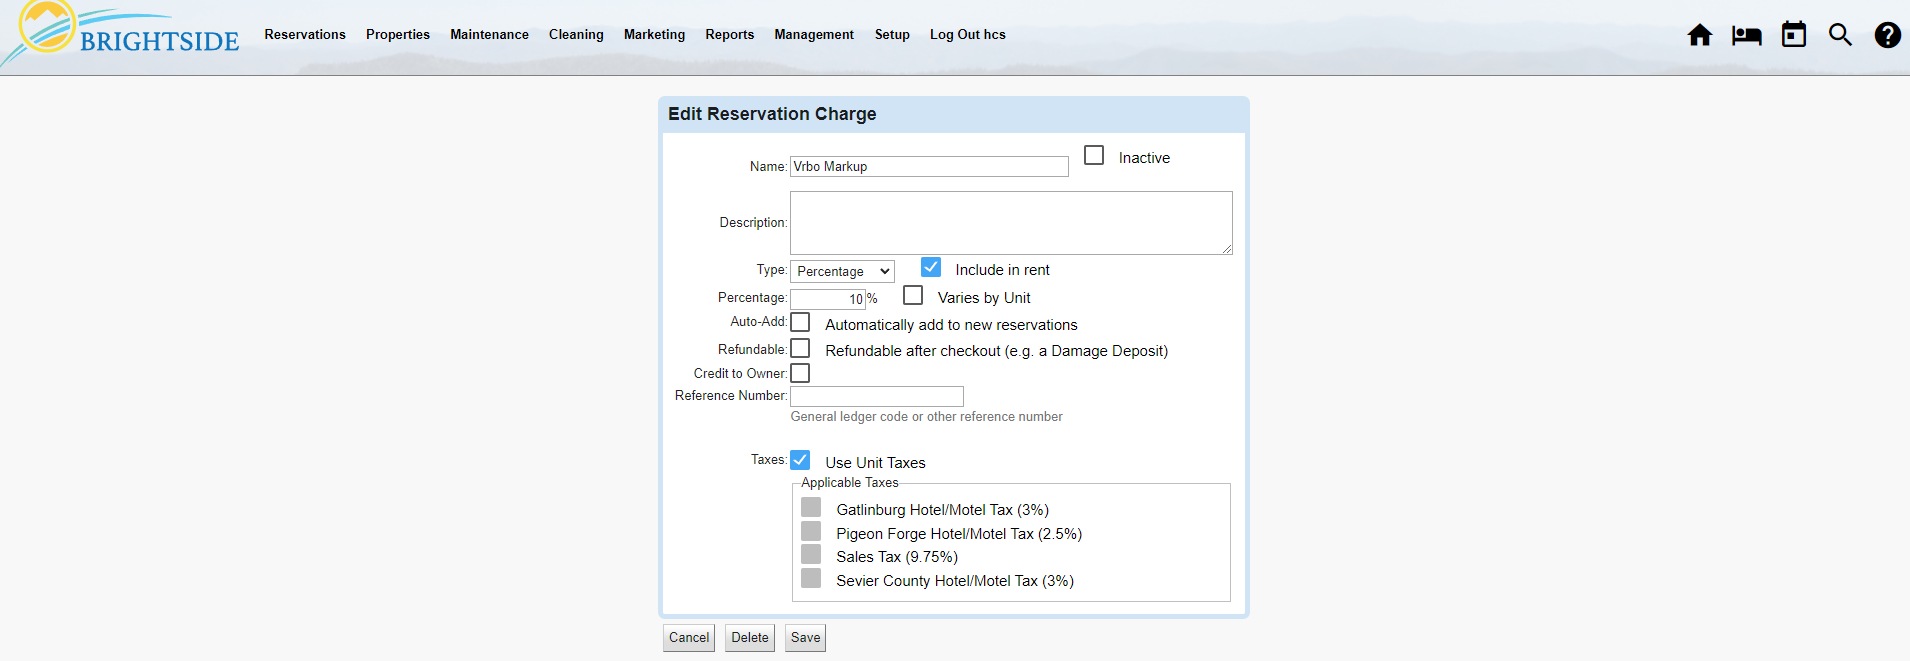
Create the “Vrbo Markup”
Navigate to: Reservations > Fees and Charges > Add
- Enter the name of this fee, “Vrbo Markup”
- Set the type as “Percentage”
- Tick “Include in Rent”
- Set the percentage you want to increase the rent in order to cover the commission charged by Vrbo. Remember, this percentage is added to the rent only, not the subtotal, which is how Vrbo calculates their commission.
- If you need to use different markup percentages per unit, tick the “Varies by Unit” box and set the rate in each unit on the Rates tab.
- You must tick “Use Unit Taxes” since this is a taxable charge.
NOTE: After you create the fee, it will show up in the Vrbo tab in Integration Partners where it may be activated. If you need assistance choosing the options for this fee, please contact support.
Vrbo Integration | Create a Vrbo Markup
Click on Image for Enlarged View
Apply the “Vrbo Markup”
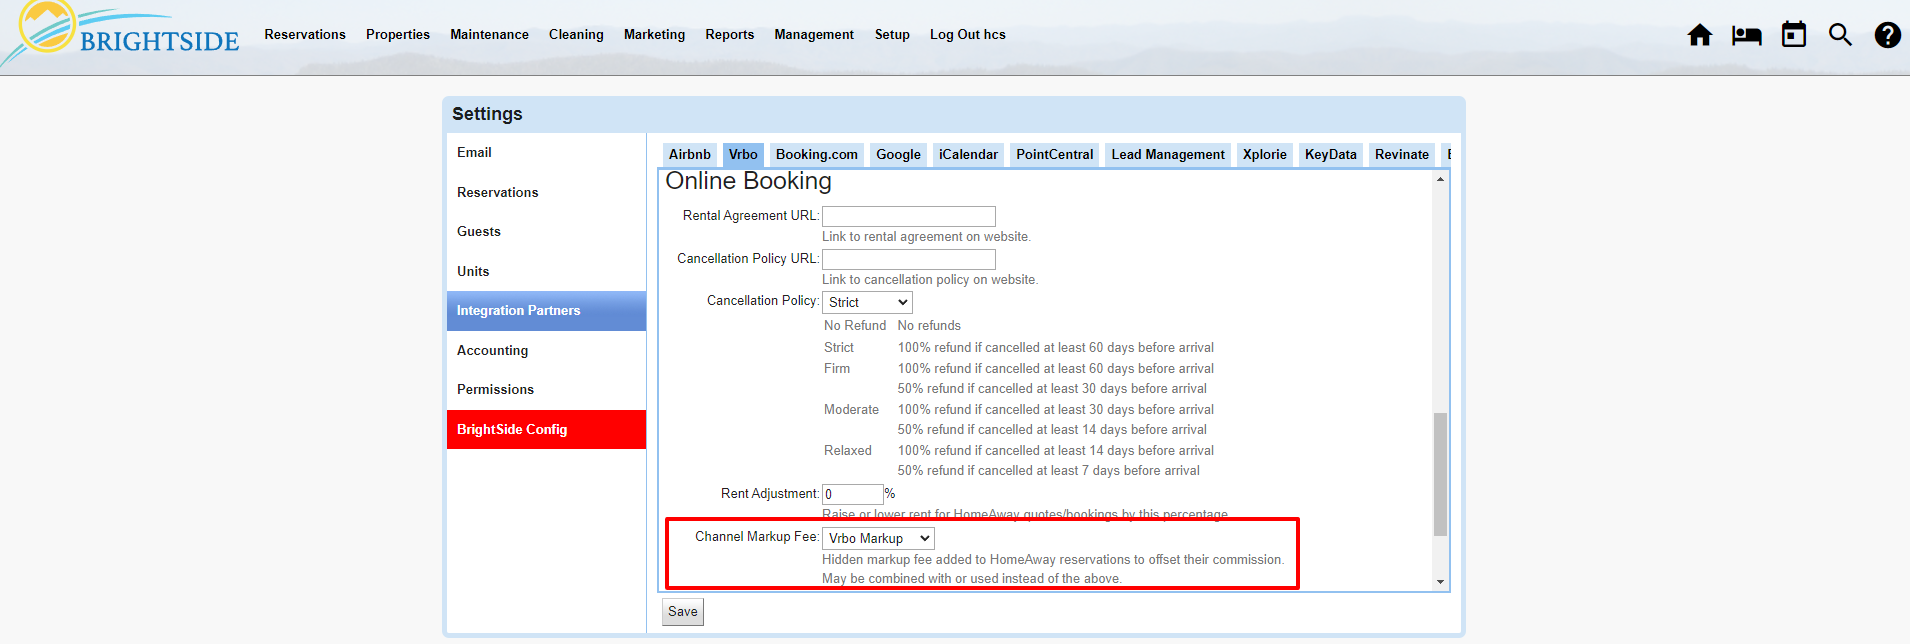
Navigate to: Setup > Settings > Integration Partners > Vrbo (tab)
- Scroll down and select Vrbo Markup from the dropdown next to Channel Markup Fee
- Save
HINT: When using the Channel Markup Fee, Vrbo shows the guests the increased rental rate that includes the markup. However, BrightSide breaks down this fee into two charges, the rental charge and the markup fee. BrightSide then assigns the markup fee to the management company. The owner’s payment is based on the rental charge that does not include the markup fee.
Vrbo Integration | Apply the Channel Markup Fee
Click on Image for Enlarged View
Blackout Dates
During high traffic seasons you may prefer for guests to book directly through your website rather than through Vrbo. Instead of removing the property from Vrbo, block those dates off by creating Blackout Dates.
When you create a blackout date, your units will not be bookable through Vrbo. The calendar will simply show that the dates are not available.
HINT: Keep in mind that blackout dates apply to all of your units. If you create a blackout date from July 1 – July 10, NONE of your units will be bookable on Vrbo for those dates. Use wisely.
- Start Date: select the date you want to begin blocking off.
- End Date: select the date you want to stop blocking off. If you want to add additional blackout dates, click the + box next to the dates.
- Save
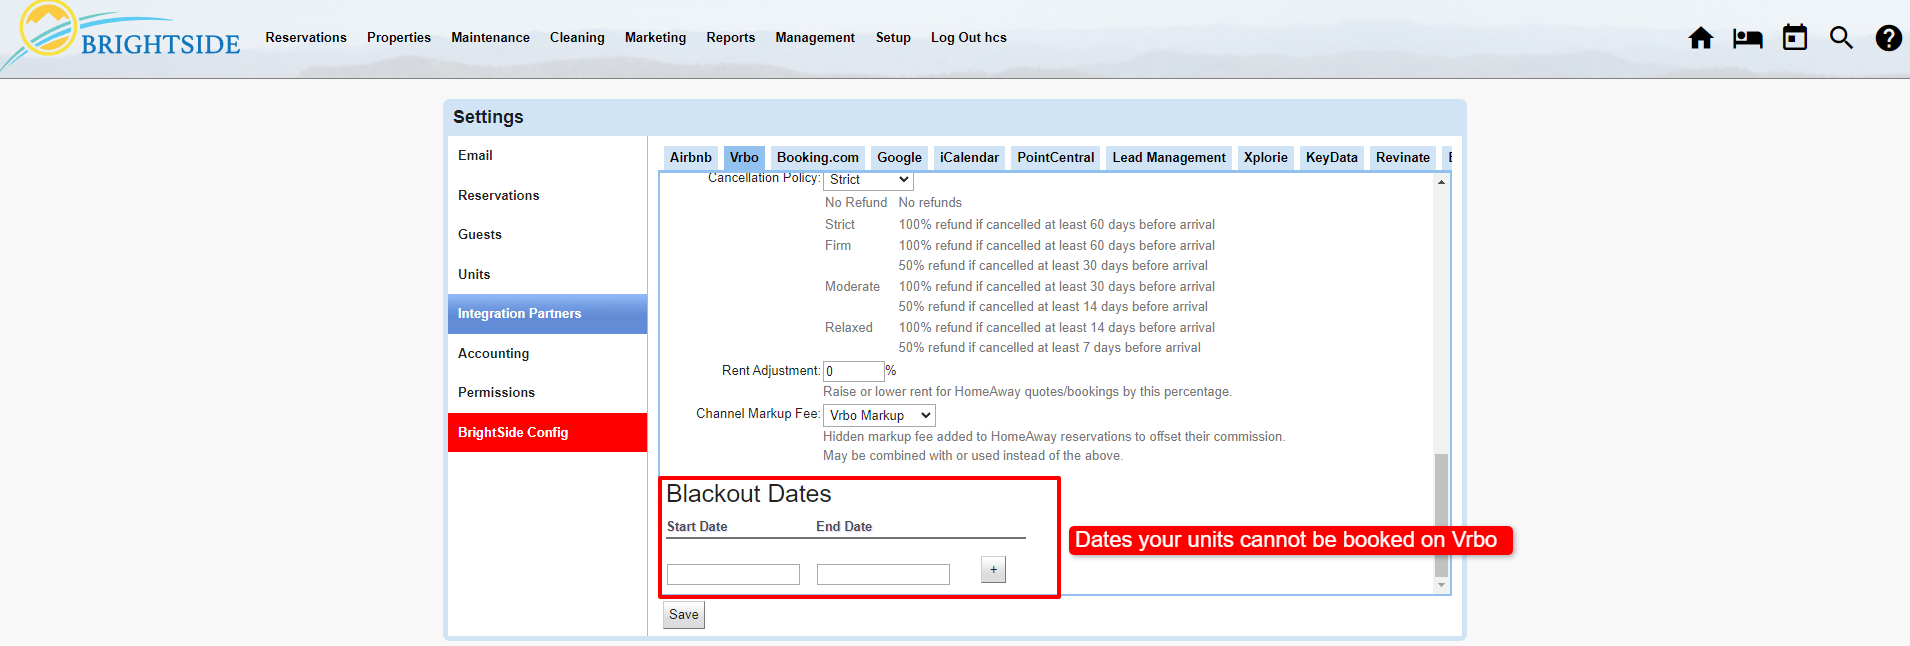
Vrbo Integration | Blackout Dates
Click on Image for Enlarged View
Activating Units
After you have completed the previous steps, you must activate each unit individually that you want to be available on Vrbo. For detailed instructions on how to activate a unit on Vrbo, visit the Connect a Unit to Vrbo tutorial.
NOTE: The Vrbo tab does not show up in the unit’s screen until after you have an Advertiser ID in BrightSide.
Connect to Vrbo
Final Step
To use BrightSide to manage your properties on Vrbo, you must have an active Vrbo account to which we can connect. If you already have an account, that’s great. We can connect it in just a few short steps. If you do not have an account, you can create one in just a few minutes using the steps below.
I Have a Vrbo Account
Start Here (when you click this link, you will leave BrightSide and go to Vrbo). After arriving on Vrbo’s website, answer the following:
- Do you have an account with Vrbo or its affiliated partners? If you already have an account with Vrbo, answer “Yes.”
- Do you currently use property management software? Answer, “Yes.”
- Sign into your Vrbo account and follow the instructions.
- When asked, select BrightSide as your choice of property management software.
- When asked, enter your unique Advertiser ID assigned by BrightSide (find it here: Setup > Settings > Integration Partners > Vrbo).
- When finished, return to BrightSide.
I Do Not Have a Vrbo Account
Start Here (when you click this link, you will leave BrightSide and go to Vrbo). After arriving on Vrbo’s website, answer the following:
- Do you have an account with Vrbo or its affiliated partners? Answer, “No”.
- Do you currently use property management software? Answer, “Yes.”
- What is the primary language of your listing content in your software? For most, the answer is English.
- Click “Get started.”
- Vrbo will take you through a series of screens to set up your account.
- When asked, select BrightSide as your choice of property management software.
- When asked, enter your unique Advertiser ID assigned by BrightSide (find it here: Setup > Settings > Integration Partners > Vrbo).
- When finished, return to BrightSide.
NOTE: After you complete one of the two steps above, Vrbo will contact you via email, and possibly phone, to confirm you want BrightSide to manage your properties and to complete the integration on their end. Expect this process to take at least 48 to 72 hours.