Summary
BrightSide integrates with Airbnb to manage reservations, update photos, block off the calendar, create new properties, and so much more. In order to connect your properties with Airbnb, follow the instructions provided in this tutorial.
Pre-Integration Steps
- If you do not have an active Airbnb account, open an Airbnb account, then return here.
- Add your amenities to BrightSide.
- Add your units to BrightSide.
IMPORTANT!: Before connecting your BrightSide account to Airbnb, you must create your units/properties in BrightSide first. Unit data only goes one way, from BrightSide to Airbnb (reservations go both ways). After your BrightSide account connects to Airbnb, BrightSide will overwrite any unit data you have in Airbnb, not the other way around. If you already have properties on Airbnb, you still need to create them in BrightSide. Once connected, the information from BrightSide will update your listings already on Airbnb.
After you complete the preliminary steps above, follow these next steps to complete the integration with Airbnb.
- Set Default Amenities
- Feature Mapping
- Online Booking
- Blackout Dates
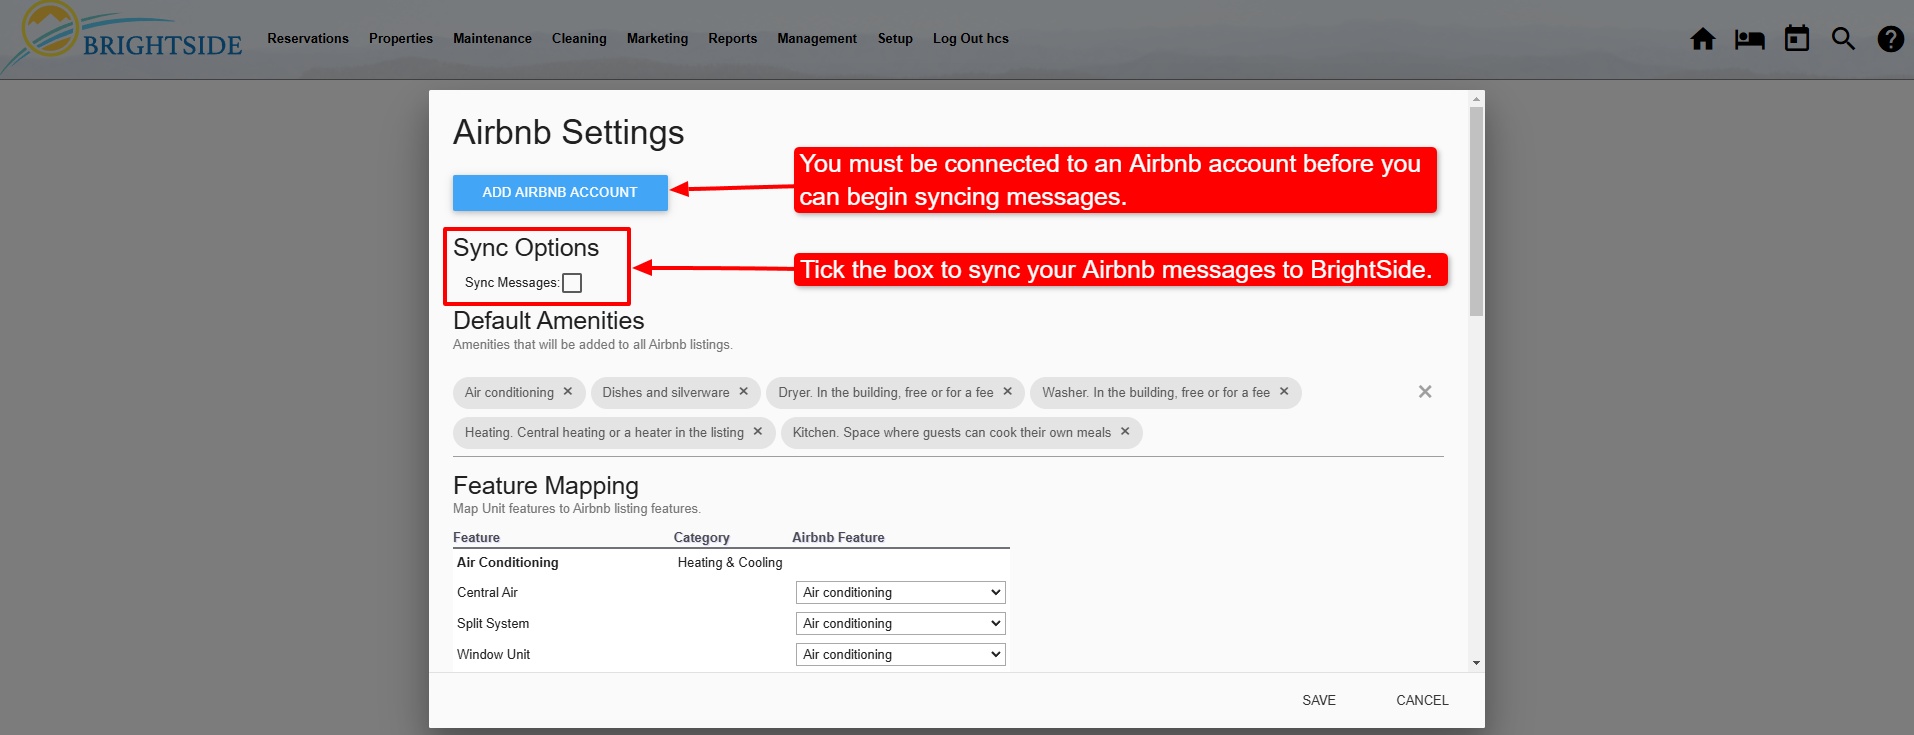
- Add Airbnb Account to BrightSide
- Sync Airbnb Messages
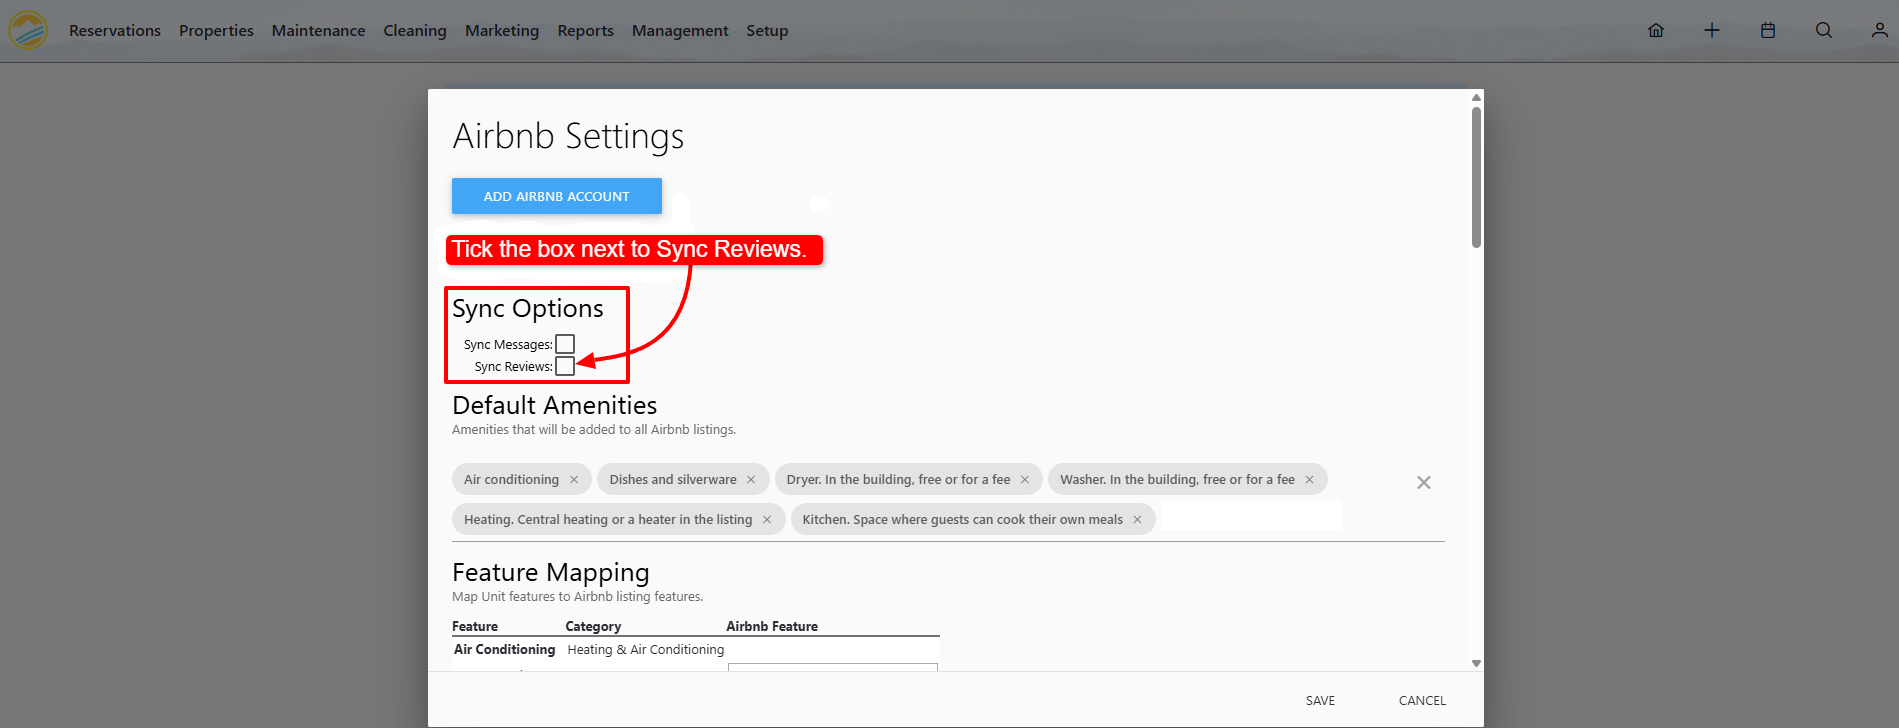
- Sync Airbnb Reviews
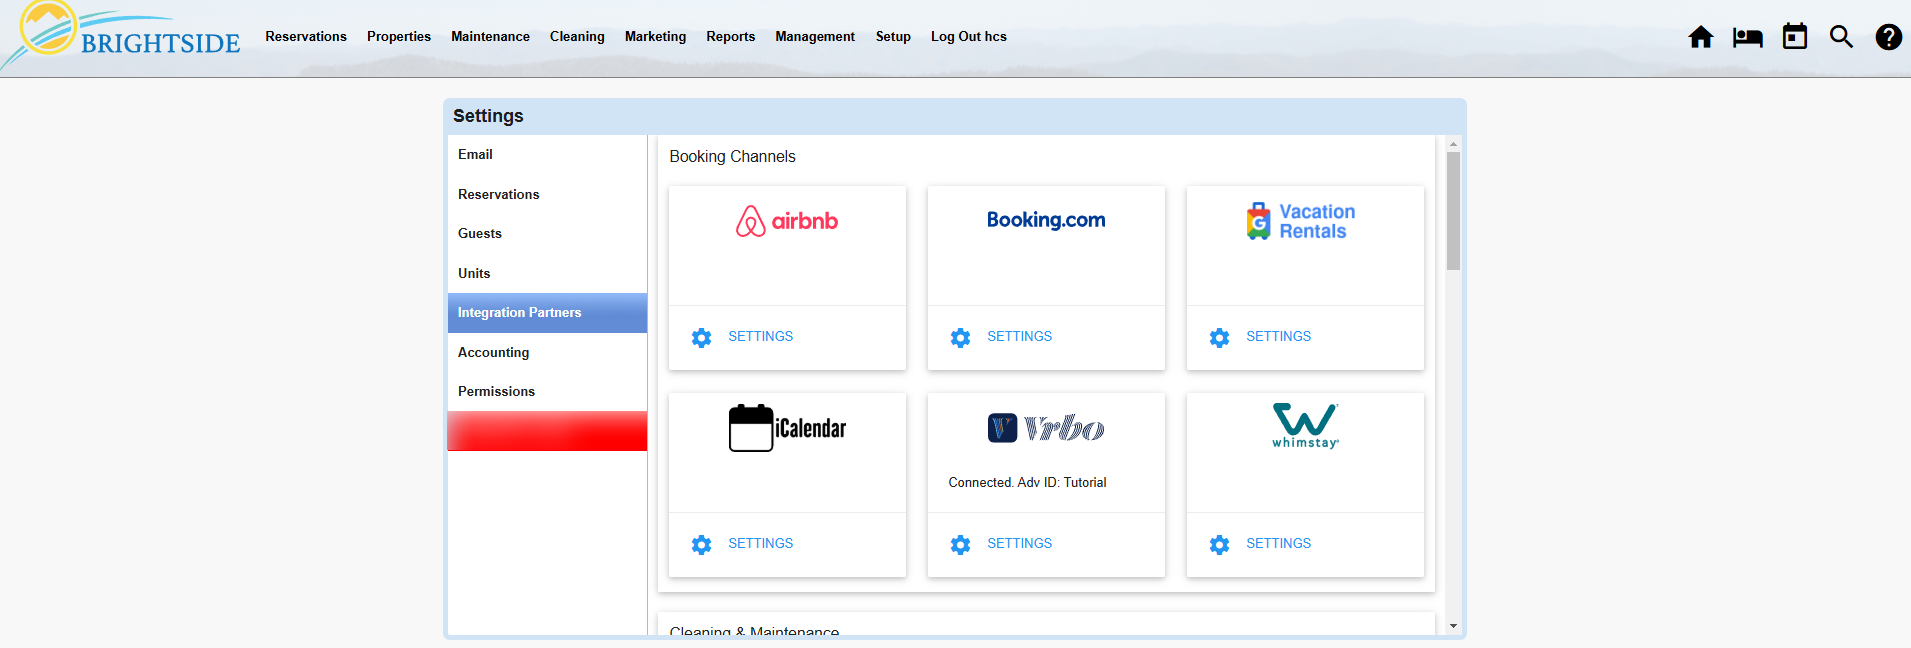
Navigate to: Setup > Settings > Integration Partners > Booking Channels > Airbnb
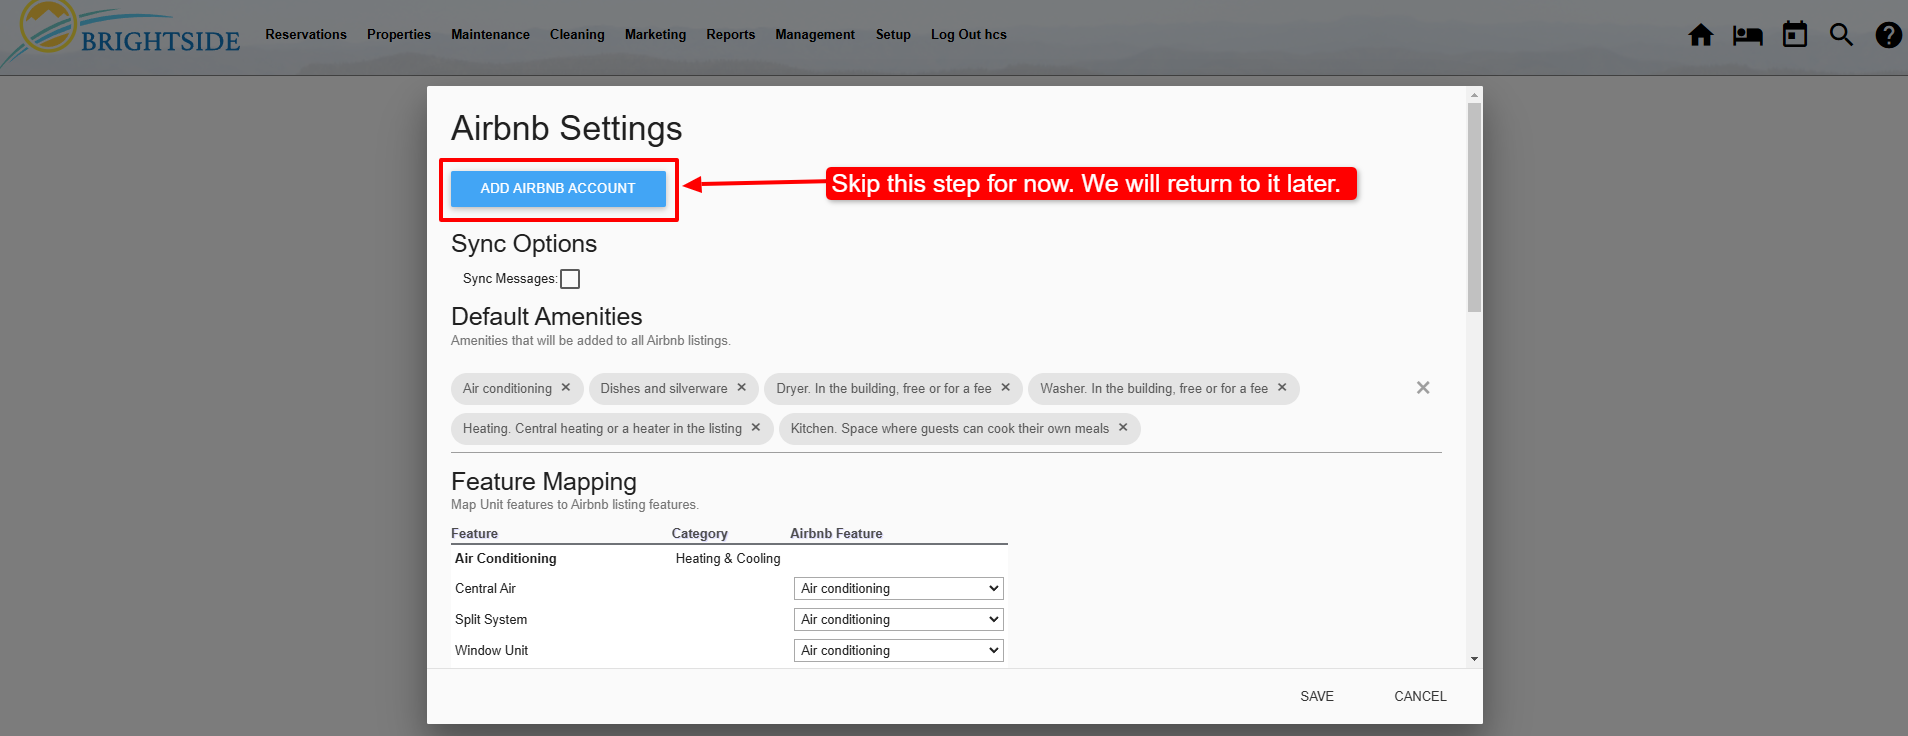
HINT: Skip the “Add Airbnb Account” step for now. We will return to it after we set the default amenities and the feature mapping.
Set Default Amenities
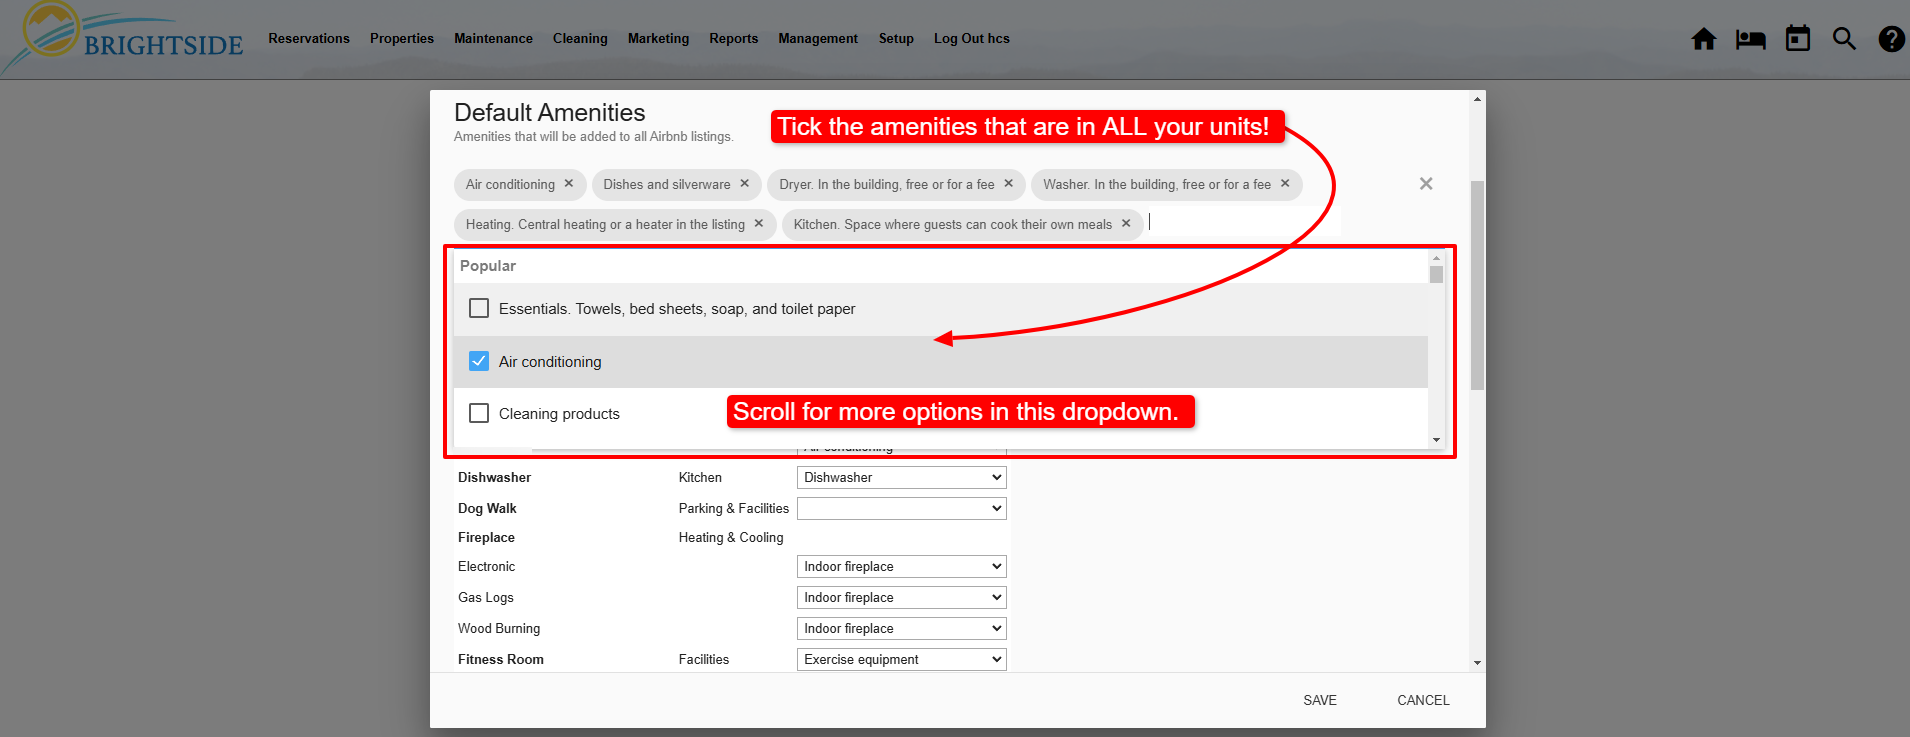
Default amenities are features that are included in ALL of your units. If you provide towels, bed sheets, and toilet paper for all of your properties, this is where you list it. If some of your properties have an air conditioner, but not all, do not include it here.
- Click the blank area below “Default Amenities”; a dropdown list of common amenities will appear.
- Scroll down the list and tick the box next to the amenities that apply to ALL of your units.
- Click Save.
HINT: Having amenities in your BrightSide account is not required to set defaults; but without amenities, you cannot complete the Feature Mapping.
Feature Mapping
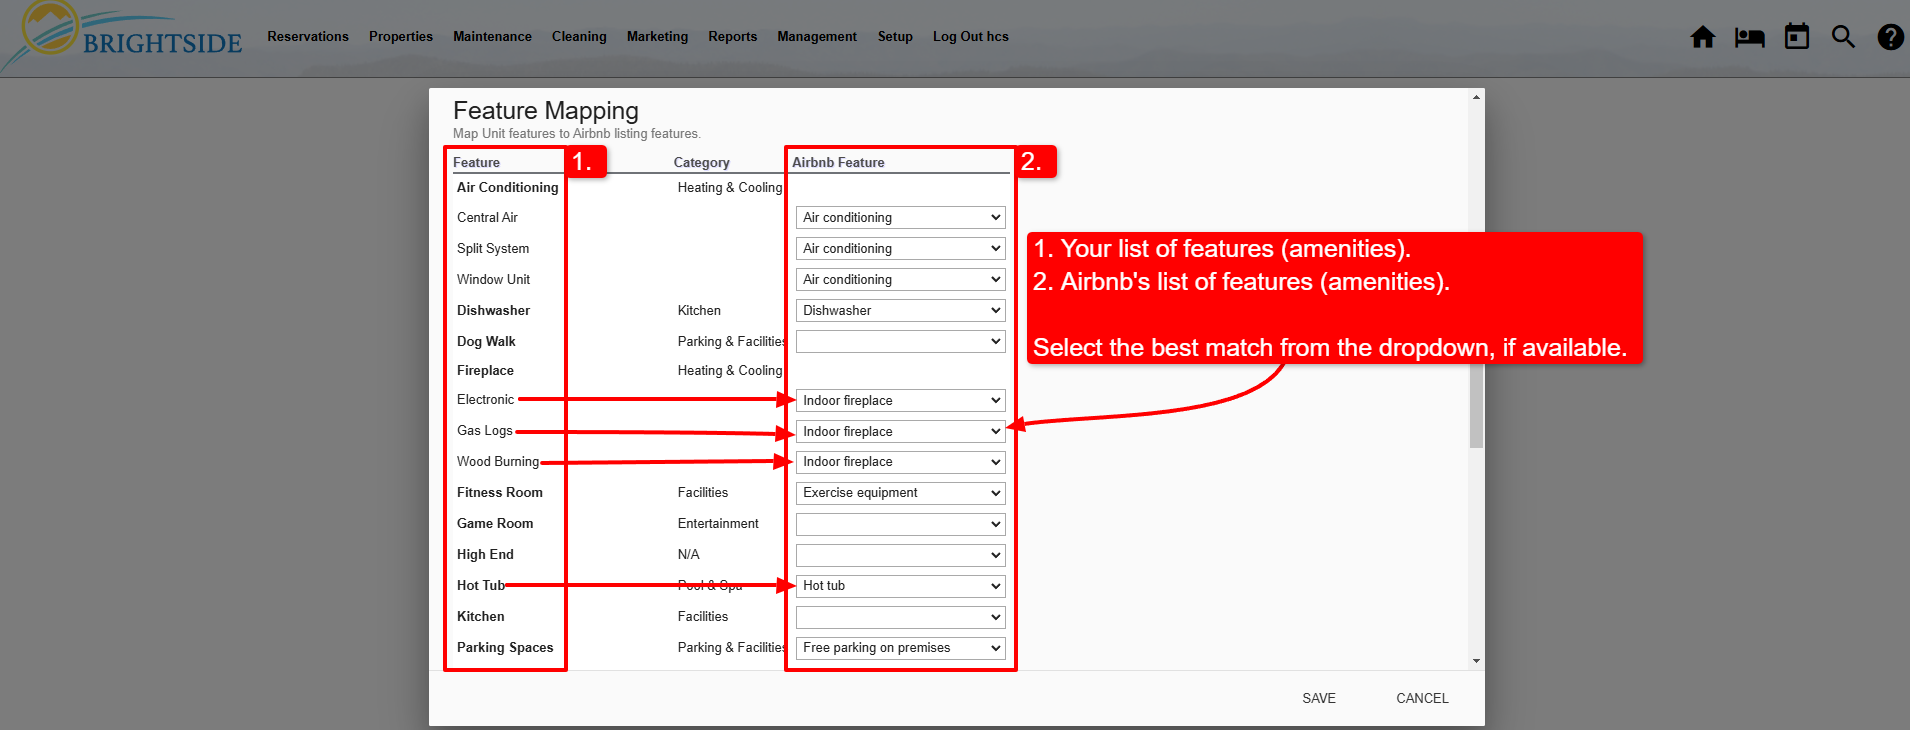
The purpose of Feature Mapping is to link your amenities to Airbnb’s amenity list. For example, they have a feature named “Hot tub”. Your feature may be named “Hot Tub” or “Jacuzzi”. By mapping the features, you are telling Airbnb that both of these are considered hot tubs.
- Under the heading Features, and below the heading, Airbnb Feature, click the arrow in the blank field. A list of Airbnb’s amenities will appear.
- Scroll down the list and select the amenity that most closely matches your amenity. Do this for each amenity in your list.
- Click Save.
HINT: Not every amenity you have will match to an Airbnb Feature (see Dog Walk in the screenshot). That’s okay, they don’t show every type of amenity on their website. However, the Dog Walk amenity will show up on your website.
Online Booking
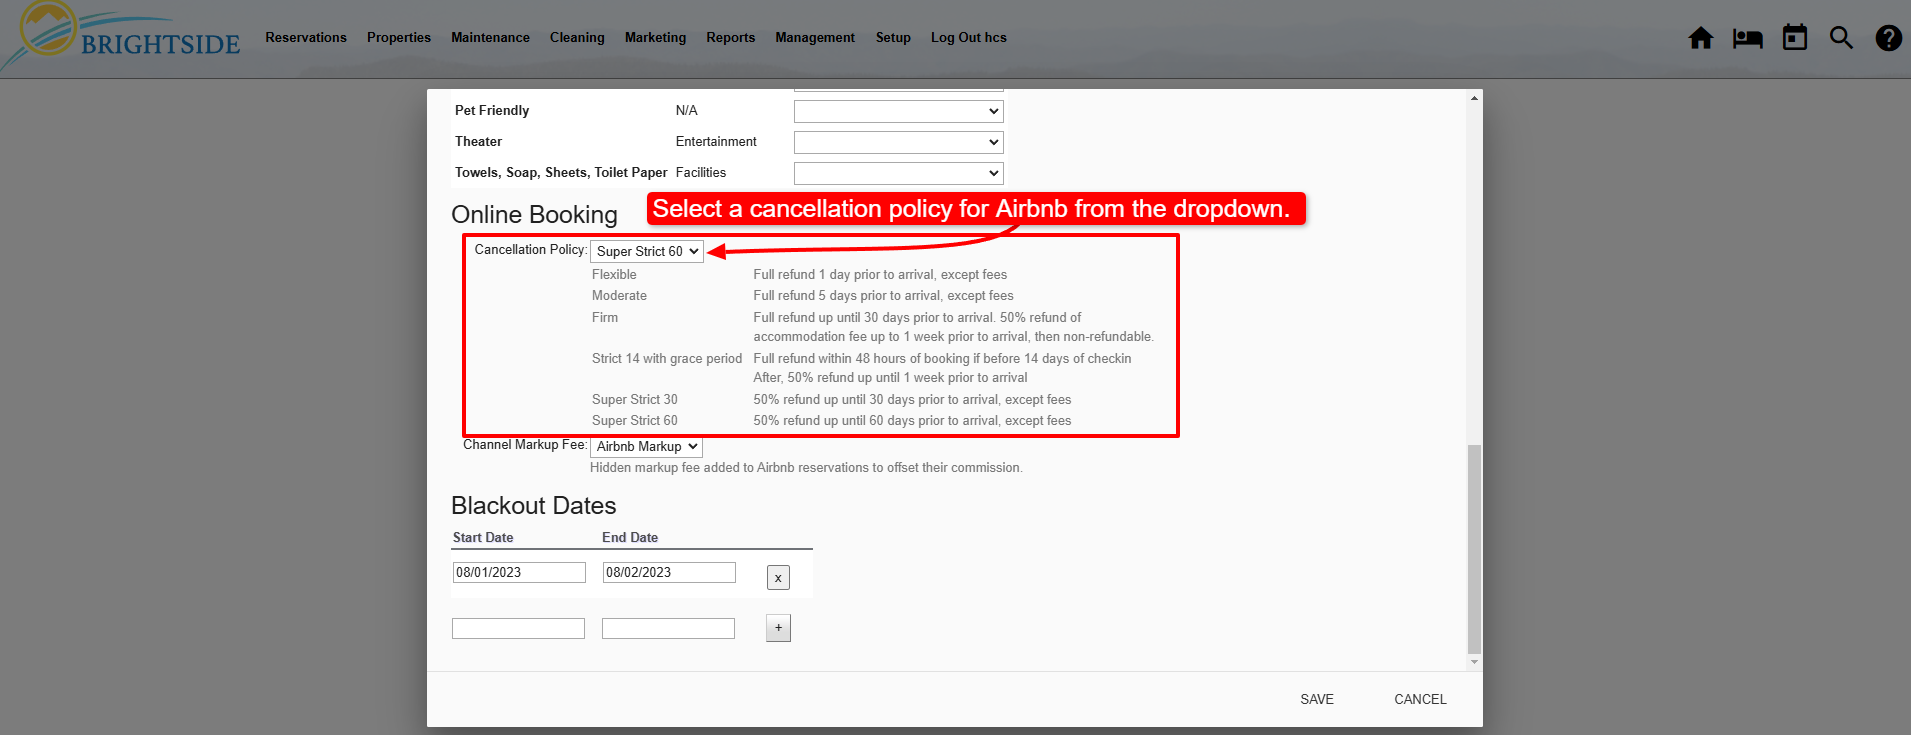
Cancellation Policy
Airbnb allows you to select from a number of cancellation policies, from Flexible all the way down to Super Strict 60. Whatever you choose here will sync with Airbnb to let them know how to handle reservation cancellations. Select one of these from the dropdown and then save it.
- Flexible: full refund 1 day prior to arrival, except fees.
- Moderate: full refund 5 days prior to arrival, except fees.
- Firm: full refund up until 30 days prior to arrival. 50% refund of accommodation fee up to 1 week prior to arrival, then non-refundable.
- Strict 14 with grace period: full refund within 48 hours of booking if before 14 days of check-in. After, 50% refund up until 1 week prior to arrival.
- Super Strict 30: 50% refund up until 30 days prior to arrival, except fees.
- Super Strict 60: 50% refund up until 60 days prior to arrival, except fees.
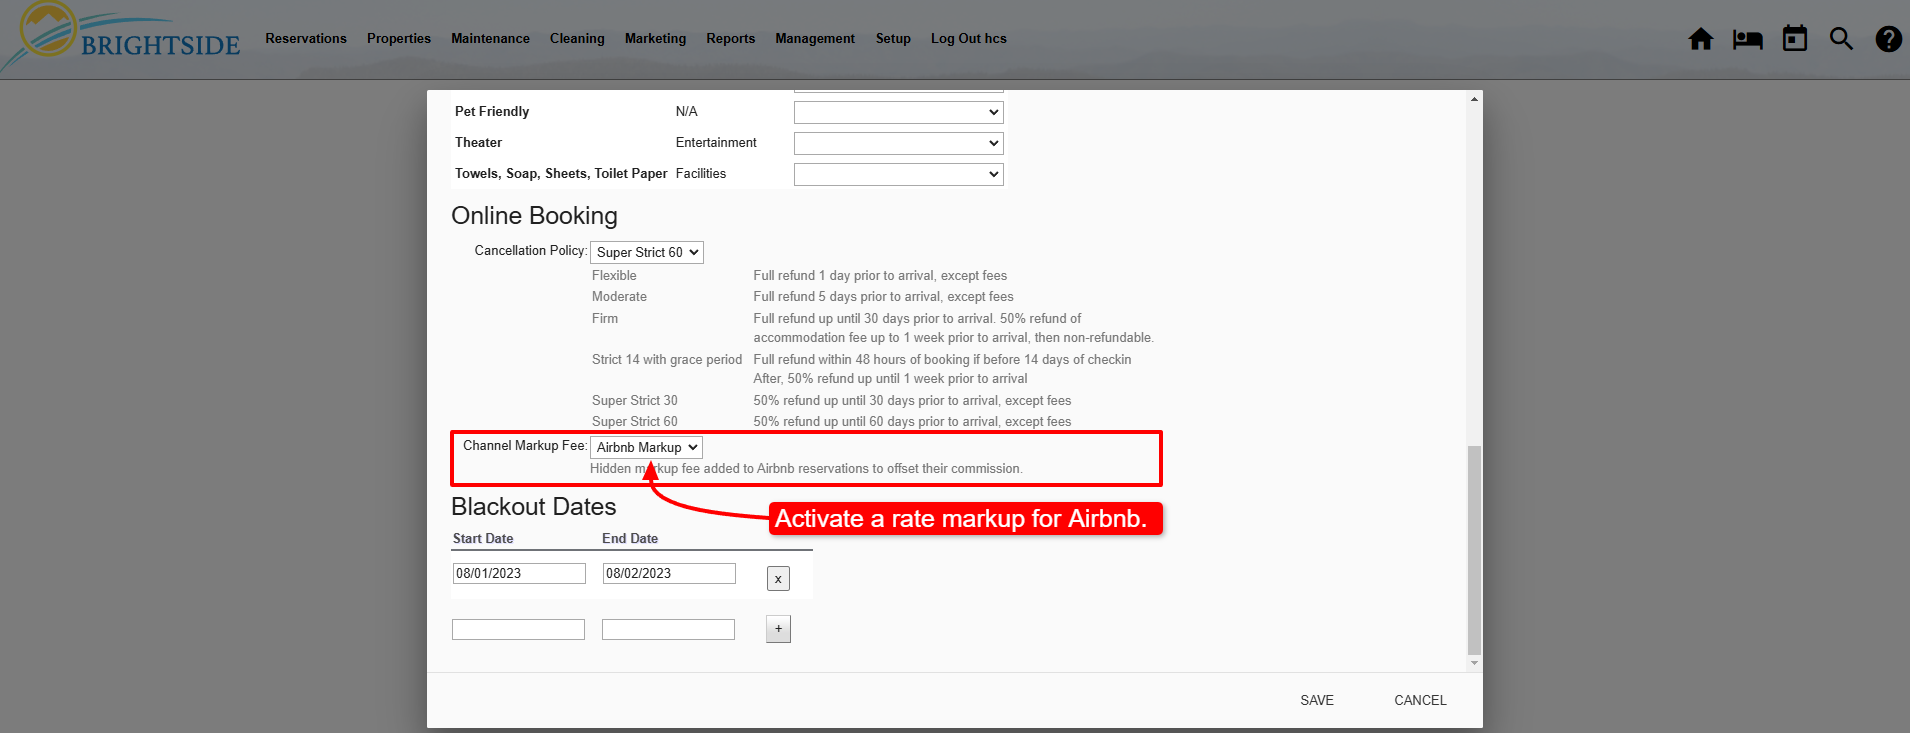
Channel Markup Fee
Airbnb charges you a commission when someone makes a reservation through their website or app. BrightSide allows you to create a fee to offset their commission, and bundle it in the rent. This fee is called a channel markup fee. The amount of the fee is up to you, however, it is normally set to calculate on a percentage basis.
This fee will only be added to reservations booked through Airbnb. For details on how this fee works, read Airbnb Markup.
HINT: Create the fee in BrightSide at Reservations > Fees and Charges > Add. After you create the fee, it will show up here where it may be activated.
Blackout Dates
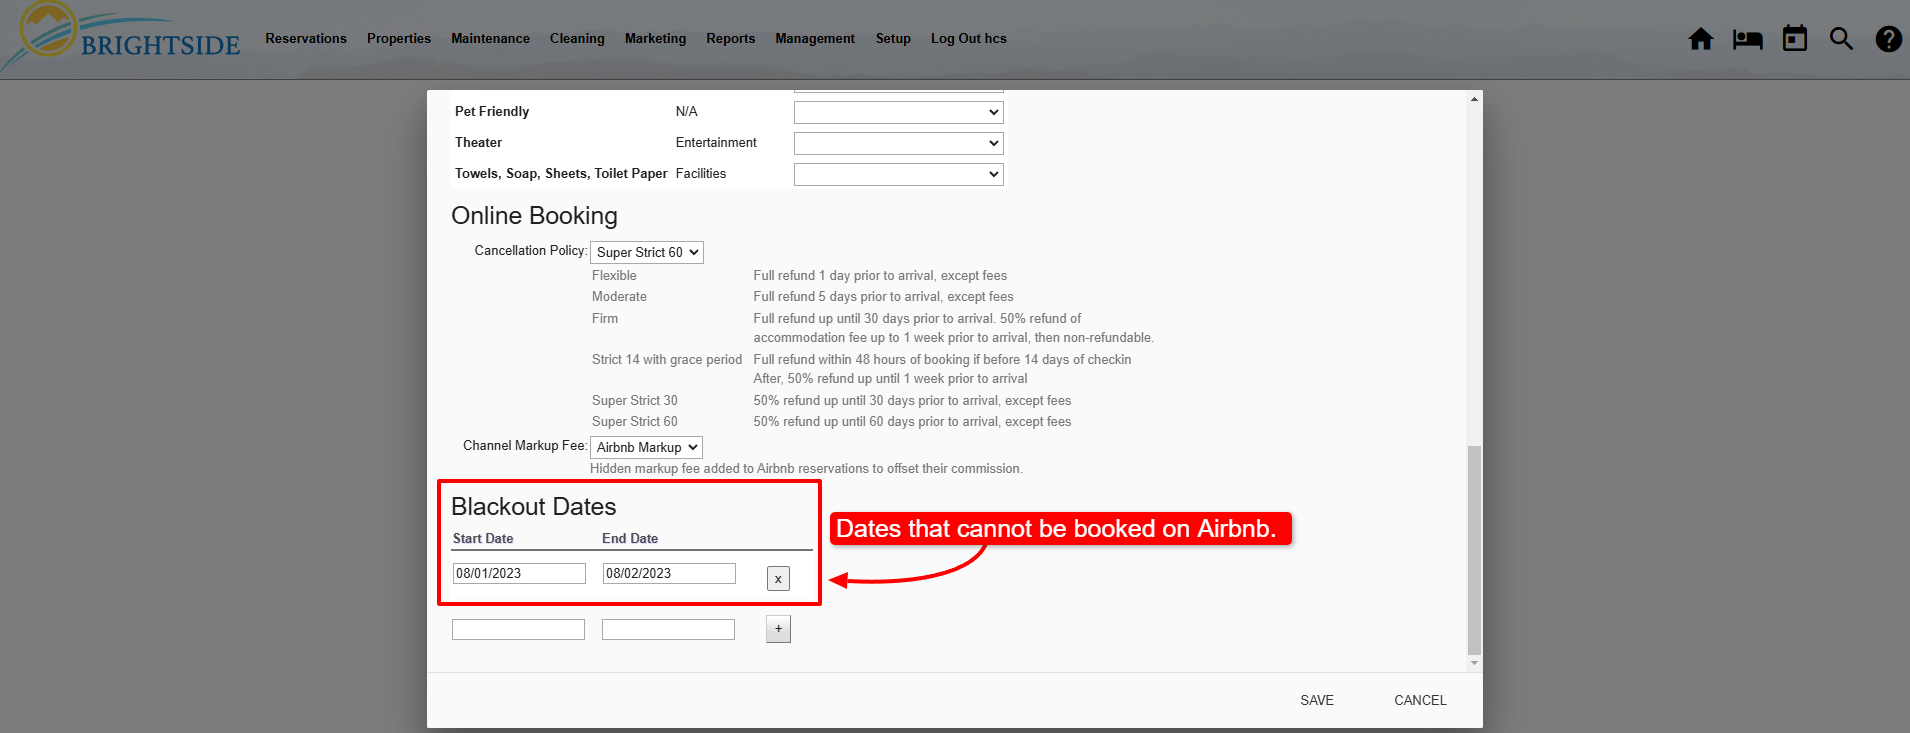
During high traffic seasons you may prefer for guests to book directly through your website rather than through Airbnb. Instead of removing the property from Airbnb, block those dates off by creating Blackout Dates.
When you create a blackout date, your units will not be bookable through Airbnb. The calendar will simply show that the dates are not available.
HINT: Keep in mind that blackout dates apply to all of your units. If you create a blackout date from July 1 – July 10, none of your units will be bookable on Airbnb for those dates. Use wisely.
- Start Date: select the date you want to begin blocking off.
- End Date: select the date you want to stop blocking off. If you want to add additional blackout dates, click the + box next to the dates.
- Save
Add Airbnb Account
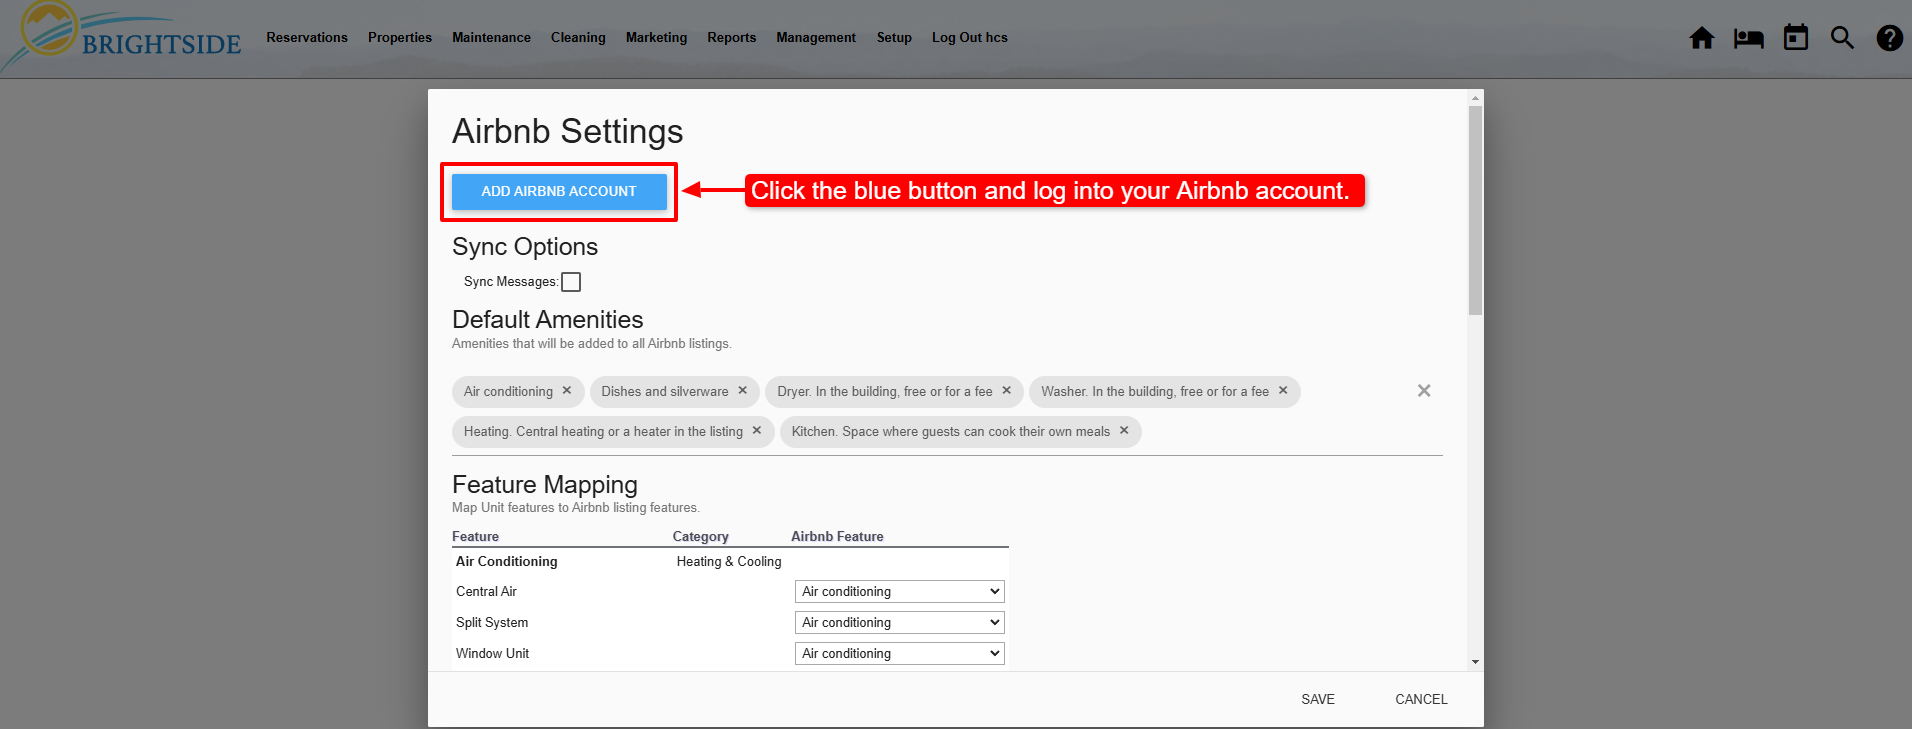
It is time to connect your BrightSide account with an Airbnb account.
- Click on the “Add Airbnb Account” button.
- Log into your Airbnb account.
- Once inside your your Airbnb account, navigate to Account > Privacy & Sharing > Services.
- Choose BrightSide as your integration partner.
- Select “Sync Everything” and connect.
HINT: Your BrightSide account can connect to more than one Airbnb account. If you are managing properties for more than one Airbnb account, you may connect them and manage them all from within your single BrightSide dashboard. Just repeat the steps above for each Airbnb account you need to connect.
EXTREMELY IMPORTANT!: DO NOT connect individual properties to Airbnb, VRBO, or any other OTA, until you have completely built out your property in BrightSide. This includes photos, rates, amenities, descriptions, basically everything! This is especially important when you already have the property on the OTA. When you connect, BrightSide will overwrite ALL unit data on the OTA. If you have not set rates, they will show up as $0.00 on the OTAs. If you haven’t added photos to BrightSide, the photos on the OTAs will be deleted.
If there is any doubt about what you are doing, contact customer support at support@bookonthebrightside.com or call 865-233-3778.
After you connect your Airbnb account, you need to activate individual units so they will show up on Airbnb. When you get ready to activate units, go to Properties > Units > Airbnb (tab).
Sync Airbnb Messages
If you use the Airbnb Messaging system, you can sync those messages to BrightSide. This allows you to send and receive messages to guests from BrightSide through the Airbnb Messaging system. Tick the box next to Sync Messages and BrightSide will begin syncing the messages. Explore BrightSide’s Guest Messages.
Sync Airbnb Reviews
Airbnb Reviews may be synced to BrightSide. This allows you to respond to guest reviews from Airbnb without the need to log into Airbnb. Tick the box next to “Sync Reviews” and BrightSide will begin syncing the reviews to Guest Comments.
Navigate to: Marketing > Guest Comments
Once Airbnb reviews begin to sync, you may respond to them in Guest Comments. Airbnb reviews are not displayed on your website, but your responses will be included in the reviews on Airbnb’s website.

